Improving Ultra-Rare Legend LE414 Speaker Control Selector Switch Assembly

November 26, 2018
#291

Gentle reader,

After the more than forty year journey building the best sounding stereo system that I could afford, I have tried a LOT of components of all kinds.

I have determined, that for maximum signal contact, banana plugs cannot be beat for speaker wires and cables. Below shows several types and brands of terminals one can use instead of bare wire. The forked ones are called Spade Lugs.
Above are examples of the many types of plugs I have tried. The one laying down in the middle is a double-banana plug.

After MANY tries with various brands and styles, I decided these from Nakamichi to have the greatest contact area and firm hold.
However, sometimes they hold too tight. So, lately, I have been using these:
The one drawback is that the bodies although painted are still conductive. Fortunately, my amps have built-in protection which automatically resets. There are many fake Nakamichi plugs made largely in China. So if you like what you see here, look carefully at their design.
These are the double banana plugs which are coming that will be used in association with the speaker control switch below.

If I need a speaker switch, I want one that uses banana plugs.
Some years ago, I came across a LEGEND LE412 Speaker Control. It had three-way binding/banana plug terminals, a unique style and look. So, I bought it. 

Soon after, they may have stopped making them, or so it seems. I could not even find a photo on one!
What you see here, is only the SECOND LEGEND brand speaker switch that I have ever seen. So, naturally when I spied it on eBay, I bought it. 
It is the LE414 and switches FOUR pairs of speakers.
They cleverly used clear rubber feet to cover the screw holes on the bottom. One was missing, but that is not a problem.
See what I mean, a clean and unique design, well thought out and executed.
Measured top-to-bottom, the terminals holes are the industry standard 3/4 of an inch apart. Which means using double-banana plugs is an ideal solution.
The problem is, they assembled it with the + and - terminals going left to right, not top to bottom. Side-by-side, they are less than 3/4" apart.
So, I fixed that. Let me show you how I did it. And if you are fortunate enough to EVER find one of these LEGEND Speaker Controls, you too can make it work better.

First, pry off the clear rubber feet. A utility knife, Xacto knife or sharp tweezers will free them from the bottom cover.

Using a #2 Phillips screwdriver, remove the four screws and set aside in a safe place so that they do not get lost.
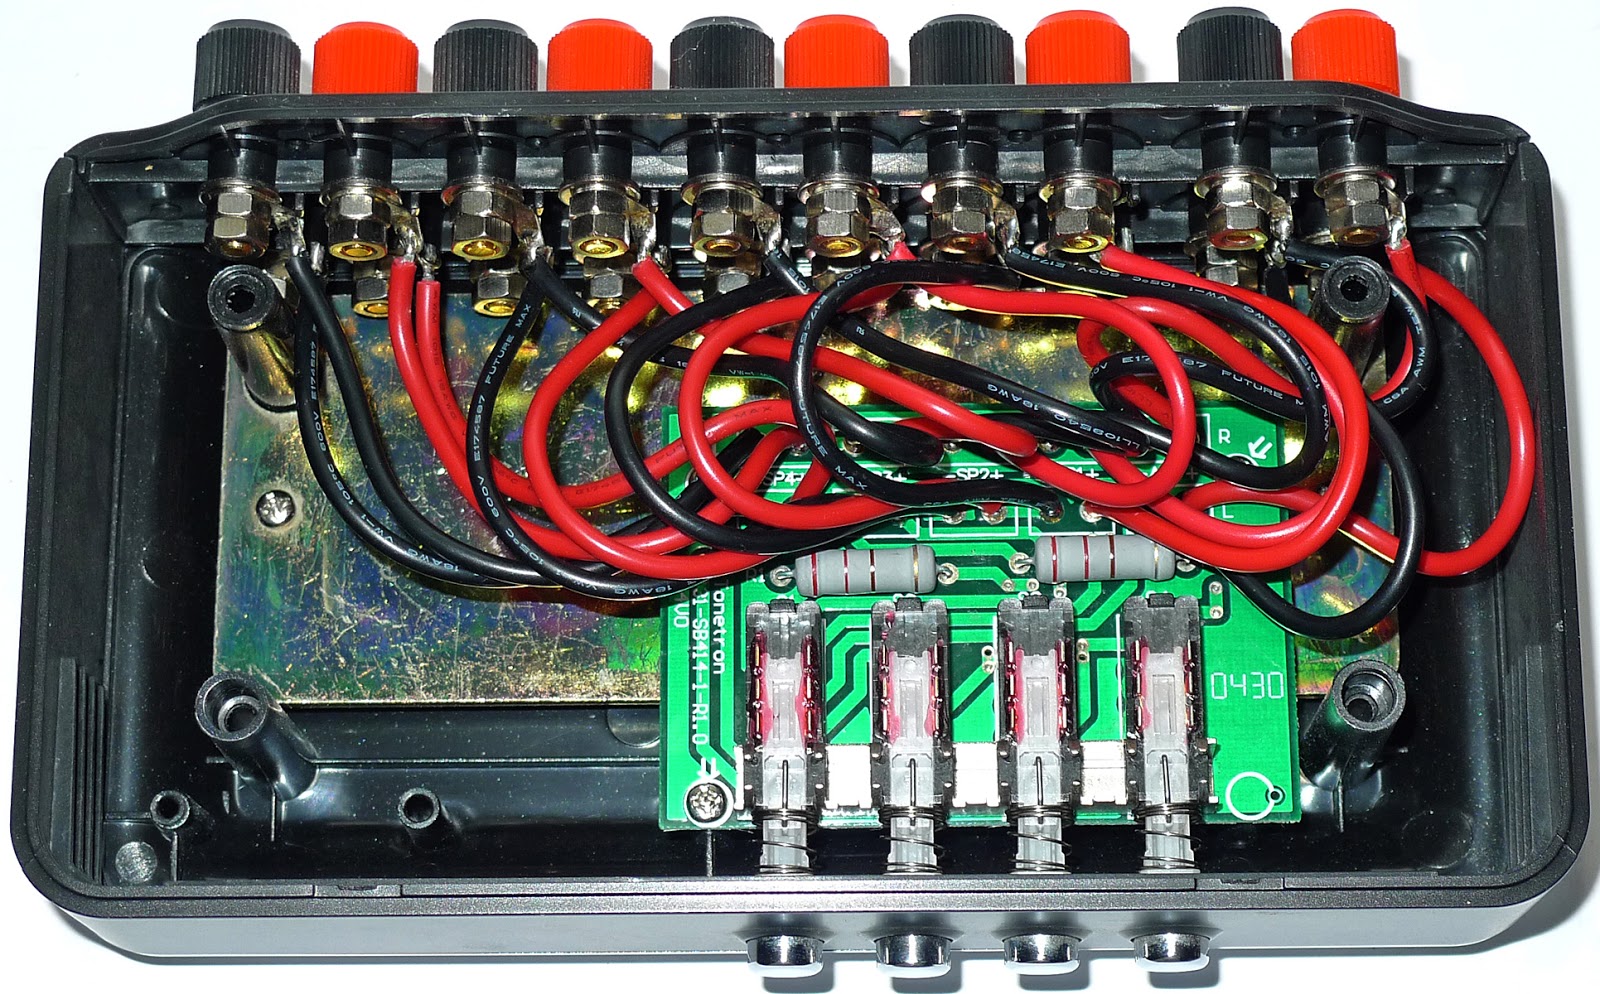
Lift off the top and if it is the 414 model, this is what you will see. The 412 is simpler since it has half of everything.
A "bundle of snakes" could describe this mess of wiring. This is 600 volt rated wiring, so it will easily handle large amplifier's output. My LE412 has never given me trouble.
I meant to measure these resistors, but it slipped my mind. They are fairly large so they can handle a lot of current. Do you know how to read those stripes?

Three #2 Phillips screws secure the board to the case's base. Set them aside as well. They are shorter than the main screws, but the same diameter.  
They wisely added a steel plate to the base to stabilize the unit, but it is not enough weight. Well, not if you use 12 gauge speaker cables like I do.
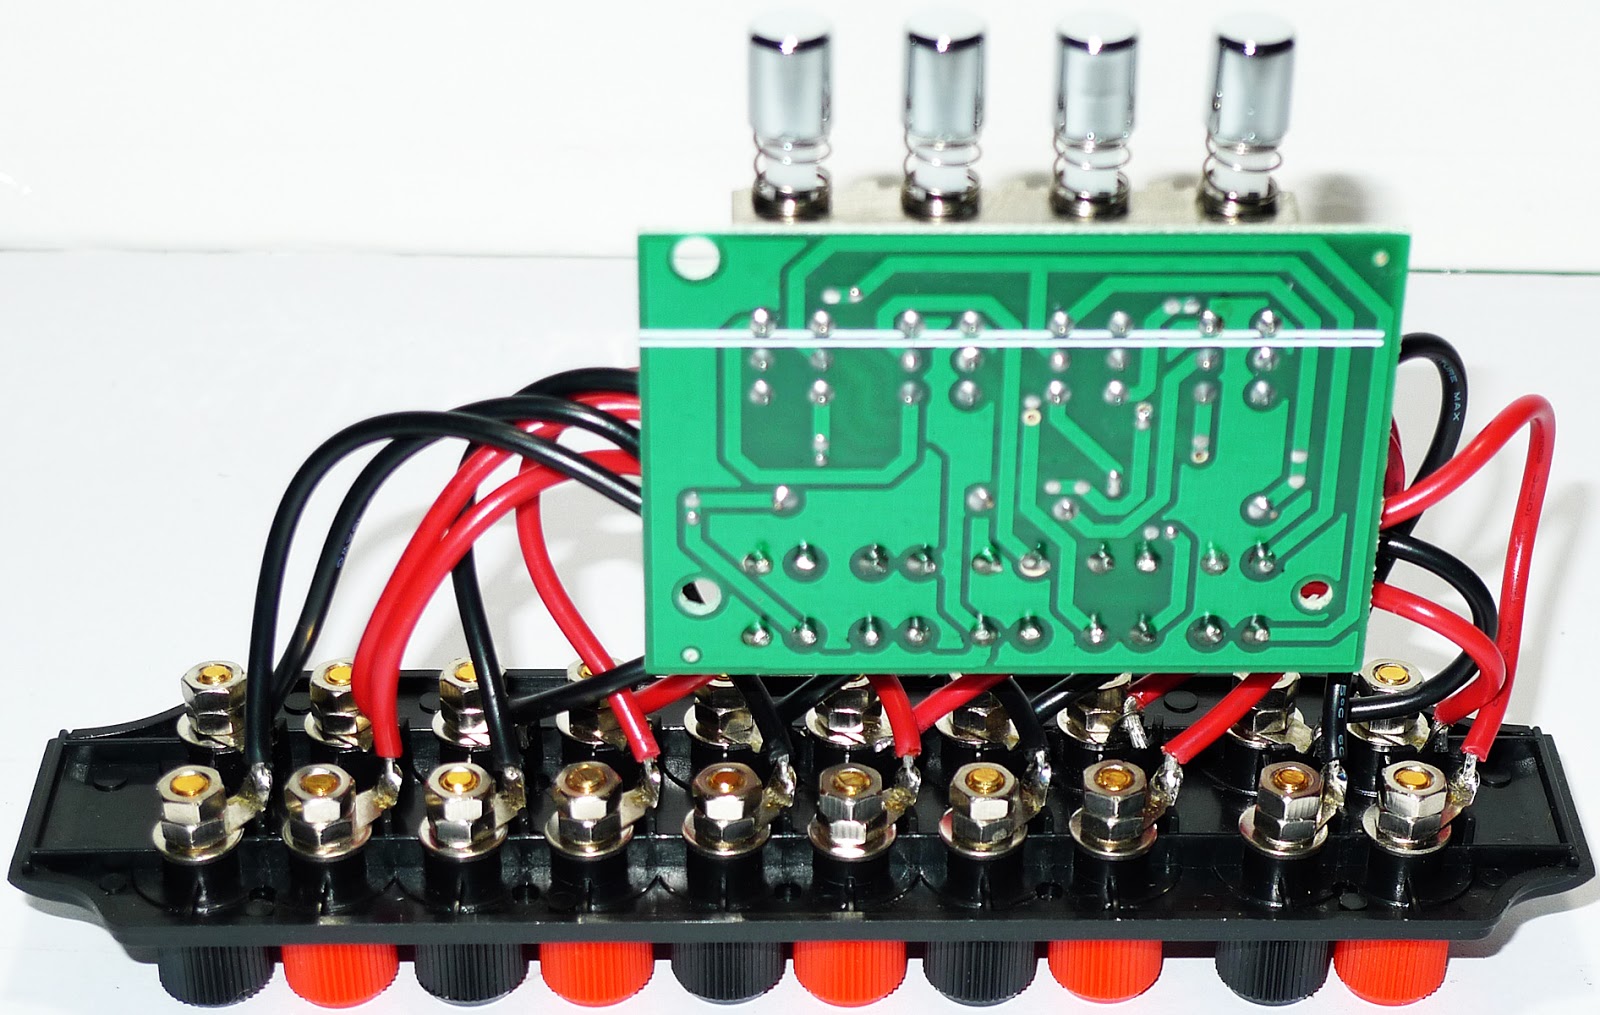
Once freed, the assembly shown starts to make sense. All neatly done. Note the terminals are double-nutted. This keeps them from loosening.
NOTE also the factory setup of RED-BLACK-RED-BLACK, etc.,  from left to right.
The first thing one must do to reorient (re-Asian?) the terminals is to trace each pair of RED-BLACK and wire-tie them together and label them as I have done below. 

NOTE: The board where each pair of wires passes through is marked as to which goes where which should help.  
Since they are three-way binding terminals for the speaker wires or cables, one can use bare wires through the holes, spade terminals, even ring terminals in the case of these since the plastic/metal nuts can be completely removed. I, of course, use banana plugs. 
The photo above shows how I used a #1 Phillips screwdriver passed through both terminals to hold them for loosening and tightening the nuts. Taking the red and black nuts all the way off is not necessary, however. NOTE how thin the metal is. Proceed carefully.
It is VITAL to do one set (four wires/terminals) at a time so as to avoid mixing up the wires.  ABOVE shows the new orientation with the black wire(s) on the bottom and red ones on the top. NOTE that I secured them differently: Washer, nut, ring terminal and then the second nut.

BE VERY CAREFUL when tightening the nuts! These are very thin terminal barrels and I broke one. Fortunately, I kept the old ones from my LE214 from when I upgraded that unit to heavier duty terminals. 
I was forced to do that since I was using the Nakamichi banana plugs with a zig-zag slot cut in them rather than the traditional spring design bananas. While that type offer the best conduction, they are hard to get in or out of terminals and I snapped a few of the terminals on my LE412 as a result. 

Above shows the new orientation, RED on top, BLACK on the bottom and the screwdriver in place holding the two terminals parallel so that the wire holes line up with the grooves LEGEND molded into the back panel to allow for easier inserting of the speaker wires. NOTE, that these can only accept fairly thin gauge wires.
Above shows all of the wires and terminals in their new locations. I marked the RED terminals with an "L" to remind me which is right and left. NOTE all of the cable ties and flag labels that I made still in place at this time.
While the silver stickers denoting what plugs in where are still valid, the factory R and L markings (on the ends of the back panel) no longer apply. Thus, the L I wrote on every other nut.

I snipped off each wire tie with small wire cutters prior to reassembling the components.
With my digital-VOM, I checked each right and left terminal using each switch as I went along to assure that they had continuity. 
Photo below shows the improved LE414 it in place for testing. I hooked it to my Yamaha receiver. That is the PC on which I create. Smeagol (Gollum) says hello.
Using a pair of jumper cables equipped with banana plugs, I hooked it to my Yamaha and made sure each channel worked for all four pairs of terminals and switches.

As we have seen, there are two resistors on the board, I assume to add resistance since this is a parallel circuit switch. However, I would still not use more than two pairs of speakers at a time, even though one can press all four switches in.

I have those twelve new double banana plugs coming (shown near the top of the article) which I will be using with the switch.  Their design will help to prevent breaking the sadly thin metal barrels of these terminals.
As I wrote above, the internal steel weight is insufficient to hold down the front of the speaker control if using heavy cables. I added these weights to my LE412. But still have to use reusable adhesive like BluTak underneath to keep it from "popping a wheelie". I don't remember where these weights came from, but they are the type of things I keep, "I might need these some day."
I am now using my LE412 as a switch for the Realistic Audio Power Meter 300 shown above. Which allows me to monitor either A or B speakers being used.

I have six speakers in my system in the listening room. Klipsch KG4s are the main ones and a pair of Advent Baby Advent II wired through a Dynaco QD2 and a pair of Dynaco A25XLs as the surround speakers. 
The Dynaco QD-2 has passive internal circuitry to protect the amplifier from too low of resistance while creating an ambiance and much greater depth to the soundstage.
The 1990's QD-2 is an improvement on the 1970's Dynaquad which used simple circuitry to "free" ambiance and the acoustics of the recording space used.
This version is an improvement and adds a center channel which can be switched out. 
Previous models were called QD-1 Series II and lacked these three-way binding/banana terminals. Using cheaper plastic spring terminals.
In place between my Dynaco PAT-6 preamp/tuner and ST-200 power amplifier and wired. I use Monster Cable Z-Series speaker cables. 
As I stated, the QD-2 has circuitry designed to add resistance so that when using all four speakers, the total resistance does not fall below four Ohms.
Here is a recent photo of the listening room's system and front speakers. Not seen are the two Dynaco A25XL speakers on stands made from bamboo which flank my chair on the side walls. The soundstage fills the whole room. I love it.

Wooden Speaker Stands and Risers too Expensive? Try Bamboo Stools. How-To Guide. 

The link above shows the bamboo stands which are actually stools which I repurposed to raise the A25XLs closer to ear level. The stands (above) under the Klipsch KG4 speakers are also made from bamboo. The factory bases were too low for me.

I hope that you have enjoyed my latest project. I have replaced spring terminals with three-way binding/banana terminals (look at the photo with the switch on my PC) before, so if you want to buy and try one of the Dynaco QD-1 Series II units, it is possible to do.

Thank you once again, for taking the time to read my words and view my images. You are the reason why I spend hours documenting my adventures.

Scott
November 26, 2018
#291


I Found Some New-Old-Stock Forty-Year-Old Utah Speakers. Unbelievable!

November 19, 2018 
#290

Gentle reader,

It was one of those right time, right place kind of things. We'd gone to the local Salvation Army on Saturday. It was the store where I have found more vintage electronics than any other place. And countless LPs and CDs too.
But, like you may have experienced finding any interesting electronics these days is becoming more and more rare.
They had a silver MCS stereo receiver, you remember, the ones they sold through J.C.Penney? It was not a particularly high end one, but interesting looking. For some reason they had NO speakers. They always have all kinds of speakers. I wanted to test the receiver, but how?
At that point, my wife walked up and said, "What about those?" Pointing above and behind me. "Utah speakers! No way! Those things are legendary."
You see, they had decided to rearrange and placed small appliances in with the electronics and electronics with the small appliances. Who does that?
I proceeded to test them and the receiver. Sadly someone had removed the price tag from the MCS receiver and they will not sell anything without a price on it. Oh, it worked fine, too.
On the speaker's tag it reads: "Utah New-Old-Stock Speakers (2)" That explained the incredible condition of these Utah model AS-2AX bookshelf speakers. I can only assume in their infinite lack of wisdom, they took them out of their boxes to display them. No doubt tossing the old boxes.
Here's the cool thing. They set them out on November 1st. She pointed them out to me on the 17th! So, for more than two weeks, nobody else saw them either. Meant to be? It seems so.
Beautifully made cabinets with real black walnut veneers. As you can see, they are two-way units. They veneered BOTH sides of the particle board. An unnecessary expense. Both are that way.
Being perhaps forty years old, the wood was quite dry, I would fix that. Below and in other photos, you can see the veneer on the inside walls.
When I tested them, I heard noises from one of the woofers. That did not deter me. The price was right and I was anxious to own them and paid the $25.99. Note that they still have the rubber covers on the RCA terminal.
As you know, I carry a test kit with me when we go to thrift stores. It includes: A music cassette, a pair of RCA stereo interconnects, a power cord; the kind with a figure-8 plug on the end, and a pair of cheap speaker wires.

But at home, I use large gauge speaker cables and banana plugs. I was about to make up some smaller patch cables to test them here and determine which one had the woofer noise. 
Then I remembered the double banana plugs that I'd used to hook up the meters and switch for the system in the listening room. I told you all about that.
Once I determined which was ailing, I set up the folding table and put it face down to remove the back.
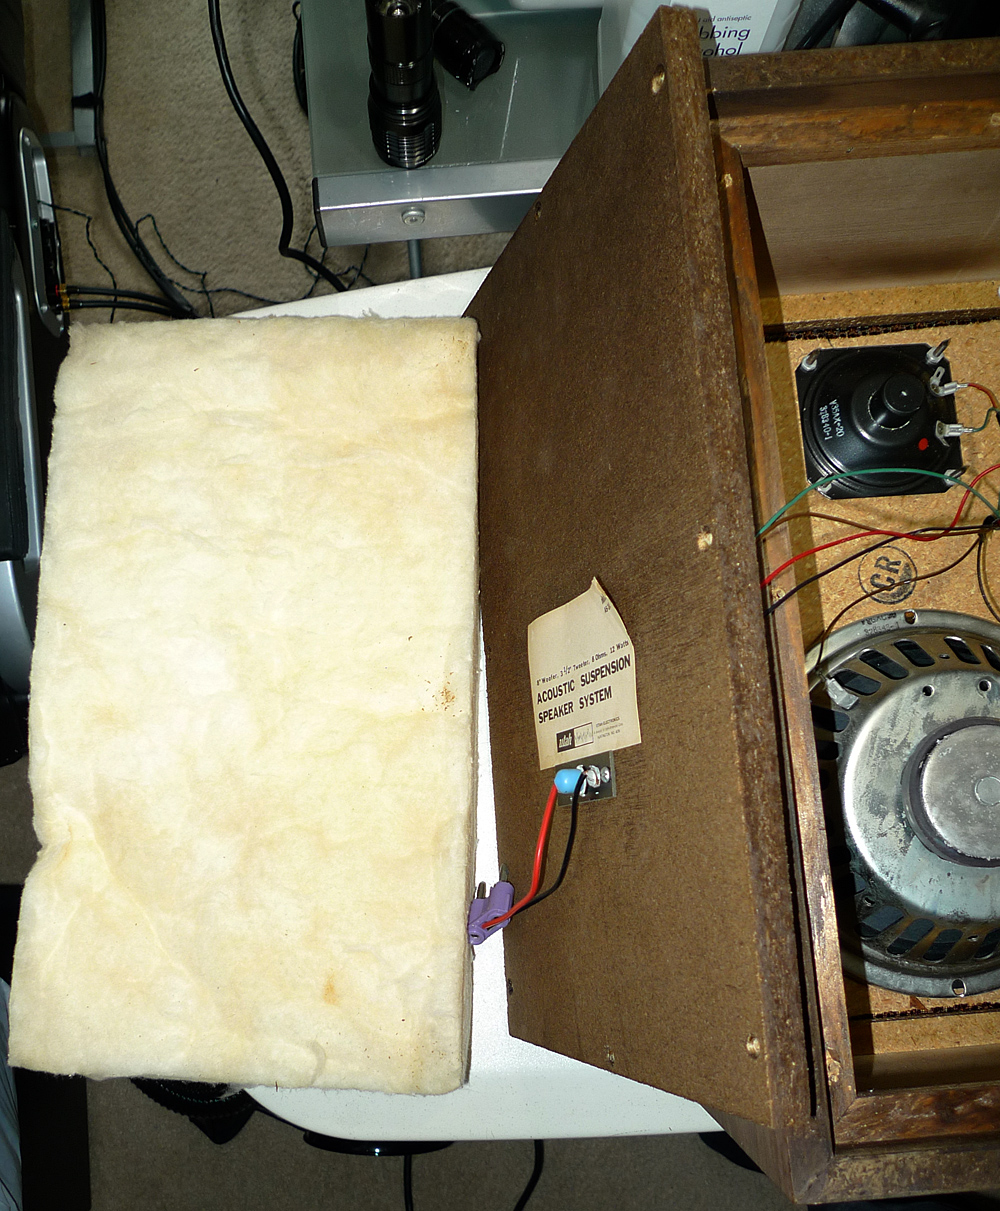
Once the back was off, I found a piece of fiberglass which looked like it had been tossed in as an afterthought. Low morale at the Utah factory?
Oddly, some of the metal was corroded inside, especially around the tweeter magnet.
I know it's silly, but the OCD part of me feels that black wires are ground and red are hot or positive. Apparently Utah did not subscribe to that notion.
The "crossover" consists of a non-polarized 50 volt capacitor. No frequency or capacitance number on it, so I have no idea of the crossover frequency. 
Being made in the USA, the nuts were 5/16" and easy to get off. 

The woofer definitely had an issue. I looked for a replacement on line, but no luck.
I contacted Cy Beam via eBay, telling him the problem to see if he had one. He didn't but gave me a suggestion.
I followed his advice, carefully cutting off the dust cap. There was no debris as he suggested. However, I could see the cone was slightly off center. By moving the cone back and forth I watched debris being rubbed off of the inside of the voice coil. Ah-ha. 
I carefully used an Exacto knife blade to scrape the offending surface area. Pausing to blow it out with canned air, each time.
I kept moving the cone out and in and blowing out the detritus until it no longer rubbed off.
Finally, the rubbing sound was gone and I put it back together to confirm that I'd solved the problem.
Satisfied with the results, I took it back apart and carefully reglued the cap back on. Like my Advent Baby Advent II speakers, the dust cap on these were made of screen to prevent the air from compressing and hindering the woofer's movements.
I folded the fiberglass in two, as you can see, above.  I vacuumed all the corrosion and other dust from the inside of the cabinet.

To correct the minimalist effort of the factory worker, I added polyfill mats over the fiberglass.
Then some loose polyfill on top of that. This will improve the bass performance of the woofer by making it "think" it was in a larger cabinet.
The second speaker had no corrosion and also, no foam tape to seal the back. Note that the tweeter is 90 degrees off in this one. I left it alone. Take that, OCD!
At least the fiberglass in this one was the correct length. I repeated my steps with this one, including vacuuming any dust or dirt from the inside of the cabinet.
I also added foam tape so that the back would be airtight. 
Above shows how dull the wood was. I carefully cleaned all the surfaces prior to oiling the wood.
To avoid getting oil on the grille cloth and back of the cabinets, I taped them off with painter's tape.

Just look at these photos, what a difference Boiled Linseed Oil makes on wood! I used to use Tung Oil, but it is hard to find without polyurethane being added to it. 
Plus, the papers that came with my Dynaco A25XL speakers specifically recommended Boiled Linseed Oil. The boiled part was critical.


Of course, there is ZERO information to be found on the Internet about most Utah speakers. I did find one site that had scanned pages from a brochure. Not these models, though.

Too bad, but I estimate they were made in the 1970's. I'm very pleasantly surprised at just how good they sound!
In fact, I'm listening to them right now. I have to be careful since they are rated at 12 watts. Maximum of minimum? 

Most of us poo-poo cone tweeters. But they do the job. Dome tweeters may disperse the sound better, but I would never guess these were cones by the sound.

I have see in my various FaceBook vintage audio groups folks praising their vintage Utah speakers. While these are not high quality or have coaxial or full-range drivers like some models, they certainly look and sound terrific. I'm going to keep them for a while. Plus, I love the look of black walnut.

While I had the Boiled Linseed Oil out, I also did the cabinets of the LX4 speakers. 

Thank you once again, for taking the time to read my humble blog. It is your valued comments that keep me working on new stories to entertain and hopefully enlighten you.

Scott
November 19, 2018
#290

PS A few days ago, a new milestone was reached: 200,000 page views! I am SO grateful!


I bought a NEW Yamaha CD Player! Build Date of April, 2026. Check it Out!

  August 19, 2026 #551 Gentle reader, Most of you are aware that I have been in the home audio hobby for fifty years now. Thanks to the thri...