Using Vintage Film Camera Lenses on Digital Camera Bodies PART THREE.

March 23, 2018
#244

Gentle reader,

This should be subtitled: Cheap Auxiliary Lenses Tested with Pentax 110 lenses on a Panasonic Lumix DMC-G1 Digital Body.
These first two shots were made with a 110 film camera with an auxiliary wide angle lens added via 40.5-49mm step-up ring. The camera was the vaunted Minolta 110 Zoom-SLR Mark II. Both shots I made at work one day at lunch.

I love the way all the branches seem to be reaching to the middle of the image. The only thing that detracts are the two small areas of vignetting in the bottom corners. 
This shot clearly shows the fish-eye effect. That is a curb at the bottom and the top of a wall at the top with chain-link fence atop that. The wall is flat, yet not in this shot. Vignetting is present but not as distracting.

I ordered two T2 (T-mount) to Micro Four Thirds adapters so that I could try my Sigma/Spiratone 18mm and 12mm lenses on the Panasonic Lumix body. The 18mm did nothing to impress me. I used the kit 14-45 lens and sure enough, the same image is right at 18mm. So, I won’t be using that lens. The 12mm is a full-frame fisheye lens on a 35mm or full-frame digital body. So, it is wider than the factory AF lens. Below is a shot with the 12mm fisheye lens. Note the vertical curvature of things on the wall. That Aires 35 IIIC box next to the Jaguar E-Type roadsters is still available on eBay. As are the lenses and a few other things.
rfcollectin | eBay

Since I could not hand hold such slow shutter speeds, I mounted the body on a sturdy tripod. This is the shot it produced. I took shots after this with Pentax 110 lenses: 20-40mm f2.8 zoom lens and 70mm f2.8 telephoto lens. Of the six lenses made for these Pentax AUTO 110 SLR cameras, these are the only with metal lens bodies. They both sport 49mm filter threads, so I bought 0.30X wide angle auxiliary and 2.2X telephoto lenses. Both were less than $10. from a US seller. Each is made with three elements and the literature claims that they are coated.
 

This shot has the 20-40mm zoom mounted to the G1 with the appropriate adapter AND the 0.30X wide angle auxiliary lens attached. Since 110 film (and Micro Four Thirds sensors) are about half the size of 35mm film, one can multiply 110 lenses times two. So, it is a 40-80mm lens in 35mm equivalent. WITH the 0.30X attached, that makes it: 6mm (12mm in 35mm film) to 12mm (24mm in 35mm film) which in any book is really wide.
 
Next is the Pentax 110 70mm lens with the 2.2X auxiliary lens attached. So, 70mm equals 140mm  times 2.2 equals: 154mm or around 308mm in 35mm. Quite a reach for a 110 camera.
    The shot above is at the 20mm end of the Pentax lens alone.
The one above is 20mm end with the 0.30X wide angle lens attached. It is harder to focus with this lens attached and as you can see, it is out of focus. Yet, it is almost like just the Porsche 944 Turbo IS in focus and the rest out of focus. Similar to a Lensbaby. Note the vignetting at all corners. This lens has the telephoto reach with the lens all the way back. Wide angle is all the way out. Opposite of logic and most zooms that I've used.
     Now the shot above is at 40mm alone and is quite sharp.
Next is at 40mm with the wide angle attached. So far, unless it’s my learning-to-do-this curve is still steep, I am not impressed with the wide angle attachment. I plan to repeat the tests but outdoors.
The shot above is with the 70mm alone and again, very sharp. I tried the 2.2X, but the subject is way too close to shoot with that attached. So, no comparison image  could be made. 
Oddly, with these auxiliary lenses mounted on the PENTAX 110 body, the view with them attached are quite clean and clear. I did not expect much for my investment and these images made with the auxiliary lenses are less than spectacular. Once I have some 110 film to try, I will see how they work on the Pentax.

Below are various shots of my Pentax AUTO 110 SUPER wearing the fairly rare 20-40mm zoom lens with the shapely 70mm lens which still has the factory lens shade.
Below is from above. Isn't that a meaty lens?

These two shots show the aux. lenses attached. The wide angle lens (above, facing you) shows the tell-tale colors associated with lens coatings.

And now with the long lens attached. I see NO colors on this aux. lens. So, coated? Doubtful.
So far, my twenty dollar investment in these front mount auxiliary super-wide-angle and telephoto lenses is unimpressive. I have tried them both attached to my Nikon 50mm lens on my D200 and here are the results.
 Standard Nikon AF 50mm f1.8 (film) lens alone.
Same lens with 2.2X Telephoto attachment.
Same lens with 0.30X Wide Angle attachment.
The photos speak for themselves. While each did their assigned task of widening or magnifying the subject, the Tele lens wasn't too bad but darkened the image. The Wide lens certainly widened, but at the extreme expense of softening.
I remembered that I'd bought an adapter which is barrel shaped for my Panasonic Lumix DMC-LX3 camera which sports a Leica Vario-Summarit lens which is 24-90mm (35mm equivalent) lens. The lens is at 24mm zoomed OUT and zoomed IN at 90mm. All shots are with the built-in flash. Here are the results:
No aux. lens @ 24mm with flash.
24mm with Wide attached to barrel adapter.
Wide end zoomed until barrel is not visible.
 90mm with flash.
 90mm with Tele. attached.
These photos show similar results. The telephoto adapter is adequate, the wide angle severely softens the image. So, if one wants a cheap alternative to a Lensbaby, get one of these wide angle lenses. But it is my considered opinion that one should never expect much from a new lens that cost less than ten dollars.
As the two film photos at the top of the article show, whichever front mount wide angle lens I had been using on the Minolta Mark II SLR did have positive results. 

Thanks for looking,

Scott

March 23, 2018  

50-year-old Thrift Store Speaker Plays On in a New Form!

March 22, 2018
#243

Gentle reader,

Some time ago, I found a "retro" radio, actually I've owned a number of retro radios, but this one is different. It's a FLOOR radio. As the name implies, it stands on the floor and thus can have a much larger speaker and sound. I wrote about it previously here:
A link to my article on collecting other REAL tube and RETRO radios is here:
But, this article is about THIS speaker I found at a thrift store. 
As High Fidelity (Hi-Fi) and later Stereo became more popular in the 1950's and 1960's, (and accessible without having to build the electronics), more and more homes were being equipped with a Hi-Fi. At first, they were floor and table radios that now incorporated a turntable (record player)* inside a lid on the top of the radio. 78 RPM records were ten inches (10") in diameter and limited to around three minutes of music due to their wide groove and rapid rotation. Later on, some were made that were twelve inches wide. "Long Playing" records which spin at 33 1/3rd RPM which have "microgroove" came out also in ten inches then twelve inches took over. The LP came out in 1948. This is my oldest one, from 1949:
*Record players are a turntable and amplifier in one unit. Crosley, a brand I recommend avoiding, is making a killing selling record players to those that are getting into, or BACK into LP records. These poor souls, so excited to listen to records, have no inkling that their new "stereo" is wearing their records grooves out with each playing. AVOID all-in-one record players at your record's risk! Crosley is a no-no!

Hi-Fi makers, always wanting to keep up, came out with floor radios that had a stereo amplifier, but only one speaker built-in. The owner could later buy the second, matching, speaker when they could afford to. In the mean time, all LPs were played in mono.  The floor Hi-Fi units looked something like this:
As stereo came along, around 1958, equipment makers started building STEREO consoles. At first with tube amplifiers and later as solid-state (transistor) equipment became affordable with those types of equipment. Here is a 1960's solid-state Fisher stereo console I bought for $10. via eBay:
Consoles came in many "styles" to complement your chosen decor. This one is elegant and simple for the "modern" home.
Beneath the hinged lid are the electronics. This came with a three-speed DUAL turntable, (DUAL is a German brand name). However, it went berserk. Literally, shaking and jumping. So I bought this Miracord unit and fitted it in the original location. Only to discover that the counterweight on the end of the tonearm was hitting the wall and only 1/3rd of the record could play! My solution can be seen below.
The well in front is for LP record storage.
FISHER was a big and quality name in electronics once. This is the stereo receiver (radio tuner and integrated amplifier) which drove the two built-in speakers. It was equipped with terminals to add a second pair of speakers should the owner wish to.
The problem was bass notes could set-up acoustic feedback, so volume had to be kept to a minimum to avoid that problem. The receiver's components can be seen below.
I, of course, could not leave well enough alone and had to improve the setup. Better speaker cables and stereo interconnect cable which I replaced the cheap ones from the (better) turntable to the receiver. I later passed this console on to a young man from Washington, D.C. Glad it was going to a younger person.

I have gotten off topic, with my brief history of Hi-Fi and stereo. This is about a lonely 49-year-old speaker. Made in Japan around 1969 and sold by Lafayette Electronic (a chief competitor to Radio Shack) as a Criterion X5 model. Rated to handle 75 watts of music program, these were top-of-the-line. Most stereos put out less than ten watts-per-channel back then. 
Equipped with the standard beige grille cloth, somehow it had survived all these years and it was $4.99. I had to rescue it.

Speaker makers have sometimes gone too far with the number of "drivers" (individual speakers) in their cabinets. Some "audiophile" speakers today have dozens of drivers!
Above, B-I-C's top-of-the-line speaker had two tweeters and two super-tweeters. Below, a pair of Japanese that went even further. BTW, the pair below sounded lousy. The B-I-C VENTURI models sounded great.

Minimum is one "full-range" driver such as car speakers, or one bass unit (woofer) and one for higher frequencies (tweeter) with a "crossover" to divide the music and protect each driver from the frequencies they cannot handle. Often, they made three-way speakers:
This Criterion X5 was made with top quality drivers. It is a 3-way design. The middle speaker is called: mid-range (squawker, back in the day) and it was most important since the bulk of the music came in the frequencies it was responsible for.
At first, the tweeter did not work. By twisting the "H.F. RANGE" knob on the back, I could hear something. I removed the woofer and squirted DeToxit into both of the L-Pads, as they are called, twisting each knob back and forth to really clean the contacts. And viola! Sound from all three!
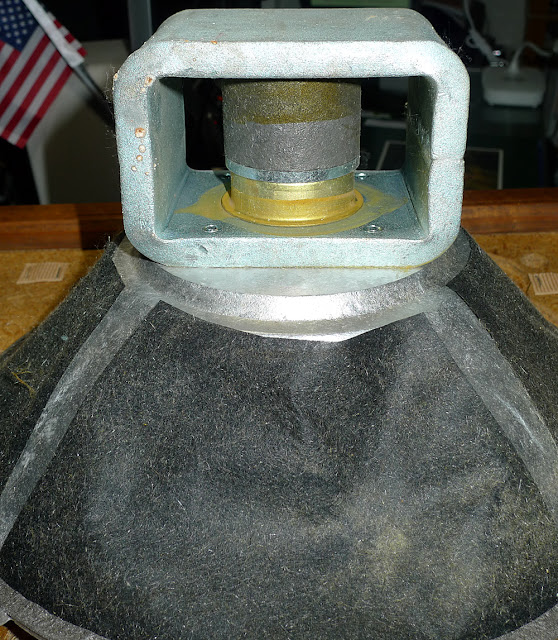
This woofer frame and the tweeter are made from diecast aluminum, a process usually reserved today for really expensive speakers. Cerwin-Vega, being the exception. The metal is non-magnetic and much stronger than stamped sheet steel which is most often employed.
Note, also, the "surround" is concave instead of the usual convex and is some type of treated (and sealed) fabric. Unlike cheap foam surrounds, it is made to last. And it has.
The cabinet, being sealed, and thus "acoustic suspension" was filled with fiberglass. I've never seen a woofer with fabric applied to the frame to keep the fiberglass from fouling the cone by getting in between it and the frame. Clever and effective. Another sign of quality.
The magnet structure is also different from newer designs. IT features an "alinco" magnet which is more powerful than standard ring magnets and thus is much smaller. Took at how thick the steel frame around it is!

Above is the crossover, below is the inside of the black panel above. The L-pads (below) are the silver things. Above the various coils and capacitors divide the frequencies and send the right ones to each speaker. Quality abounds in this half-century-old speaker.
Below, the pair removed from the cabinet and labeled as to where each pair goes and to polarity (+ and -).
I set the stereo (PROTON AI-3000 II) that sits inches from me on my desk, to mono and turned the balance knob to the left. I listened to the speaker for days liking what I was hearing, yet wondering what to do with it. 
Then it came to me, upgrade the floor radio with the speakers from this cabinet! I'd wanted to buy new speakers for the radio, but worried that most affordable drivers would be too inefficient for the "mid-fi" radio receiver to drive without strain or distortion. Since this speaker came from an era of low powered equipment, they might be ideal. Most consumer radios are "lo-fi". This being equipped with three-way speakers qualified it at "mid-fi" verses Hi-Fi.
Here (above) is how it looked before. Below shows the cut outs behind the grill cloth for the three speaker components:

The radio was made to look like a vintage tube floor radio but with the safety and convenience of modern electronics. It was empty inside and the black power cord was parallel to and wire-tied to the speaker wires. A recipe for 60 Hertz hum picked up from the power cord. I remedied it by moving the power cord to the left side.
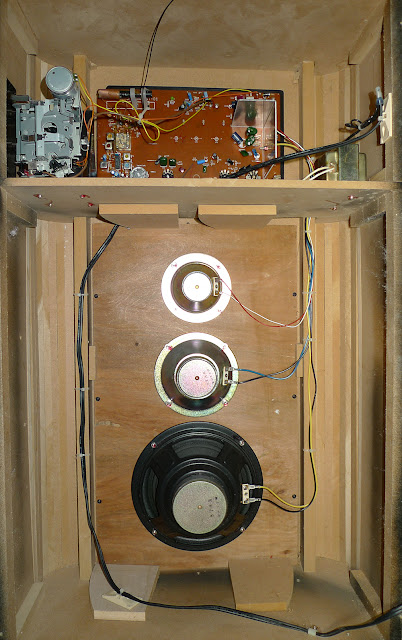
Equipped with a cassette player (inoperative) added to the appeal when it came out. The receiver components (below) are all on one board and include a crossover to divide the music and send it to the appropriate drivers. The L shaped device is a heat-sink for the power transistors that drive the speakers.
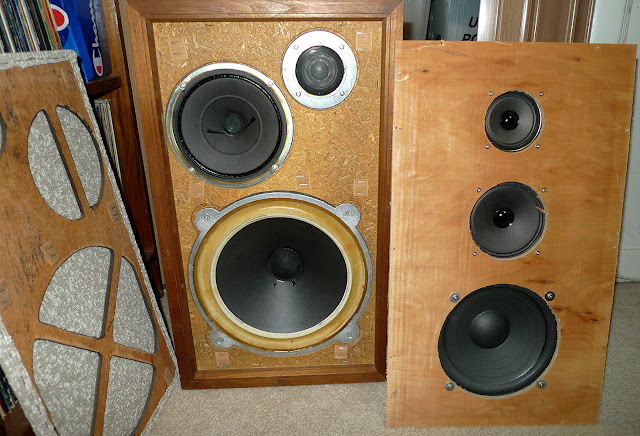
I'm getting ahead here by showing you the cheap, thin, plywood and equally cheap three drivers the radio came with (below). See how the two baffle boards are almost exactly the same size? Like it was a match made in Heaven.
What follows are the multitude of steps it took to disassemble the speaker cabinet to safely remove the particle board baffle board from the speaker. Plus the steps to remove the factory baffle board and grille from the radio and to transplant the quality speakers into the radio.
The radio's speaker baffle board was held in with screws and pieces of wood made from the material cut out of the radio's cabinet nailed in place, top and bottom. The cabinet is made from MDF a more dense and stronger type of engineered wood than traditional particle board. The Criterion speaker has a particle board baffle and rear wall with the rest comprised of  3/4" plywood with black walnut veneer on the outside. I had to remove all four walls and thus destroy the cabinet to remove the baffle without damaging it.
The grille and decorative grille-work were assembled with staples and attached to the cabinet with them as well.
Above the baffle is test fit into the radio cabinet. Like it was made for it!
The speaker cabinet had decorative and structural solid walnut trim pieces to frame the grille. They were ideal to use as strengtheners for the edges to keep the heavy woofer in place. I glued and nailed them to the back of the baffle. Note that each driver is held in place with "T" nuts that are driven into the wood from behind and are much better at securing, permanently, the drivers to the baffle than just screws driven into the particle board. Quality strikes again.
Above, the components are reinstalled into the baffle. Note the "tan lines" where the walnut trim pieces helped secure the baffle (along with long staples) to the plywood walls of the speaker cabinet.
Baffle clamped in place with screws and thick washers. The individual drivers wired and soldered and insulated with heat-shrink tubing.
Because bass notes coming from the front of the speaker will be cancelled out (not heard) by the notes coming from the back of the speaker, care must be taken to prevent air and sound from "leaking" from the back side to the front. Thus, why speaker cabinets are sealed and/or may have carefully sized "reflex port" tubes designed to delay the rearward bass notes by 1/2 cycle so those coming out of the port will reinforce the bass coming from the next wave pushed out front. I used Gorilla Tape to seal the area where bass might seep past the grille cloth. Gorilla brand duct tape is far better made, will hold forever and not break down like standard duct tape.
Since the Criterion cabinet was sealed and filled with fiberglass (which "tricks" the woofer into "thinking" it is in a much bigger cabinet) which slows down and scatters the waves of air caused by the rearward movement of the woofer cone to prevent their hitting the speaker walls and creating a "standing wave" inside the cabinet. I needed to fill the radio with similar material. Mats of "polyfill" were laid on the bottom and sides of the space and loose fill placed in the opening to fill the space completely. Polyfill is what is used to stuff pillows and stuffed toy animals. It is a non-toxic and not likely to cause itching like fiberglass that gets into skin when one handles it.
Gorilla Tape was also used to seal the small holes in the (bottom) speaker portion of the cabinet's back wall as well. Granted, the walls of the radio and this thin Masonite back panel are not sufficiently strong enough to damp resonance from loud bass. But this is not a problem as I do not play the radio loud enough to worry about that.  
Here is the "fait accompli". Since I could not staple the wooden grill work to the baffle board, I glued it in place through to fabric.
How does it sound? Fantastic! I am tickled pink with the vast improvement in the sound! All for the cost of $4.99, the radio has been transformed and the speaker components live on in a new form. Perhaps they will still be playing fifty years from now. I won't be around, but perhaps one of our kids or grandkids will want the radio in their place when we are dead and gone.
Thanks for looking!

Scott

March 22, 2018       
 

ARE The "World's Best Cables" Truly the Best? I Decided to take up the Challenge to Find Out

January 9, 2025 #503 Gentle reader, I've been in this hobby we call "listening to music" since the mid-1970's when my then...