Forty-Plus-Year Adventures with Vintage Dynaco Stereo Equipment and More! PART FOUR

July 20, 2018
#262

Gentle reader,

I continue on with my ever expanding saga covering my forty-plus years pursuit of Audio Nirvana. I do so on a budget. Mostly previously enjoyed components. I buy locally and sell on eBay. My eBay funds get put back into my hobby. Now that I'm retired, even less is changing.  The last chapter can be found here:

When we left off, I had completely disassembled both the stereo and six-channel systems with the eye towards simplifying. Here was the last photo from part three:
As you may recall, I had my nice glass and steel component shelve on my left with originally nothing on the front wall except the speakers. As time went by, more and more things started filling the room, even between the speakers. Then the six-channel system was added and more and more. Oh, and mostly unseen is all the artworks, many Asian that were filling the walls and shelves. And, of course LP shelves and numerous CD racks, even a cassette tape collection. When will it all end? By the way we are up to October, 2015, now.
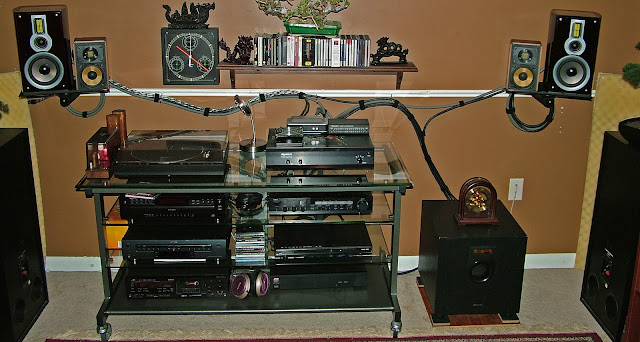
First off, the Kenwood THX Certified power amp has gone to a new home because, I FINALLY scored a Panro-era Dynaco component: ST-200 power amplifier. There it is on the bottom, left. The two speakers on the outside up on the wall stands are AR 215 PS units. The modified Minimus 11s are on the inside. On the floor stands are iconic Radio Shack Optimus LX-5II with the legendary Linaeum ribbon tweeters. One can also clearly see my "bass traps" in the corners.
Here is the "dirty side" AKA: the back. I have been replacing the Liberty Cable interconnects with top-of-the-line Monster Cable ones. Some Liberty models remain. It take great pains to keep the AC cables and cords separate from the music carrying cables. Even though they are SO well made, it is unlikely any 60 Hertz hum could enter them.
The C-V LS-12s are back and the first appearance of my soon-to-be-restomodded Radio Shack Minimus 7W speakers. They are the tiny ones atop the C-Vs.
Stereo-200 has moved to the top left for ease of attaching/removing the speaker cable's banana plugs.  Also new is a TDK two-drawer CD-recorder. I sold the Pioneer single disc one when this TDK came along.   
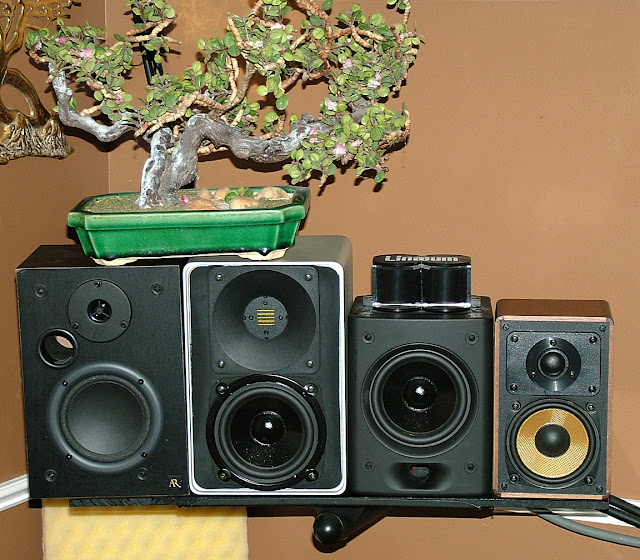
Pushing the limits of these shelves. I had some 1/4 thick Lexan sheets, AKA: bullet-proof glass. Seriously,  this stuff it TOUGH! On the left, the Acoustic Research PS 215s, then the modded Minumus 11s, the LX-5II ribbon speakers and the Minumus 7 now sporting woven Kevlar (speaking of bullet-proof) from another form of the Optimus speakers which have a cult following. I'd have to go back and read my many-chapter coverage of the modding of these 7W speakers to see which ones they came from. Anyway, they are the first step in the long process.
What follows are three photos over a few weeks where I abandoned all other speakers (save the needed 12" sub) in order to fully test my completed Minimus 7W speakers. Look closely and you will see they now sport the same FMT ribbon tweeters their big brothers 11s have.
I could not decide where to put the massive  C-V LS12 speakers.
 OR the subwoofer! Also, the components had been rearranged. Again.
Note, also I have changed speaker cables. I have tried numerous models from several companies. In this photo, you can see some snaking up the left corner to the terminal plate in the ceiling.
Ah! The significance of this photo was lost on me for a minute. BTW, were up to the end of 2016 now. 
I bought a Yamaha C45 preamplifier and passed on the Adcom. The last surviving Adcom component is the ACE-515 power conditioner. 
Now, this photo shows the C-Vs back AND speaker cable changes, again. Note the "umbilical cord" cables now going up the corner? The black ones are Monster Cable Z-Series. The thick gray ones are M-C M-Series. The lighter color gray ones were crap. I read the reviews after installing them and sure enough, the bass was MIA.
A lovely pair of Philips speakers, also sporting ribbon tweeters have joined the fray. Model number is MCD-908. They were part of a Philips kit that included a hybrid tube/digital integrated amp and these speakers. I've read the amp was crap, but these speakers are not. They have curved sides and a nice glossy piano-like finish. Should have kept them.
Again, I had to study the photo closely to see the difference. Yamaha C45 preamp was moved out of service and my FIRST PROTON component took it's place. The legendary D540 integrated amp with DPD circuity. In essence it is Class A up to 40 watts. At that point a second transformer and power transistors cut in and provide more than enough power to handle ANY crescendo. I bought it to use as a preamp since the two sections can be separated electrically by pulling the two "U" pins.
Near the end of February, 2017, I have removed the Dynaco ST-200 and moved the PROTON to the top to try out the DPD circuitry. The blue stuff under the speaker switch is Blu-Tak reusable adhesive. The speaker cables are heavy and make the switch do a "wheelie". So it keeps the switch in place. I wrote several articles praising the PROTON DPD circuitry and could I afford a PROTON power amplifier, I would have one! It's THAT good.
Another close look was required. First, I saw the Yamaha and Dynaco stacked on the lower left. Looking around, I spied the BLE Design multi-strand speaker cables. A seller on eBay hand braids top-quality OFC thin cables in order to create budget versions of Kimber Kables. I tried a pair of his least expensive, liked them, reviewed them and he gave me a discount on his thicker ones. So, I used them too. The subwoofer is still for the wee Minimus 7W but I wasn't using them much at this time.
This photo shows the Dynaco is back and both sets of BLE Design cables in place. At some point, I'd upgraded from the silver OPPO to an all-black one, as well.

This is a good place to stop. Another major change is about to happen on or about July 20th, 2017. One that pleased me too. Nope, I am not going to give you a hint. Come to think of it, that was ONE YEAR ago. PART FIVE will be the LAST.

Thank you again for your generous time spent reading my humble blog. 

Scott 

July 20, 2018
#262 

Forty-Plus-Year Adventures with Vintage Dynaco Stereo Equipment and More! PART THREE.

July 19, 2018
#261

Gentle reader, 

Third in the continuing saga of seemingly constant changes I managed to achieve over more than forty years seeking "Audio Nirvana". Previous chapter is here:

Forty-Plus-Year Adventures with Vintage Dynaco Stereo Equipment and More! PART TWO.
What is missing above? A power amplifier, that's what.
And here it is. But wait, what else do we have here? It is the first iteration of a SEPARATE SIX-CHANNEL system to play SACDs in all their multi-channel splendor. SONY H-T receiver and OPPO universal player are the ticket to ride. The Kenwood THX Certified amp on the left is for the stereo system.
I picked up this teak shelf and decided to put it to use. I've found, bought and tried out numerous home theater receivers over the years. In fact, my latest find, a Pioneer VSX-971V, sits inches from me with a Denon universal player so that I can enjoy FM, CDs and SACDs in the home office.
Placement of that 12" sub was a problem as you can see below. 
First go-round with this new challenge. I found that single POLK Audio speaker in the center and came up with that contrived post/platform to put it on. The BOSE 301s are now the front speakers of the six channel kit. At first, I used two of the tiny Infinity speakers for the rears from the living room system. Oh, of course, the "home theater" in the living room was ALSO going through changes. Drove my wife nuts.
Extra speakers have found new homes. Much cleaner look now. Note, below, the addition of convoluted foam mounted on corrugated board behind the oak speakers, below. Bass traps?
Now, we are getting somewhere. I found a matching pair of POLK Audio speakers and stood them all upright. I read in one of the many books on speakers that they should never lay down. The author explained why, but that was an old book.
DAT's it! Yes, someone donated a Digital Audio Tape machine and I bought it. Turns out something was off because the tape speed was wrong. I sold it on.
Other finds, above, a Nakamichi CDC-200 changer which remains a permanent part of the stereo. The SONY DVP-S9000ES DVD-SACD player mentioned in the last chapter is at the bottom.
No longer had I a tuner in the stereo. That Floor Radio I wrote about previously did and still does nicely for FM in the listening room. JVC 3-head cassette is also a permanent part.
The OPPO was moved to the stereo because......
A SONY SACD changer took it's place. Who better than SONY to make a SACD player. They and Philips co-created both music disc formats.
New additions include a pair of Axiom Millennia M3Ti speakers atop the stands. AND a pair of DCM Timeframe 275 speakers. For a while, they were in the office doing duty.
Much to see hear and below. Get it? Anyway, I found a second subwoofer, don't recall who made it, both attached to the six-channel system. Found and installed a proper TV shelf for the center channel speaker. I do not recall the maker of that speaker either. Turns out, the woofer of the original Polk Audio had stopped working. Can't have that.
And speaking of POLK Audio, I found this center channel at a thrift store and ordered brand new POLK Audio speakers to match. Yes, the tweeters ARE supposed to be at the bottom. Axiom grilles are off here. They were my first speakers with non-parallel sides to the cabinets.
Now showing....Acutex MTS/3 speakers. The ones with fake midrange drivers. I decided to make them mirror-images by flipping one tweeter/fake over. I also refinished the cabinets. I love working with wood.
Don't know that it really made any difference. Here's the backs of them with sheets attached explaining.
I chose "Full size" for this image above, how big it is on whatever you are viewing this on, I have no idea. But I can read it right now. I replaced the cheap terminals as I often did with three-way binding/banana terminals.
Cerwin-Vega! That is how the badges read on my new-to-me LS-12s. My first and probably last pair of the American legends. They AND the BOSE 301s are now in this room, the office. They are driven by the Pioneer receiver in tandem. The BOSE are mounted near the ceiling directly above the LS-12s. They are eight feet apart. Literal wall of sound.
The second subwoofer has found a new home. Check out that big dragon on the old one!
White Van Speakers! I could not resist buying these Digital 2000 speakers. I bought them the same time as the C-Vs. I eventually took the components out and sold them, trashing the cabinets. 
They actually seem to be well made.
 Someone bought them.
Hopefully enjoying their sound.
This is the first appearance of my restomodded Radio Shack Minimus 11 diecast aluminum speakers, sitting in front of the C-Vs. I replaced everything which includes FMT ribbon tweeters from Parts Express. Now horn loaded.
I fully documented and presented a step-by-step article outlining all the changes I made to these wee speakers. Their sound was amazing. My wife, who is not into all this that I do, but being a collector as well, understands, sat through song after song as these played. She admitted they do sound amazing. She does not do that. Maybe a, "Mm-huh, that sound's nice."
Wiring and cables, there has been much written and argued about regarding this subject. I found a seller on eBay who was a home theater installer. He had dozens of Liberty Cable cables available, used, for a fraction of new cost. All top-of-the-line Z500s. I bought many and outfitted the system with them. They are the blue ones. Grey, or is it gray, ones are Monster Cable.
And then, it all came apart. Well, not by itself, I decided having TWO complete systems in one room was silly. Plus, the SACD surround sound to me was not that much of an improvement. As you can see, here are all the parts including speakers. Note the Radio Shack models with the Linaeum ribbon tweeters. Not previously seen here.   

This is a good stopping point in the saga. I hope you are enjoying these articles. I'm having a ball putting them together.

Thanks once again for looking. I really appreciate it.

Scott
July 19, 2018
#261 


Stereo Amplifier or H-T Receiver Running Hot? Here's a Simple Solution.

July 18, 2018
#260

Gentle reader,

I know I JUST published #259 today, but the cooling fans/plate I ordered yesterday arrived today and I set it up to cool my Pioneer VSX-971V receiver. This receiver was made for home theaters, but it is serving in a much simpler mode, playing FM and CDs plus SACDs in stereo in my home office. Here is a photo of the kit which sits inches from me while at my desk.
This set is new to me. I found the receiver at a thrift store for $14.99 and bought the Denon universal player via eBay for the same amount. It's a sweet combo and I am psyched to be able to crank it up without worries since it's 110 watts per channel in stereo and I have very efficient speakers in here.

Even though this multi-channel receiver was intended for home theater duties, I wanted it to replace my recently departed vintage PROTON AI-3000II all-in-one receiver. I noticed that having the Denon on top with three inch rubber feet acting as spacers, the Denon was quite warm and the receiver's top even warmer.
[The artist and OCD parts of my brain feel that smaller (in this case less-tall) things do not belong on the bottom of a stack. But the evidence was in: that 3 inch gap was not sufficient to allow convection cooling of the receiver to occur. Thus possibly shortening it's life and probably the Denon's too.]

I had just received a flyer from one of my favorite electronics companies, Parts Express, a few days ago. In said flyer was the new AC Infinity Airplate S7  12 inch wide cooling fan system. Not something I would look twice at, but it seemed to be divine intervention in this case. I was all set to buy one from them, but one word came to mind: Amazon. Here is their link:
AC Infinity AIRPLATE S7, Quiet Cooling Fan System 12" with Speed Control, for Home Theater AV Cabinets  

It was less expensive, not much, but with PRIME, shipping was free and it arrived today after ordering it yesterday!
I'd previously measured the grille atop the receiver and suspected this cooling plate would be almost ideal.
Well packed in the factory and seems to be well made too.
Cool thing, pun intended, is that one can easily remove the fans and flip them over so the fans blow the opposite way. Clever.
Cleverly made to run off of a USB port AND they can be daisy-chained if one needs more than one.
Fortunately, a robust AC transformer is included. Look how they added grip-ridges for ease of removal or plugging in.
After more than 35 years working on subway car's HVAC equipment, I know the importance of filtering air. I added a whisper fan to my Dynaco Stereo 200 power amplifier which I bought used via eBay. The left channel would cut out and my suspicion was correct that the transistors were overheating. That fan, which I filtered, quietly cools it and there have been no more problems. 
The black foam padding, top and bottom were ideal for my needs. At first, I used a utility knife and straight edge to cut out a section from the inside of the lid. Turns out they used double-sided tape and peeling it off the bottom of the box was no problem. 

Above is the grille on the top of the receiver and below is the fan and foam being test fit.

I cut it to fit the bottom of the plate since the fans blow out and taped it with masking tape to secure it. Masking tape, if you don't wait too long comes off cleanly. This makes cleaning the filter and reinstalling it a breeze. No pun intended.

The AC adapter fits nicely in the one AC plug in the back of the receiver. There is plenty of wiring length so I shortened it and secured it with double sides hook-loop tape.
Note the three-speed switch on the power wiring.
Above was my initial method, to have it blow filtered air into the receiver case. However, even on high, I could feel no air coming out of the grille on the side of the receiver. At first, I thought, maybe two layers of foam are too much. These fans do not rotate very quickly.
Then, I realized that trying to push air through a restricted opening (the bars of the grille) that was smaller than the fans, was counterproductive. I flipped the plate over, left the filter in place on the bottom, it won't keep dirt out of the receiver, but I won't have dirty fans. I will place a piece of filter material over the side grille and block the edges of the grille on top so that air is not pulled in there and immediately exhausted again.
As the fans are running and after some loud playing of music, I can definitely feel warm air being removed which is exactly what I should. Mission accomplished!
The first thing I noticed when I picked up the box, is that Amazon slapped the label right on the product's box. Then I read the yellow label and shook my head. At least the Post Office people didn't drop it. Also good it was only two fans and not something truly delicate. 

So, there you have it. If I wanted to get technical, and if there is clearance, I could removed the receiver's cover, cut an opening for the fan plate, screw in on. Run the wiring internally......or just leave it as it is. Can't put anything on top, but I proved that is not a good idea. If you find this article helpful, please leave a comment, either here, or on FaceBook.

Thanks for taking the time to read this.

Scott

July 18, 2018
#260  

The 500th Article Of The Robb Collections! Thanks To All Of You! Indexes To All Categories!

  October 24, 2024 #500 Gentle reader, First of all, THANK YOU for taking the time to read my writing and viewing my images! This article, s...