September 14, 2019
#331
Gentle reader,
The house we live in had a vanity separate from the master bathroom in a little alcove 36" wide.
We never used the bedroom and once the kids stopped moving back in, we converted the room to a den.
However, we really needed a central place for ALL the cleaning chemicals and other things so we didn't have to search the various closets and under sinks or on top of the kitchen cabinets to find just what we needed.
NOTE: If you click on any photo, a second window will open over this one with all the photos as thumbnails at the bottom and the one you clicked on larger than here.
You can either click through each one or use your < and > arrow keys to go through them.
It did not occur to me to take any before pictures, but the vanity was standard suburban one: oak base and Formica top with inset sink.
The drain pipe exited to the right through the wall, the water supply lines came up through the floor. The floor had carpeting continued from the room to the base of the vanity.
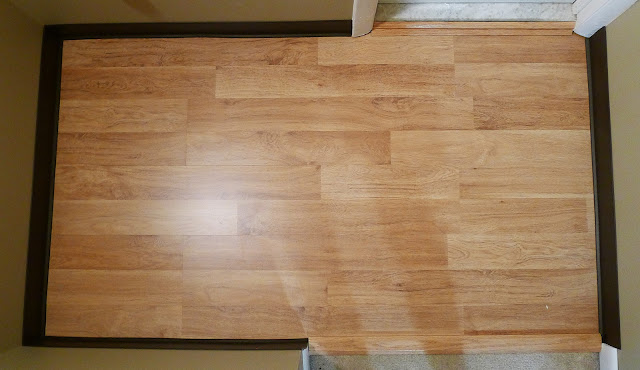
After removing all of that and capping the water lines beneath the floor and the drain pipe as close to the wall as I could, I painted and then put down laminated flooring.
We chose rubber molding because standard thickness wooden ones would not allow the 35.5" wide shelf to fit.
I had planned to use darker Acacia wood flooring that I'd put in the foyer, seen below, the dark brown rubber would have matched better:
But, we didn't have quite enough left and did not want to buy another box just for this project.
Interestingly to us anyway, we have two Acacia trees in our back yard.
They have fern-like leaves and grow these beautiful feathery pink and white blossoms.
There is the cap I mentioned. That was what caused me anguish when facing the task of assembling the shelf, how could I maneuver past it? The shelf is only 1/2" narrower than the space it is going to occupy.
By the way, a shout-out to Habitat For Humanity and their ReStore stores. We bought two boxes of this flooring for $10 each. Habitat for Humanity ReStores A great place to look for furniture and building supplies as well as other things for your home and projects.
We bought, also from the ReStore, that oak transition piece from the carpet to the wood floor. But to cover the gap beneath the marble threshold, I had to get creative.
I ripped it lengthwise with the table saw and used Gorilla brand clear double-sided tape to install the two stacked pieces.
We wanted a LED light fixture to replace the wide oak four-light one that was there. This one was perfect.
While I have never assembled this kind of steel shelves before, I had certainly seen them and they are very strong and inexpensive.
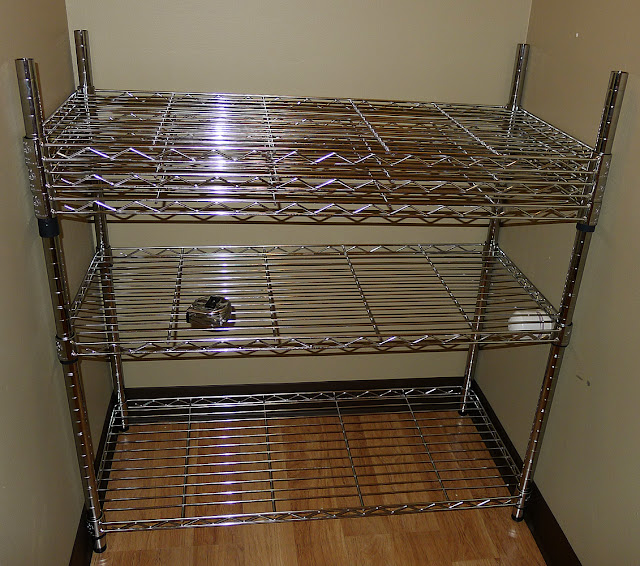
At first, I simply assembled to legs and the bottom shelf, however, no amount of wrangling or twisting was going to allow it to clear that big white pimple!
While I didn't actually pray about it, it came to me after a few minutes.
Put the shelf on the floor, in place.
Insert the legs in their holes.
Raise the shelf with a box.
Then slip on the plastic retainers.
At first, looking at the tiny ridge inside the retainer halves gave me pause, "How can eight of these pieces of plastic REALLY support 350 pounds?"
My wife, who is not your typical female, which I love about her, took apart dozens of these shelves at the aerospace company she works for, she assured me that they DO, she had to swing a heavy hammer on every one to free the shelves from the wedge shaped pieces.
The box "in situ" as NO one says in Latin. The shelf is away from the back wall to allow my hands to get in there and place the plastic pieces on.
The directions suggest using a rubber mallet, I did and it is essential. Do not use a steel hammer, you will dent or bend the shelf if you do.
The retainers "click" once you get the ridge onto the impossibly tiny grooves. I say impossibly, because it just does not seem possible that little ridge and groove can be so strong.
If the pieces were not TAPERED, they would not hold much weight at all. It is that ingenious design, however, that does. The more weight, the tighter the steel corner sleeves grab on to the tapered collars. And the tighter the plastic pieces grip the poles.
Bottom shelf is now on and hammered down. I set the second shelf on to add rigidity, but did not hammer it.
Here's the real KEY to doing this, especially in a space where the shelf is the same width as it's location:
Put on four pairs of retainers and slide ALL of the shelves on.
THEN screw on the upper poles.
 I should have put the retainer on the very top before the last shelf as it was a little tricky to hold it up with one hand and slip on the retainers with that light right there.
Anyway, install the top shelf and hammer it down.
NOTE that the shelves will stay cocked at an angle as you see above and below so that you can install lower ones.
I divided the shelf's height, 72 inches by the number of shelves and came up with 19 inch spacing. The top one is a little bit less than nineteen.
And here it is, completely installed, in place and ready to fill. I had to use an 18mm lens on my camera which is why the walls look curved.
Did I write, "cleaning supplies"? Yes, we have a few, with them all in one place, save one of each that are used often under the kitchen sink, we now can not only find what we need, but see whether we need to buy more.
Obviously, that last statement was never true before as we have multiples of many things.
AND, something that particularly bother my wife, the top of the kitchen cabinets are empty.
About that, it wasn't until I was editing this photo, did I spot something else up there, it turn out two dog bowls were hiding there as well.
Do you like what we did with the cabinets? We had a company the replaces all the doors and covers all the original wood give us an estimate, over $6,000!!!! Uh, no!
I carefully lightly sanded and refinished the cabinet faces and ends with a little bit darker stain/polyurethane.
BUT, refinishing the doors with all of the surfaces with the same stuff, was problematic. It looked terrible.
We had seen kitchen cabinets that had been painted by some friends of ours and it looked like just that, done by someone quickly. There had to be a better way.
Then, we found out about and bought cabinet paint. Yes, there is paint made just for cabinets.
WE painstakingly hand removed all the original finish without chemicals. Doing one door at a time, then painting so that we could see the results, before doing some more doors.
While normally I don't like painting hardwood, in this case, all of the l-o-n-g hours of sanding every surface of each of the 21 doors by hand paid off.
The cabinet paint is unlike any we have ever used. It turns darker shades as it dries then returns to the original color.
It's extremely durable unlike say regular gloss house paint. Not one chip or scratch has appeared since we did them years ago.
And, we like the contrast between the blue and the dark stained frames.
What do you think? We don't tweet, but if we did, #painted cabinet doors.
Thank you SO much for reading my humble blog. Your kind words and comments, either here or on Facebook, help me to keep writing.
Scott
September 14, 2019
#331


