August 8, 2018
#268
Gentle reader,
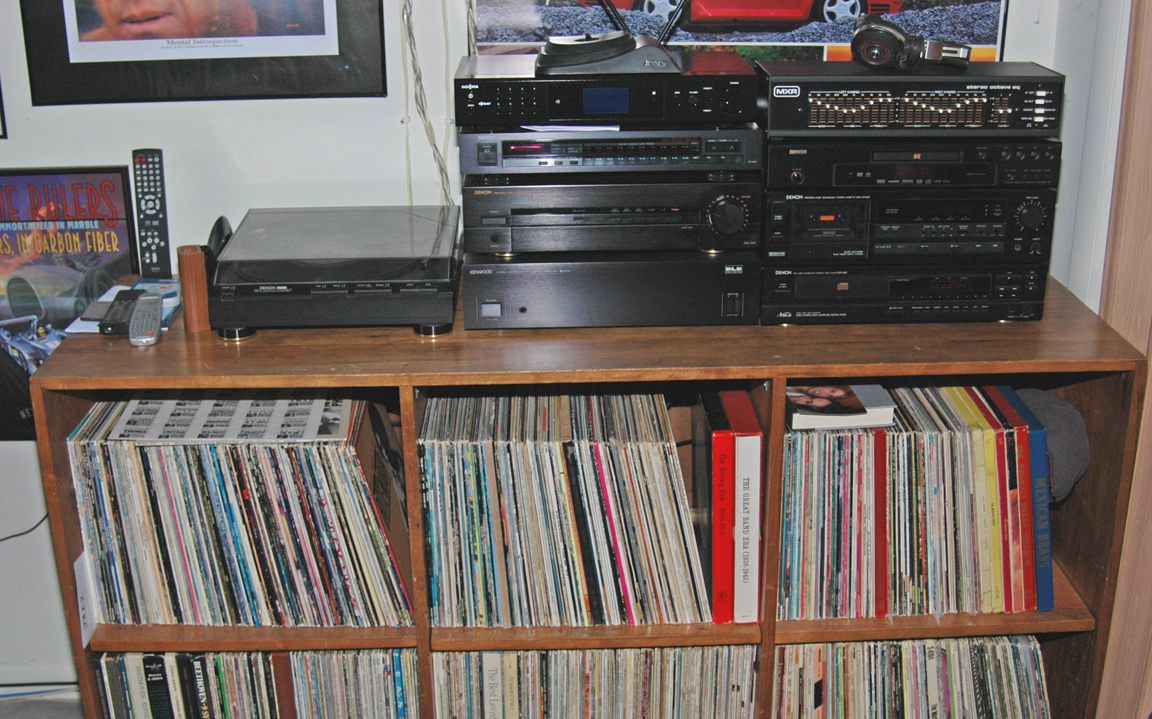
I have written recently about the equipment I use in my "office" at home. We intended this bedroom to be used as a place to have the family computer, a desk or two, pay bills, etcetera. However, my wife rarely used it and I started "man caving" it. At times, I have "piped in" music from the living room or listening room via cables in the attic. I have also had various stereo components in here in various places in this room over the years.

Above is from ten years ago and is NOT an example of simple!
The "office" is next door to the listening room which was originally the master bedroom prior to previous homeowners making a very large bedroom downstairs to be the master. Once that daughter moved out, for the last time, we decided to move the TV and modest surround sound equipment into that room making it our den. You have seen the transformations, if you've been following my blog. Previous recent articles on this (office) room are:
Minimus 7W Restomod Speaker's Sound and RCA Interconnects and A Look Into Where All The Magic Happens.
Minimus 7W Restomod Speaker's Sound and RCA Interconnects and A Look Into Where All The Magic Happens.
And:
My most recent, was a look at the many stereo and home theater receivers which have graced our ears over the years. Many of them were home theater models, yet I was using them for stereo-only in here. A waste of much of their potential.
I had found a very nice Pioneer 7.1 receiver model number VSX-917V and set it up in here to drive my Cerwin-Vega! LS-12 speakers in combination with my BOSE 301s. A wall of sound emanated from the four of them. As noted in the top-linked article, my test CDs showed a lack of the excellent treble I have grown to expect.

Just LOOK at all the terminals on the back! Way too much for simple stereo use. It's like daily driving an exotic car. Yes, it gets you to and from work, but it yearns to show you what it can really do!

A find of a simpler Yamaha stereo receiver at Salvation Army, it came home with us, and when I compared them, I decided to use it and offer the Pioneer for sale on eBay. It can be found here at a bargain price with remote and manual: rfcollectin | eBay
For fun, I photographed them stacked as I have done with others in the past. Then I removed their top cover and photographed the "guts" inside. I am presenting them here.


NOTE: I am a trained electrician with more than forty years experience. It is very important to NOT open any electrical device. The warning labels are there for your protection.
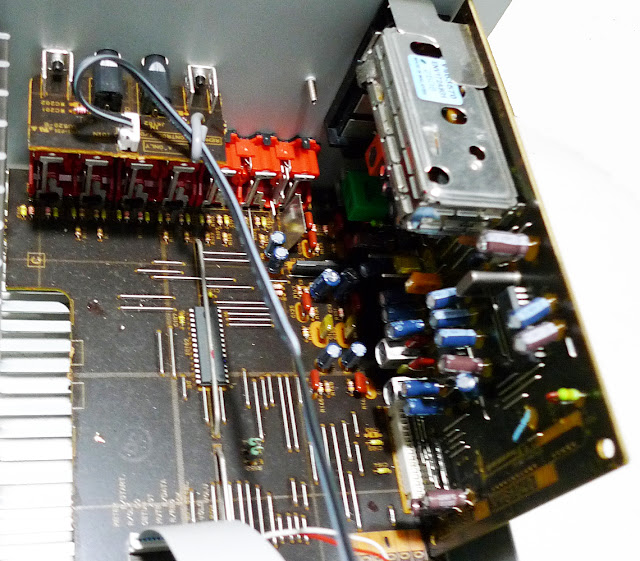
We'll start with the dissection of the hidden digital and analog components that remain safely hidden from countless millions, below. Pioneer's 7.1 "guts" are shown in several photos. I start with the top in place and finish with the unit's bottom plate and feet, for both units.

First glimpse reveals many circuit boards and lots of ribbon cables going many places. Interesting to me to see the brand names on various components: SONY on some of the ribbon cables, SANYO on the 7.1 amplifier's magic box attached to the heat-sink, are two examples.


The view from both sides. They really packed it in. Seeing SO many things in there tends to humble one if they know nothing about what all that IS used for. And even with all my experience, much is still mysterious to me.


Above looks towards the left end, if viewed from the rear. The long board is for all the analog inputs. The narrow board behind that is for the optical and coaxial digital inputs. Silver box at the left is the AM/FM tuner input circuits.

Large green board at the top of the photo is the circuitry for the front display as well as the multitude of buttons and switches on the face of the unit.

Silver box marked "BANDO" is the power transformer that converts the 120 AC wall current to the voltages and DC currents needed for the incredible number of pieces that it takes to transform music and the entire soundtrack, (ALL sounds in a TV show or film) sort it and send it to the correct speakers at exactly the correct time. All designed to immerse us in the movie we are enjoying.

These four transistors are attached to the heat-sink at the top and their board is marked "REGULATOR". Just what it regulates, I do not know. Beneath it is the wide grey SANYO multi-channel device. It creates the most heat. The white stuff smeared around is heat-sink compound that helps the heat from the transistors to easily be transferred to the heat-sink. Without a heat-sink, the transistors would die due to overheating. Ample ventilation of receivers and amplifiers is important. I see many pictures showing people have put their turntable on top of their receiver. Not a good idea.

And here is the bottom of the Pioneer. The slots allow cooler air to be drawn in to the heat-sink to help it dissipate. What appear to be nice thick aluminum feet are an illusion. Almost all makers do similar tricks.
 Yamaha has much more ventilation slits in the top of it. Nice to see it is relatively scratch-free and no tell-tale ghost footprints from other components being placed atop it.
 Almost barren inside compared to the Pioneer. But it's task is far simpler. Simply tune AM and FM, and amplify whatever source is selected, sending the left signal to the left speaker and right to right. Not one digital-audio component circuit or converter.
 Board at the top of the photo is the AM/FM tuner circuitry. Note how the entire heat-sink was milled from one block of aluminum. The Pioneer has the fins mechanically attached to the main aluminum piece. The more fins the more surface area to radiate heat from.
 Box at the top is the far simpler power transformer, which converts the 120 volt AC house current to the DC lower voltages needed to do the electronic magic. Most of the work is done on the main board which is horizontal and attached to the bottom plate of the receiver.
 Four transistors, above, left PNP and NPN and the right ones are attached to the heat-sink. Instead of white heat-sink compound, Yamaha uses some sort of heat-transfer gaskets between the transistors and surface of the heat-sink. Note the smaller heat-sink attached to a component on the main board.
 Power portion of the main board is seen above. Two tall black cylinders with silver centers are the main capacitors for the amplifier. They store energy for when the music suddenly gets louder. These are the ones often replaced in older equipment.
 Vertical green board, above, is for the digital readouts and various tuner and source selection buttons on the front of the receiver. Small round objects beneath it are what the four knobs rotate: Loudness, Balance, Treble, and Bass, left to right.
 A better look at the AM/FM tuner board on the right, above, and the RCA inputs in red, which are attached to the main board.
 Another look, this one is the inside of the back panel. AC cord coming in on the left, two AC plugs to the right of the cord. Then, mostly hidden, the speaker terminals. Another view of the power capacitors for the amplifier.


To allow heat to ventilate from receivers and amplifiers, it is best to not place components on top of them.


In the previous article in which I wrote about once again realizing just how amazing my restomodded Radio Shack Minimus 7W speakers sounded, I wrote that they had been relegated to serving as the rear surround speakers in the living room.
I also stated that I had bought a second pair via eBay so that they could remain in here for my enjoyment. Well, the "new" ones arrived and they are in superb condition. What follows are side-by-side comparisons, one of the restomodded units is on the left and a stock one is on the right.


Link to eBay seller's replacement/upgrade crossover kit is below.
Minimus 7 premium!!! upgrade kit for Optimus/Realistic speakers
The amount of bass and wide and high soundstage these wee speakers produce is astounding!

I applied boiled linseed oil to all four cabinets. The new ones particularly absorbed it. Mine have been oiled from time to time. I just love the look of black walnut.
The entire time I have been working on this article, the music has been flowing from these wee, but mighty speakers.
Again, thank you for taking the time to read my humble blog. Your comments are welcome.
Scott
August 8, 2018
#268


Great blog! Thanks for sharing tips for choosing audio equipment.
ReplyDeleteThanks for reading and commenting.
DeleteScott
If I had to do it all over again I would have choose a receiver and speakers that don't have spring clip terminals. That set up is truly mind numbing to manage when one uses the bare wire connection. Thank goodness for pin connectors.
ReplyDeleteIndeed! Spring terminals were a way maker's cheapened their products.
ReplyDelete