I Found Some New-Old-Stock Forty-Year-Old Utah Speakers. Unbelievable!

November 19, 2018 
#290

Gentle reader,

It was one of those right time, right place kind of things. We'd gone to the local Salvation Army on Saturday. It was the store where I have found more vintage electronics than any other place. And countless LPs and CDs too.
But, like you may have experienced finding any interesting electronics these days is becoming more and more rare.
They had a silver MCS stereo receiver, you remember, the ones they sold through J.C.Penney? It was not a particularly high end one, but interesting looking. For some reason they had NO speakers. They always have all kinds of speakers. I wanted to test the receiver, but how?
At that point, my wife walked up and said, "What about those?" Pointing above and behind me. "Utah speakers! No way! Those things are legendary."
You see, they had decided to rearrange and placed small appliances in with the electronics and electronics with the small appliances. Who does that?
I proceeded to test them and the receiver. Sadly someone had removed the price tag from the MCS receiver and they will not sell anything without a price on it. Oh, it worked fine, too.
On the speaker's tag it reads: "Utah New-Old-Stock Speakers (2)" That explained the incredible condition of these Utah model AS-2AX bookshelf speakers. I can only assume in their infinite lack of wisdom, they took them out of their boxes to display them. No doubt tossing the old boxes.
Here's the cool thing. They set them out on November 1st. She pointed them out to me on the 17th! So, for more than two weeks, nobody else saw them either. Meant to be? It seems so.
Beautifully made cabinets with real black walnut veneers. As you can see, they are two-way units. They veneered BOTH sides of the particle board. An unnecessary expense. Both are that way.
Being perhaps forty years old, the wood was quite dry, I would fix that. Below and in other photos, you can see the veneer on the inside walls.
When I tested them, I heard noises from one of the woofers. That did not deter me. The price was right and I was anxious to own them and paid the $25.99. Note that they still have the rubber covers on the RCA terminal.
As you know, I carry a test kit with me when we go to thrift stores. It includes: A music cassette, a pair of RCA stereo interconnects, a power cord; the kind with a figure-8 plug on the end, and a pair of cheap speaker wires.

But at home, I use large gauge speaker cables and banana plugs. I was about to make up some smaller patch cables to test them here and determine which one had the woofer noise. 
Then I remembered the double banana plugs that I'd used to hook up the meters and switch for the system in the listening room. I told you all about that.
Once I determined which was ailing, I set up the folding table and put it face down to remove the back.
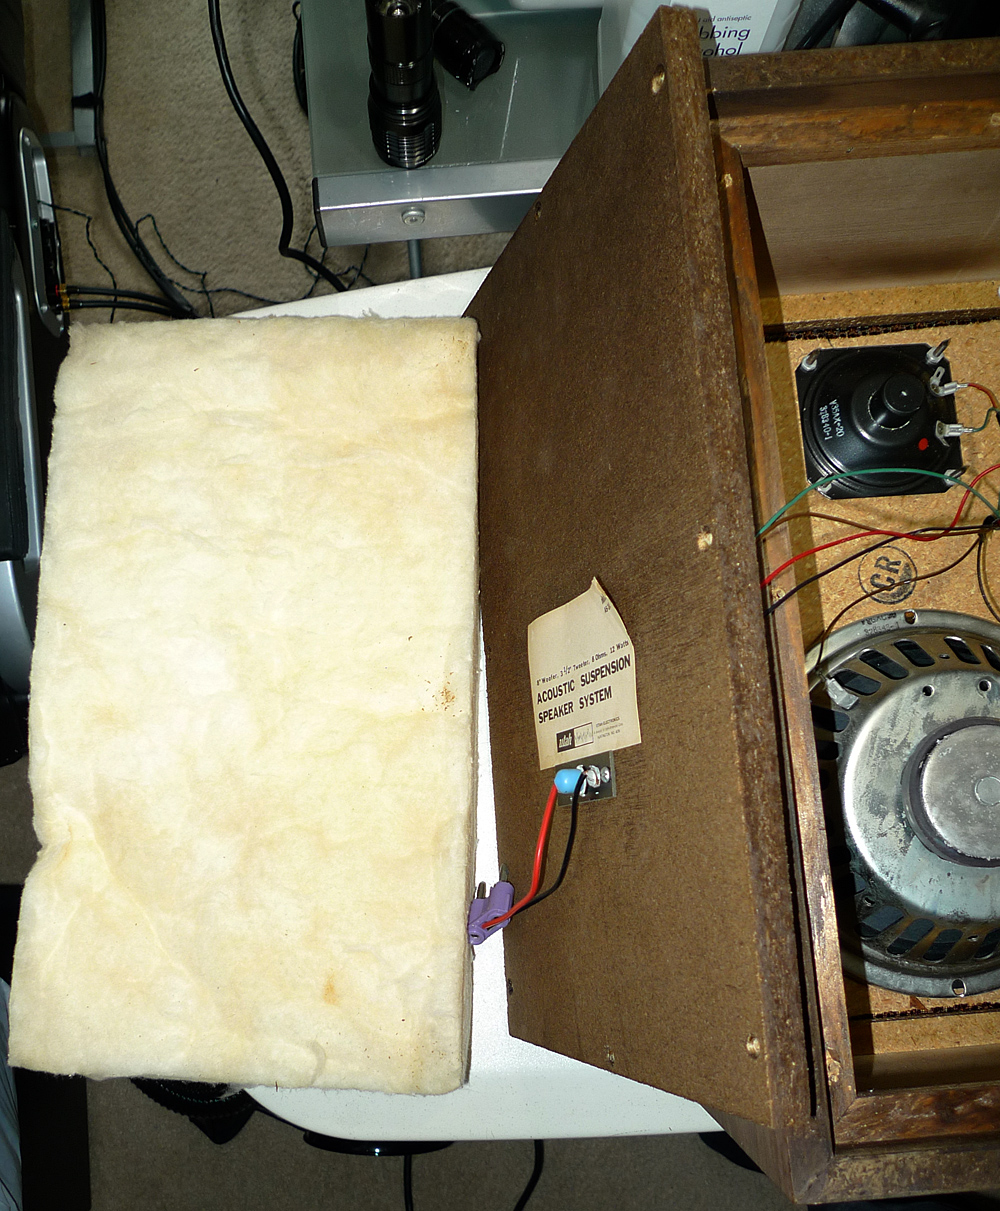
Once the back was off, I found a piece of fiberglass which looked like it had been tossed in as an afterthought. Low morale at the Utah factory?
Oddly, some of the metal was corroded inside, especially around the tweeter magnet.
I know it's silly, but the OCD part of me feels that black wires are ground and red are hot or positive. Apparently Utah did not subscribe to that notion.
The "crossover" consists of a non-polarized 50 volt capacitor. No frequency or capacitance number on it, so I have no idea of the crossover frequency. 
Being made in the USA, the nuts were 5/16" and easy to get off. 

The woofer definitely had an issue. I looked for a replacement on line, but no luck.
I contacted Cy Beam via eBay, telling him the problem to see if he had one. He didn't but gave me a suggestion.
I followed his advice, carefully cutting off the dust cap. There was no debris as he suggested. However, I could see the cone was slightly off center. By moving the cone back and forth I watched debris being rubbed off of the inside of the voice coil. Ah-ha. 
I carefully used an Exacto knife blade to scrape the offending surface area. Pausing to blow it out with canned air, each time.
I kept moving the cone out and in and blowing out the detritus until it no longer rubbed off.
Finally, the rubbing sound was gone and I put it back together to confirm that I'd solved the problem.
Satisfied with the results, I took it back apart and carefully reglued the cap back on. Like my Advent Baby Advent II speakers, the dust cap on these were made of screen to prevent the air from compressing and hindering the woofer's movements.
I folded the fiberglass in two, as you can see, above.  I vacuumed all the corrosion and other dust from the inside of the cabinet.

To correct the minimalist effort of the factory worker, I added polyfill mats over the fiberglass.
Then some loose polyfill on top of that. This will improve the bass performance of the woofer by making it "think" it was in a larger cabinet.
The second speaker had no corrosion and also, no foam tape to seal the back. Note that the tweeter is 90 degrees off in this one. I left it alone. Take that, OCD!
At least the fiberglass in this one was the correct length. I repeated my steps with this one, including vacuuming any dust or dirt from the inside of the cabinet.
I also added foam tape so that the back would be airtight. 
Above shows how dull the wood was. I carefully cleaned all the surfaces prior to oiling the wood.
To avoid getting oil on the grille cloth and back of the cabinets, I taped them off with painter's tape.

Just look at these photos, what a difference Boiled Linseed Oil makes on wood! I used to use Tung Oil, but it is hard to find without polyurethane being added to it. 
Plus, the papers that came with my Dynaco A25XL speakers specifically recommended Boiled Linseed Oil. The boiled part was critical.


Of course, there is ZERO information to be found on the Internet about most Utah speakers. I did find one site that had scanned pages from a brochure. Not these models, though.

Too bad, but I estimate they were made in the 1970's. I'm very pleasantly surprised at just how good they sound!
In fact, I'm listening to them right now. I have to be careful since they are rated at 12 watts. Maximum of minimum? 

Most of us poo-poo cone tweeters. But they do the job. Dome tweeters may disperse the sound better, but I would never guess these were cones by the sound.

I have see in my various FaceBook vintage audio groups folks praising their vintage Utah speakers. While these are not high quality or have coaxial or full-range drivers like some models, they certainly look and sound terrific. I'm going to keep them for a while. Plus, I love the look of black walnut.

While I had the Boiled Linseed Oil out, I also did the cabinets of the LX4 speakers. 

Thank you once again, for taking the time to read my humble blog. It is your valued comments that keep me working on new stories to entertain and hopefully enlighten you.

Scott
November 19, 2018
#290

PS A few days ago, a new milestone was reached: 200,000 page views! I am SO grateful!


Digital Concepts 528/AF PANA. A Viable Alternative to Panasonic Lumix Flashes.

November 13, 2018
#288

Gentle reader,

I have been a fan of Panasonic Lumix digital cameras for a number of years now. Why? Quality cameras with excellent Leica lenses in many cases. 

Does it make sense to pay more for RED DOT when you get the same camera and lens for, in some cases, HALF the price of the identical Leica digital camera? To me it does not. Those that like paying extra just so they can say, "Hey, check out my Leica camera." are free to continue paying more.

My favorite Lumix is below, the DMC-LX3. It has a relatively fast Leica Vario-Summicron lens. The 35mm (full-frame) equivalent of a 24mm f2.0 wide angle which zooms to 60mm f2.8. Not much of a zoom range, but a fantastic lens!
Below is an image from an eBay auction. A Leica D-LUX 4, mechanically, electronically and optically identical to the DMC-LX3. There's the famous RED DOT and I am not impressed.

No hand grip like the Lumix. To satisfy your curiosity, when you are done with the article, you may research what Leica D-LUX 4 camera prices are verses Panasonic Lumix DMC-LX3 cameras sell for.

Recently, I have gotten into mirrorless cameras. Naturally, I chose a Lumix model. The G1. It, to my knowledge, was the first Micro Four Thirds camera on the market in 2008.
A historical note: Four Thirds mirrorless cameras came out prior to the Micro versions. They feature a sensor much larger than most point-and-shoot digital cameras with fixed lenses, like the D-LUX 4 and DMC-LX3. The mirrorless camera's sensor is smaller than the APS-C sized ones in so many DSLR cameras, but still quite large compared to fixed lens models.

Mirrorless, it is what it says: No mirror. So, one sees what the lens sees, but must depend upon the screen on the back, or if it has one, an electronic viewfinder to see what they are shooting. There is no mirror and the mechanism needed to raise and lower it very quickly so the shutter can open and close. On the converse, mirrorless camera's shutter has to close, open to expose the sensor, then stay open for further viewing/shooting.

Micro Four Thirds cameras have the same size sensor as Four Thirds cameras. The difference is the camera's body size, mostly less thickness, than the 4/3rds bodies. M4/3rds are significantly thinner and thus lighter than their forebears.

So, yes, I now have a ten-year-old Micro Four Thirds digital camera. Ancient in terms of technology. I had bought numerous lens adapters and tried all kinds of manual focus lenses as well as AF (focusing manually) Nikon DSLR lenses. My results varied and it was not a satisfying endeavor, so, I have been selling the lenses on eBay.

I also am selling most of my film cameras and all of my 35mm film. I always put new film right in the freezer, so it is still viable and gives great results. I have shot two rolls and the images are perfect. If you are interested in seeing what I have for sale on eBay, here is a link to my For Sale items:

If you have looked at buying a shoe-mount flash for your Lumix cameras, you have found that Panasonic branded ones start at $200 used, and go up from there. Being on a fixed income, I cannot afford that.

Digital Concepts (and other brand names) are made by an aftermarket manufacturer that makes inexpensive accessories for digital cameras. I am not affiliated with the company nor any other company. Thus, the fixed income.
So, I started looking around and found this flash. According to what I've read, it is made by Sakar. I would have to look around for the manual, so I cannot tell you the guide number.
It is a TTL flash. My experience with using it, shows that it's light output is much brighter than the pop-up flash on the LX3 and G1. However, using it for close-up work it's output is too great.
The photo above was made with the G1 and the D.C. flash. Clearly too bright. Below was with the G1's built-in pop-up flash. Much better, but the background is a bit dark.
On the other hand, to fill a room or capture a group of people, this inexpensive flash is just the ticket.
Mounted on the G1, you can see how much higher the flash's lens is that the pop-up would be if open.
This greatly reduces the chance of red-eyes showing up in your photographs.

Now, here's the rub. When I searched just now for information on this particular flash, I did not find any under the D.C. name. But, there is an identical one out there for $39.99:
Camerachums - The Accessory Outlet  

Since I have your attention, let me show you a handy camera case that has foam which is pre-cut with 1/4" squares that easily pull out. I've used it for several cameras and now my G1.
Convoluted foam lines the top. I like that word. Corrugated is another one that is fun to say.
It holds all the bits and pieces of my G1 M4/3rds kit. I save the foam pieces I have removed in the past so that they may be used to fill spaces.
Sturdy, well made and lockable. What's not to like?
12 1/2 inches wide, 9 1/2 inches front to back and 5 1/2 inches tall when closed.
I do not recall who made it, but I'm sure there are similar ones out there. Plus, it does not look like a camera bag. Nothing invites unsavory characters like someone advertising what they are carrying with a brand name or a recognizable shape.

I hope this article has been informative and entertaining to you. I believe sharing what we've found or learned is a helpful thing to do.

Scott
November 13, 2018
#288
 

How To Use a Stereo Audio Power Meter on More Than One Pair of Speakers.

November 10, 2018
#287

Gentle reader,

My last post was about the various kinds and types of meters one can employ in their stereo system. It can be read here:
My closing remark was along the lines of, "Now which pair of speakers to use it with...."

It occurred to me there was a solution to a question I had not asked myself: "Why not use it on both sets of speakers or even more?" The answer, while not "Genius!" was to me, a great idea.

The epiphany I had was this, "Why not use my speaker switch, but in reverse. That way, I can switch the meter to the speakers I am listening to." Brilliant!

I prefer binding/banana speaker terminals over the cheap, minimal contact spring terminals. After much searching I found this economical speaker switch years ago.
LEGEND LE412 is what they called it. I can find NO information on them now. Not even a single picture. How is it I am the ONLY person to buy one of these? 

I did a number of modifications on it, including adding those weights to the front of it. The cables I use are heavy and it doing "wheelies" was a no go. I also used BluTak reusable adhesive (available under many brand names) to secure the switch.
Here is what the back of it looks like now, after my modifications.
The company made it with the three-way terminals having the industry standard of 3/4" apart so that double banana plugs can be employed. BUT, they did not arrange them as you see them here. Nope. As you can see it is marked as having the Right channel on the top and the Left on the bottom.
I took it all apart and rearranged all the terminals and internal wiring so that they are as seen above. The terminals on the left are originals. Sadly, they were not sturdy. I had to replace the eight on the right, since the metal inside was too thin. The ones I installed are more robust, but were too thick to be placed so closely together. Thus the "rounding" I had to do to each plastic nut to make them fit. Attractive, it is not. Effective, it is.

Below shows the wiring solution I came up with. It may not be pretty, but from where I sit, all I see are the faces of the meter and switch-box. And it works.
In the previous article, (linked at the top of the page) I introduced you to various audio power meters. All but one were made and sold by Radio Shack. This one is new to me and extremely well made. Albeit with spring terminals. It is a   Realistic AMP-300. Of the four series they made, the finest construction.

Below is the first step for mine, since I needed banana plugs.
I have had these double banana plugs for decades. They are ugly, but well made, right here in the USA. No 24 karat gold plating, not red or black. (See the raised bar on the sides facing each other? I chose that side for all negative wires.)  These plugs were employed with signal cables. I rescued them and the cables from the dumpster. Unlike the ones available today, they still hold strongly, the bananas have never lost their spring tension. I had exactly SIX of them, five purple, one brown. $0.
Also in the previous article, I showed you the colorful red, white, blue and black cable (left, above) I made by twisting them together. For this, I put yellow shrink tubing on each to mark where they will go. I added large ring terminals trimmed to slide onto a binding post terminal, or four:
Obviously, I needed a second set and chose two shades of green for left and right, positive, along with dark blue and black for the negative wires.
I HAD written a long explanation on how one sets up and employs double banana plugs like these. But decided it was unnecessary to the article. 
Please pay attention to polarity ( + and -) for each set of wires. Otherwise you may inadvertently cause a problem. And, no, one does not have to twist them.
As I have a bunch of objects for cleaning records next to my turntable, it made sense to stack the two units.
This photo shows how I used the wires bare, stripped about 5/8" long, to attach to these are two-way binding/banana terminals, Sadly, my eight ring/spade terminals were wasted. 
I needed to mark the speaker cables (Monster Cable Z-Series) as to which terminals they plugged into on my amp. You can see my simple solution above.
Yes, that IS a Swiffer 360. It is very effective for cleaning records that are just dusty.
Here is how they look from the front. The APM-300 has lots of red LEDs to show the music in action.
This meter can be set to read 0-2.0 watts or 2-200 watts. It can also show RMS (moving constantly) or PEAK which means it will display the highest (loudest) moment of the music which would show whether the amp had been driven to "clipping". A term that means the music was distorted.
The bottom speakers are Klipsch KG-4s which my digital meter shows are five Ohms. 
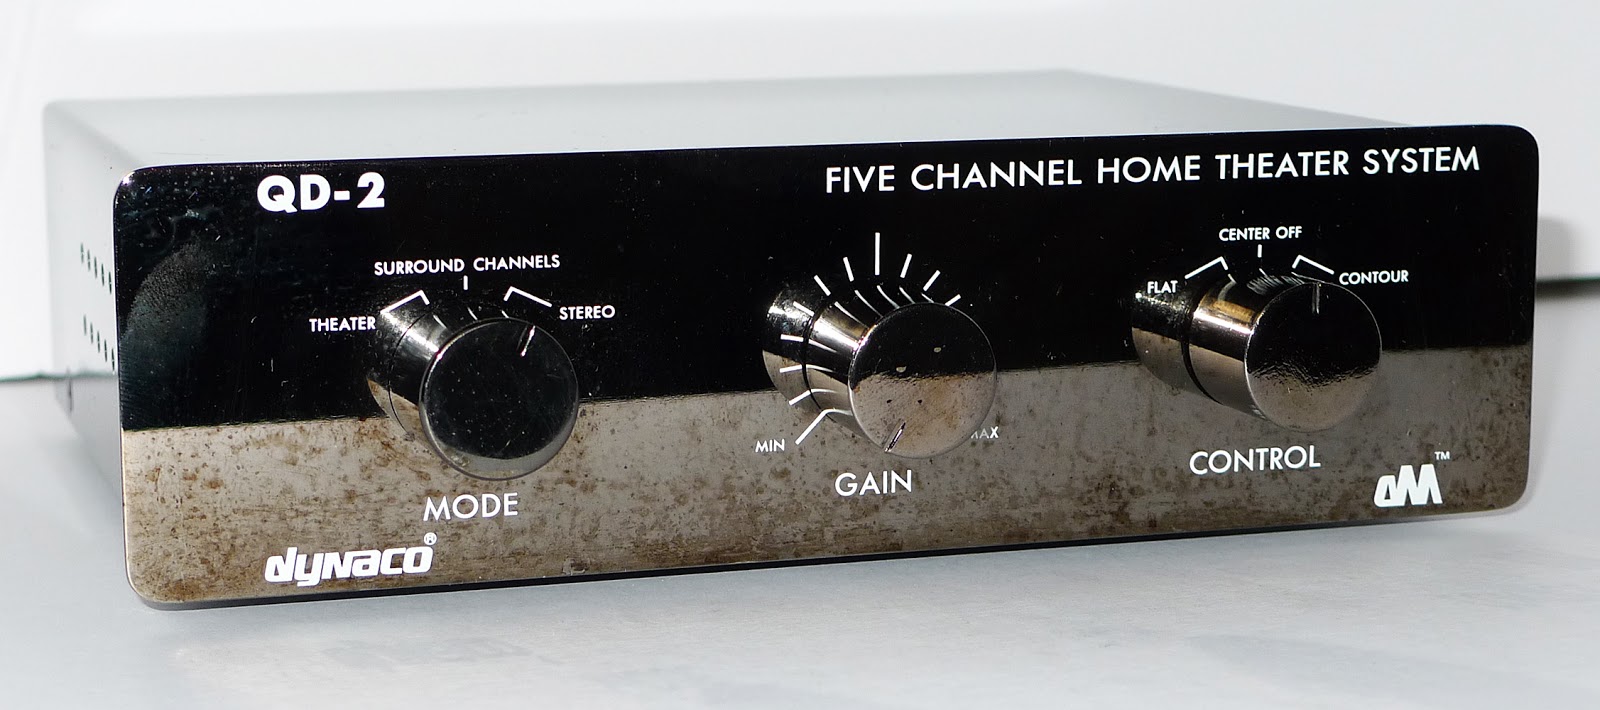
The top speakers (Advent Baby Advent II) are employed along with a pair of Dynaco A25XL speakers through the QD-2  device shown below. Together, they read 4.5 Ohms. So, I switched the meter to the 4 Ohm setting.

The QD-2 is an update on the original 1970's Dynaco Dynaquad device. It reveals ambiance and echoes which makes one feel as though they are sitting listening in the recording studio or concert hall. Works great and I love it. Previous QD models have spring terminals.
I have been fortunate to find and buy the Dynaco ST-200 power amplifier, QD-2 and PAT-6 Tuner-Preamplifier, all from the late 1990's. When Panor (originally Pan Orient) Company started making new products with the Dynaco brand name.

If you are interested in the products they made, good luck finding anything. I scoured the Internet and wrote about what I had found here:
Dynaco Given a Second Life. Pan Orient Company: Panor for Short. A Photographic History PART ONE.
And, here:
Dynaco: Panor for Short. History PART TWO Plus ODD Dynaco Speakers.  
And for more on the QD series:
Quadraphonic Adventures: 1990's Dynaco QD-2 Passive Surround Sound Device Tested.
 
So, there you have it, a way to use one set of power meters with countless pairs of speakers. As many as your speaker switch will handle. 

I thank you for taking the time to read my words and view my photos. Your kind words make all the effort worthwhile.

Scott
November 10, 2018
#287

White Van Speakers. Who Fell Victim to those Sneaky "Salesmen" Back in The Day?

  July 10, 2026 #459 Gentle reader, There is an interesting Audio-Equipment-History YouTube channel called "Multimedium". They mak...