Some tweaks to the Den stereo system + Monster Cable MCX

Gentle reader,

The other day, I mentioned to my wife that I was perfectly happy with the sound system in the den. She laughed and said, "Right. Sure you are." "What? I haven't bought anything in a long time!" I replied. "Let's see, last weekend you told me you 'rearranged the stereo'." Well, I did say that and did do that. But for a good reason! As you will see. Please read on.
For the new reader, I have made numerous changes in the sound systems over the years and covered the changes in these digital pages. To make it easy for the readers, I compiled all the sound-related posts on this page: The Robb Collections: ALL my posts about stereo equipment, speakers and more!  I have made nine other posts since then showing changes/improvements. They say change is good and for those that may, I say, may, be slightly OCD, we are simply seeking order and in my case the best sound I can achieve with my humble budget.
I just took a look at the above linked post and the only photo shows the room as it stood then. If you look you will see a number of speakers and only a few pieces of equipment. That is because at that time, I had TWO SEPARATE SYSTEMS in the den or as I like to call it: The Listening Room. The glass and steel rack shown below was once on the left wall. That teak shelf in the linked post above now sits there and holds books and Asian stuff. Well, one of the nine posts showed the return of the subwoofer on which the CD tower rested back then. You see, the second system and the three wall mounted speakers plus the sub and the stacked components on the right plus two unseen rear speakers were strictly for playing the small assortment of six-channel (5.1) SACDs (Super Audio Compact Disc) that I owned. I finally realized that having that WHOLE kit of extra equipment was, well, silly. So, in order to help a buddy choose between buying a surround sound system for his TV/Blu-ray or buying an XBox ONE, I offered to give him that whole kit. Which I did. In return, he gave me his whole XBox 360 set-up which I passed on to my grandson. Some months later, he brought the subwoofer back because his wife thought it was too loud. That was good because I am in love with the little speakers shown below:
The story on those beauties can be read here: 
As you can plainly see, they only have four inch woofers. Thus, bass is less than robust. So, rather that having to buy another subwoofer....

In the picture above, you can see a large black speaker on the left. That is one of the two Cerwin-Vega! LS-12 speakers. I am not using them, but will hang on to them because they are amazing and so efficient! Why can Cerwin-Vega! make such efficient speakers and the other makers not do so as well, I do not know. By efficient I mean that it takes very little amplifier power to make them play VERY LOUDLY! 

As to the second part of the subject line of this post: "Monster Cable MCX", M-Series is the second from the top-of-the-line of Monster Cable speaker wires/cables. The top is the "Z Series" which is outside of my budget.
Note the two shades-of-gray (or is it grey?) speaker cables above and below? Those are both MCX Series cables. The lighter colored ones are new and are MCX-1. The larger ones are MCX-2 which are more expensive and complex in their construction. You can Google these cables when you are finished reading if you are confused or seek more information.
To begin, when the subwoofer first returned, I placed it on the left side and neatly placed the Cerwin-Vega! LS-12 speakers on the right wall. This looked fine, (as you can see below) but I realized that the classical and movie score music has the Bass and Cello players on the right side of the orchestra. While I have STACKS of speaker wires and cables that I have tried over the years down in the work/laundry room, none were of sufficient length or quality. 
Above shows the subwoofer on the left and the type of wires, twisted-pair ones (I don't recall their name) also made by Monster Cable, supplied the signals to it and frankly didn't look very good. OCD, remember? Plus, you see those two black cables that are heading up the left corner walls? They are one of two pairs I found at The Village Thrift store. They are of Chinese make: XINXIN is the name and while they seemed well made, the actual conductors (wires) inside were quite thin. 
Where are they going? You may wonder. To terminals in the ceiling, through other no-name twisted-pair 10-gauge cables in the attic, to terminals in the ceiling and then attached to one or the other pair of speakers in THIS ROOM, which is next to the den. It is my study/home office/museum/library/simulation-racing-station room. I use Monster Cable XP (their least expensive) speaker wires in here. Confused yet? My wife gave up years ago on trying to understand all the changes. I can't imagine why. 
I was able to score two new 30-foot reels of Monster Cable MCX-1 speaker cables which included the red and black "speaker pants" shown. As you can see, I use a variety of brands of banana plugs. I'm leaning towards Nakamichi BFA N0524E units which are the silver ones above. I like Monster Cables various ones as they are high quality and fit tightly in their respective receptacles. There are knock-off such as the ones seen below, but they only hold tight the first time you plug them in. Eventually, I will replace all of them with those Nakamichi BFA units. 
Above is the MCX-1 cables as plugged into the high level inputs on the subwoofer. The low-level inputs are the silver RCA terminals on the left. That is a PANGEA power cable you see. PANGEA is sold exclusively by Audio Advisor. They are very high quality and are also available in 7 gauge as well. Those are called: AC-9 and are quite unwieldy.  I sold the one I had for that reason. The AC-14 is fine for my subwoofer and Dynaco ST-200 power amplifier's needs. PANGEA is expanding in the High-End (Audiophile) world and offering more and more products. They are showing the rest of that industry that quality audio products do not have to cost hundreds or thousands of dollars to satisfy the "golden ear" segment of the population.
Speaking of the Dynaco Stereo 200 amplifier, here is the terminals on the back. It may look confusing because of the glass shelf it is sitting on shows the cables attached to the preamp below it. The blue RCA cables are Liberty Cable brand which I once had the entire system wired with. They are THX certified. (George Lucas in a marketing genius!) They are the input cables, the other ends of them are below the glass and plugged into the Yamaha preamplifier as are the other RCA cables. Almost all are various Monster Cable units. The red and black terminals on the right are the two sets of speaker terminals on the amp. The small yellow, blue, red and black wires lead to the separate Radio Shack power meters. Note the Nakamichi banana plugs on the top. Below are Monster Cable double-banana plugs. The top row (A) hold MCX-2 cables which feed the small wood-cased speakers. The bottom row (B) feed the speaker switch and hold the new MCX-2 cables which go to the speaker switch.
Above is the LEGEND LE412 Speaker Control switch. I reconfigured it so that the red (right) terminals are on top and black (left) terminals are on the bottom The two pairs of terminals are 3/4" apart which is the standard for "double-banana" plugs. I used to use them exclusively. Right to left, the speaker cables are: INPUT L&R, speaker outputs 1 L&R, speaker outputs 2 L&R. #1 connects to the subwoofer. #2 to the speakers in this room. Do you see the difference between the Monster Cable plugs and the knock-off ones? By looks, not much, but quality and holding power. THAT is the difference. Quality costs, but it doesn't have to cost too much. WHEW!

You got all that? My wife is shaking with laughter that I would A: go to all that trouble and 2: to photograph and write about it. But you understand, right? 

Conclusions: I found an immediate difference in the subwoofer due to the replacement of the other M/C twisted-pair cables with the MCX-1 cables. I would usually have to crank the volume on the subwoofer to 50, with the new cables, only to 35 for the same volume. MCX-1 has fairly thin conductors verses the size of speaker cables I usually use. The MCX-2 is constructed with two sizes of conductors; thick and thin. In both cases they too are twisted around each other, but wrapped with two different kinds of covering. I am going to substitute the MCX-2 main cables with the other reel of MCX-1 to see, hear actually, if they make a sonic difference. More to follow.

UPDATE! After test listening with the MCX-1 speaker cables, I was certain that bass was missing. I switched to the thicker cables and found that I was correct! I looked on line for reviews of the MCX-1 and found that others detected the same loss of bass. So, I removed it all and eventually all of my M-Series cables. I now use exclusively Monster Cable Z-Series cables and the sound is superb.

Thanks for looking,

Scott
Updated May 8, 2019 

Update on Home Photo Studio and Study in US Military Camouflage

Gentle reader,

Just a few days ago, I wrote:  The Robb Collections: Have a photo studio in our home....on a budget! and since have bought a couple items that make it work better.

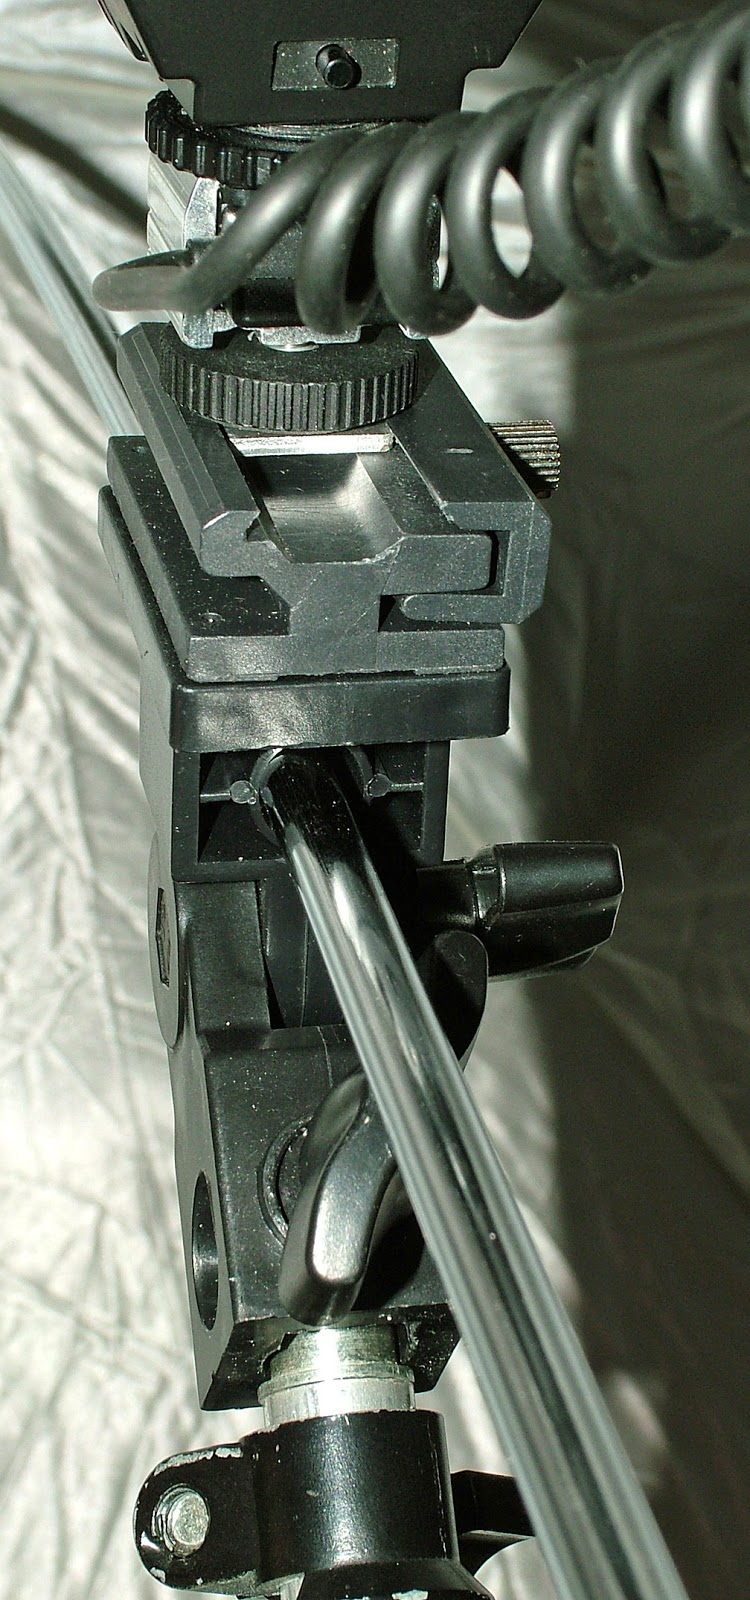
I realized that the flash would work better and easier by having an adapter (of which I once had several of) which would mount a regular camera flash and hold the umbrella as well. This works better than the setup shown in the link above. Here is what I used today, got it for $3.99 via eBay:
It's the device that is attached to the top of the light stand and holds the flash via the flash's "foot". That is the flat part at the bottom of the flash with one or more small terminals in it which slides into your camera's hot shoe. The silver piece with the curly wire attached to it is another useful/needed part to making home studio pictures so much easier. More on that, below.
Attached to the front of the flash is a small fold-able "soft box". It attaches with Velcro to the front of the flash head and widens and softens the harsh flash. Thus, the flash's light hits more of the umbrella's reflective surface, which makes that artificial light more like the Sun's. No harsh model's shadows or red eyes as a result. This one is a LumiQuest brand, called PROMAX.
Above and below one can more easily see the new adapter and how it holds the flash foot and umbrella's shaft.
Below, you can see the remote flash cord's foot as attached to the camera's shoe. It has the same number of electrical connections as the flash and camera do. Each serves a purpose. One of which is the camera's light sensor reads off the sensor's surface as the image is being made and cuts off the flash once ideal light has reached the sensor for a perfectly exposed photo. Clever! This is called "TTL" which stands for Through The Lens. "iTTL" is Nikon's term for their digital SLRs. One cannot use a TTL flash designed for a Nikon film camera on a Nikon digital SLR. Too bad as I have a nice one. That just guarantees that one has to buy more equipment. Same thing applies but in reverse for lenses. While Nikon DX (digital lenses for APS-C size sensor DSLR cameras) WILL mount on a film SLR, it will have darkened corners in the photos. This is because DX lens' "circle" of light is smaller than full size FX (35mm film size) lenses do. Thus not all the film is exposed to the light.
There is good news though, because in the case of Nikon and Pentax: almost all lenses designed since the early 1960's for Nikon (and Pentax) cameras can and do mount on digital bodies. The "crop factor" is x1.5. So, my 50mm film lens on my D70S shows an image equal to a 75mm lens on a film SLR. Great for long shots, but not so good for wide angle shots. There are adjustments that need to be made, however. But I am getting off subject. It happens, I tend to run off at the mouth or in this case, my fingers.
So what is the purpose of the silver umbrella? I'm glad you asked that. The Sun, being 93 million miles away still creates stark, crisp shadows. It is both a wide light source and a direct one. A flash pointed right at you is a narrow light source. The softbox I have attached to it widens and softens the light, but it will still make shadows. 
For pictures of my listening room, a frequent subject of this blog, I point it to the ceiling so that the light bounces off and it is widened and softens the shadows. 
The UMBRELLA, especially with the softbox, spreads the light in a great arc that tends to wrap around the subject. When you get to the pictures of me below, you will see only the faintest of shadow over my right shoulder. Had I a taller ceiling, I could have had the flash/umbrella combo directly above and behind the camera and there would have been almost no shadow at all. 
The other item I bought is a infrared remote shutter control. This allows me to start the camera's countdown and (hopefully) hide the remote in my hand before the shutter fires. To see if I succeeded, see the home photo studio's first images.

I am 60 years old now and have always preferred to be BEHIND the camera rather than in front of it. 

First off, I should have shaved, then I should have smiled. In fact, seeing the images, I thought, "I look so OLD! And a little like my late father." In fact, I look like a skinny bald grouchy old man. Oddly, I am not grouchy at all and in fact, I smile a LOT! What I don't understand is why SO MANY women of all ages and skin tones smile at me. I have teens and twenty-somethings young women that I know casually whom are always so HAPPY to see me and gladly engage me in conversation. WHY? I don't know, but do enjoy it. Great for my ego.

The other saving grace for my aging body and face is I'm married to the love of my life and very best friend. So, no young or otherwise nice-to-me woman is ever going to lure me away from my beloved Nancy. 

Are you ready to see the results of my home photo studio? Oh, wait, I forgot. Like so many of my collections, I never intended to collect what you will see me wearing below. I realized a few years ago, that since I like cargo pants, I might as well wear the real thing, so I started buying US Military camouflage uniform cargo pants. Then as time went by, I discovered 5.11 Tactical clothing and started buying those in various colors and stopped wearing camo altogether. 

My son-in-law spent ten years in the Marines and once he got out, gave me some of his uniforms. I am no stranger to USMC uniforms as I wore (then Woodland camouflage) the uniform for six years, plus all the other uniforms. I drew the line at Dress Blues, no civilian is entitled:
Yes, that is Nancy and it was several years ago as the kids you will see below are now 29 and 30.
I don't know who made these two images. I have only one photo of me in woodland camo, so will have to find it and scan it. I was with a famous woman, daughter of a late US President in that photo.
The one on the left is now 30, the one on the right, 29 and she has three kids. Half of all the grandkids we have. As you can see, I was involved in the Young Marines program and started three Young Marines companies (Arlington, Alexandria and Manassas, VA and one battalion: Northern Virginia. I will also see if I can find that picture of my Young Marines and my staff at the White House.

Some time ago I wrote a blog titled: The Robb Collections: A Study in US Military Uniform Camouflage  and it was quite successfully received. So, feel free to take a quick look at that to see why I have decided to do the continuation of that post today.

A WORD on the photographs below. Rather than stand there like a living manikin, I decided to add a duty belt, holster and Airsoft pistol. I have one Beretta and three Glock pistols. The rifles shown are also Airsoft, but look, feel and weigh like the real things and are capable of full-auto fire. Well, not "fire" more like..... I can't think of an adjective. No fire involved, though. Remember, I did this for fun and to test my digital studio. I'm going to sell almost everything seen once the "holidays" are over and the carriers are not flooded with packages. Because the fun of collecting is the chase and acquisition of the collectibles. Once one has had them for a while, the thought comes up, "What am I going to do with all this?" (The photos at the very bottom of the blog page shows two stages of my camera collection.)

I was going for a "tough" look on my face. Instead, I just look like I'm grumpy! To see for yourself how I have aged, look below:
I always wanted a pair of US Military pilot's coveralls. I came across these in like-new condition in a thrift store and snatched them up. Got the squadron patch at a gun show and the wings are from the National Air and Space Museum. Since I don't know what pilots wear on their feet (I can't imagine combat boots) I chose black Sketchers. I honestly don't know why I didn't smile. Oh well.
OK, so don't I look a little tough above? That same son-in-law is now in the Air Force Reserve and he will be getting this uniform if he wants it. Despite the way they look, there is no PINK in these boots! AF boots are actually green, but I was not going to buy a pair just for a photograph. I also don't know what color tee-shirt they wear under their digi-camo uniforms. That tee-shirt has U.S. Embassy, Bangkok on it and the USA official Eagle with the arrows, etc. Whatever the official name for that is on it.
First off, I forgot to take off my glasses for this shot. I bought a helmet that is normally used for paintball or Airsoft battles. It came with the Air Force cover on it, which fits perfectly. Since I wanted a helmet for the Army uniform, I bought an ACU cover which does not fit well. Remember all "weapons" shown are unloaded and Airsoft.
OK, so the USMC boonie cover above just looks silly. I also have a garrison cover, like below, but chose the boonie for the photo. I kinda look tough in this one, don't I? Sort of? Anyway, above is the USMC digital camo uniform for "sand-land" as they refer to places they've been lately.
Above is the digital camo USMC uniform that replaced the traditional woodland camo BDUs.
Above, as you can see, the US Navy had to get into the digital camo act. I had not seen these until watching the movie Battleship. I thought then, "C'mon, the Navy doesn't wear camo!" Well, I was wrong, as you can see. They do and it is pretty cool looking. 

That is it for Military uniform photographs. Despite the aged model, they turned out well. 

Long before 9/11, there was (and may still be) a catalog company called: U.S. Cavalry. Much like Guide Gear, they sold lots of military and police related items. One of my very favorite places to go as a kid, and now too, is a military surplus store. Ranger's Surplus is about all there is left, at least around here. The gun shows often have collectors selling stuff and I bought some of the pieces above there.

Anyway, as I was saying about U.S. Cavalry, my wife bought me a "FEDERAL AGENT" tee shirt. Something that is not available today. Sadly, if I or anyone else that had such shirts that you will see me modeling below were to wear it out in public they stand a good chance of being shot or possibly stopped and questioned by the law. They would be right in thinking one was trying to impersonate a police or other lawful authority figure. 

That being said, I have NO intention to wear ANY of the items I have modeled above and below outside of my home. In fact, some cannot be resold because some less-than-savory character might get a hold of said articles of clothing and cause harm or terror. I will never be a part of that by selling such things. In fact, they will have to be destroyed to prevent them from falling into the wrong hands.

So, below, as I said, I am simply modeling these shirts and pants to demonstrate what they looked like on me. 
Looking at these images, I feel silly, but what is the point of having a collection unless one can share it, right? 

The badge shown is a PROP badge bought via eBay. It is the same one used in the hit TV series NCIS. Again, the pistol, a Glock 17, is Airsoft and unloaded.
So that is what the back of my head looks like. Believe it or not, the shirt and pants match in color almost exactly. For some reason, as you will see below, in these photos, they look quite different.

I am a big supporter and fan of our nations Border Patrol agents and all the hard, hot and dangerous work they do. The National Geographic Channel has an excellent show titled BORDER WARS. It clearly portrays real agents doing the seemingly impossible task of stopping people and things (guns, money, drugs) from crossing our borders, of which we have many. 

I saw the following shirts on eBay and bought them. The blue one and black one are genuine CBP items. HOWEVER, they are not worn on duty. Watch BORDER WARS and see what they actually wear. So how I appear below is only a fan's way of supporting those hard working Americans that put their lives on the line everyday.
The HAT is genuine, I bought it from Guide Gear. The badge emblem on the shirt is what they really look like. The ICE ID is another PROP bought via eBay and wouldn't fool anyone.
Reading the back of the shirt, I do wonder what it IS for. 
See how the shirt and hat look almost brown? They are just as green as the pants. Weird. The hat is NOT genuine, but the patch is. Bought it, oddly, from a company that sells flags. Weird, again.
The image below has the other genuine CBP shirt. It too was bought via eBay. SRT stands for Special Response Team. A much more PC term that SWAT. The shirt is way too big for me and so, I put my vest on underneath. The vest is an out-of-date stab-proof vest NOT a bullet-proof one. I suspect prison guards must have used it. 
So, there you have it, my Walter Mitty (Google that name) moments when I dressed up as our Nation's Finest. Next stop is photographing the items all separately for future sale on eBay, except for the tee-shirts, of course.

One final photo for you to enjoy. A beautiful young woman named Liah that works at our local grocery store. She is as nice as can be and I shot this a couple days after Halloween. The long hair is costume hair attached to what appears to be a headband. Isn't she gorgeous?
She was actually blushing when I shot this. Surprised that I would want to take her picture. Well, the world could stand to see more beauty, in it's many forms.

Thanks for looking (and not laughing) at my one-and-only effort at being in front of the camera.

Scott 
  

Have a photo studio in Your home....on a budget!

Gentle reader,

I want to thank you all for your continued viewing of my blog. With all there is to see on the Internet, that so many of you have taken the time to read what I've written and view the accompanying photos, it truly humbles me. It's well over 85,000 page views so far!

I was given a cheap plastic camera as a child in the late 1960s. It used what is called "roll film" which is 70mm wide and has a paper backing. One loads in into the camera, closes the back and then winds it until "1" appears in the small red window in the center of the film door on the back of the camera. I will look in a bit to find a picture of one like it that I once had in my camera collection.* That ANY pictures turned out from my young hands and that cheap camera astounds me. But the photos did turn out.

My wife and I (we are both in our second-and-final marriage) refer to the times of those unions as, "In a former life.....". So, in a former life all we could afford was a simple 110 film camera. 110 film is 16mm wide and also has paper backing but like it's larger predecessor, 126 film, is inside plastic cartridges that simply dropped into the back of their respective camera's film door. One winded it until "1" appeared in the window. Most 110 and 126 film cameras automatically stopped at "1".

It wasn't until April, 1995 after our divorces that I was finally able to buy what I called a "real camera", a 35mm SLR. It was an Olympus OM-10 with a 50mm f1.8 lens and generic flash. Cost me $100 at a pawn shop. (One similar to it is pictured at the bottom of this post.)

Fast-forward twenty-one years and hundreds of cameras (yes, hundreds, see the bottom of this blog page to see most of them) later, I now have five or six digital cameras. Only one of which is a DSLR, a Nikon D70S. In digital terms, it is ancient, only 6.3 megapixels. Nonetheless, since I seldom print photos and can only print 8 1/2 by 11 pictures, that is plenty.

When I had only film cameras, I experimented with home studio photography. I made a background cross bar from copper water piping and used two matching light stands to hold the bar and the blue fabric background fabric. I won't go into what was involved in setting everything up back then, but it was a lot of steps, including ironing the background!

Whew! That all being said, I will now show you how you can set up a photo studio in your own home in a bedroom or other small room. On the cheap. Below is the background and attendant pieces to hold it.
You probably recognize this as the den or "listening room" as I like to call it. The stereo components are behind this background stand arrangement. The background components, except the seamless paper, all came in a kit in a nice fabric bag via eBay for less than $30.00, shipping included. I was skeptical about the quality for that price.

Simply type "background stand" in the search bar on eBay on under the "Cameras and Photography" category and literally hundreds of choices will appear. I wanted to buy it in the USA and found several sellers offering the EXACT same kit here with free shipping as the multitude that were in Asia. I chose one that is seven feet tall by five OR ten feet wide. It arrived quickly and I was well pleased with the quality and sturdiness of all the parts of it.

"Seamless paper" is what I have unrolled from the crossbar. It was given to me by a friend some years ago and I have never tried it until today. Here is the first picture I shot:
It is brighter than the one above because I had zoomed in and more of the light hit the subject and sensor as a result. However, for people pictures, one needs to orient the camera vertically to better fit the sensor and thus use more pixels for the subject and less needed to crop.
There are MANY "studio" flashes available and I had used many back in the day. Below is what is now a vintage flash from a long defunct company:
Those clever readers will note that Spiratone (the J.C.Whitney of the photo world then) used four shoe-mount (slides on the adapter on top of the camera) flashes arranged north,east,south and west around the opening for the "model light" socket hole. The model light is used to set up the flash without having to shoot some pictures, develop and print them, etc. Remember, these are from LONG before digital cameras were ever even dreamt of.
There would be a power cable plugged into it on the lower right and a "Sync cord" from the camera's "PC" socket. No, that does not mean "politically correct".
Here it is from the side. That silver doohickey on the bottom slips into the angle-adjustable adapter that fits atop a sturdy light stand.
Above and below, you can see it attached to the light stand and the 60 inch reflector umbrella is held by the adapter as well.
You may be thinking, "Since you have this fancy flash, why aren't you using it?" Because my modern digital SLR camera is not equipped with a PC socket and big flashes like this can tend to have more voltage when they fire than what the camera is designed to handle with a top-of-the-camera mounted flash. Thus, one could fry the circuits of their digital camera. Provided one could even figure out how to set their DSLR up with the right aperture setting and such an ancient flash. 
"So what IS the answer?" I'm glad you asked. First off, you will need a light stand and an umbrella holder-adapter attached to it and the aforementioned flash umbrella. Many companies make all of the above and sell them for a wide variety of prices. EBay is my go-to source for many things, so I recommend looking there first. ALSO, you will need a tripod, a Digital SLR camera and the correct flash for it that reads the flash off the sensor, this is called "TTL" for Through The Lens which most modern cameras do have. The flash MUST be able to rotate AND tilt the flash head in order for the use of a reflective umbrella.
See how I set it up below for both horizontal and vertical flash uses. The first picture below shows it set up for vertical shots. The flash head is rotated and tilted to aim at the center of the umbrella.

The device that is attached to the camera and tripod is something I came across years ago and set up for this tripod. Tripods are designed to allow the camera to tilt, as this one does to, but I like my device better.
You can clearly see the lightstand adapter on the left above and the umbrella's shaft coming through it.
My wife and I have almost opposite work schedules, so unless this Nikon has a self-timer, I'm going to have to wait until we are both home to make the images of one of my collections for a future edition of this blog. Why? Well, I'll be wearing the collection. So you will finally get to see what I look like.
To conclude, you will need: A digital SLR camera and lenses, dedicated flash for it which has a rotating and tilting head, a sturdy tripod for both, a light stand and adapter for an umbrella and a flash-reflecting umbrella. Plus, of course the background stand kit and either seamless paper or a fabric background. ALL of the above one can find on eBay and elsewhere on the Internet.
Good luck in building your home studio, and once again, thanks for looking!
Scott 
*I promised a picture of a green plastic camera like I had as a kid, and here it is:
It was actually more green than this photo shows, too much flash, ironically! They were sold as a Sears model as well. Since I've added this, below is an Olympus OM-10 like my first "real" camera:
'Tis the one on the right. Actually, mine was "chrome" on the top and bottom. This all-black one was a little more expensive when new. Also, the dial-thing on the right side on the front was an option and allowed one to choose the shutter speed. 

Vintage Racing at the new Dominion Raceway, Virginia PART TWO

Gentle reader,

Yesterday, I began this series about the new racing facility in Virginia, USA called Dominion Raceway. Dominion Raceway & Entertainment 

I met my buddy there to check out DR and enjoy the vintage sports and formula car racing. It is continuing AT THIS MOMENT (9:50 AM, October 23, 2016). It is a three day event that begins on Friday with practice and qualifying. Usually one can attend Friday's practices for free.

I was interested in which cars were going to be racing, being 60 years old and a lifetime "Car Guy", I will always be interested in vintage racers. So cars that one oohed and ah-ed over as a kid obviously will be the hot ticket. So far, DR has not attracted that expensive crowd.

As I wrote in PART ONE, there are some cars there that appear to be the genuine article, the Datsun 240Z possibly raced by Paul Newman and there is a Triumph #44 possibly raced by Bob Tullius. But we never spoke to either driver or crew. So they may be tribute cars.

There is vintage car racing in probably every type of racing. Only so many types interest me: Sports cars: starting with the top classes which are/were called Prototypes. Current and past open-wheel racing, Indy, F1, etc., hold no interest for me. The pinnacle race in all the world is in France and is called 24 Hours of Le Mans. The car makers with deep pockets spend huge amounts to create and race these cars: Audi, Porsche, Toyota, Nissan, Peugeot, Renault and others in the ultimate P1 class. Audi and Porsche have to most wins at Le Mans. These types of vintage racers will appear at the iconic venues, Le Mans (for the Classics, every other year) Laguna Seca, and other circuits that they raced on back in their day.

At Summit Point I have seen Ford GTs, including Mark 4s, Porsches (a 910) and Ferraris from the 1970s and earlier. But that is the closest venue after DR with Virginia International Raceway a lot further down the road. We hope to see more and faster cars in the future at DR.

So, let me continue with the cars that are/were there. Normally, open-wheel racing has no interest for me as I said. But the vintage Formula Fords and Formula Vee (Volkswagen) do. Below is another of the former. Note the Australian flag sticker.

 Not a lot to them (above) is there? Lightness equals speed. Safety wasn't much of a concern.
 We spoke with some FF drivers, there are two types: HF for Historic Ford, 1972 and earlier, and CF for Classic Ford; 1973 and newer. They told us VRG requires treaded (verses slick) tires which slows the cornering speeds. So lap times are slower but also the chances of losing control by "overcooking" it in a corner are lessened. Because the drivers know the tire's limits.
 In previous years, I saw a lot of this type of racer. This car is painted in Gulf Racing colors.
 The owner/driver said he was surprised there were no others there. His runs a Ford Pinto four cylinder engine putting out 140 horsepower. Not much, but the car weighs only 1100 pounds!

 Here are more shots of the one-and-only Spitfire there.
When we saw this car a little later, they were bleeding the brakes. They had failed in the last race which explains why he was going so slow.
 There were only two Formula Vee racers there so they raced with sports cars. If you know vintage VWs, you can see it has VW suspension and drum brakes. A tube frame chassis and the engine is BEFORE the transmission, thus mid, not rear, engined.
 The car featured below had already raced twice when I made these shots. It is an MG-B GT V8.
 GM produced an all-aluminum V8 engine in the early 1960s. WAY ahead of it's time. It was very light and small displacement. 3.5 liters. Used in smaller Oldsmobiles and Buicks, if I recall.
It had problems so they sold it and all the rights to build them to British Leyland.
BL fixed the problems and have been making and selling cars and SUVs with versions of them for decades. GM execs tried to buy back the rights from BL, but they declined.
Most MG B roadsters and GTs had the venerable cast iron four cylinder engine.
The MG-C GT had a cast iron inline six cylinder engine.
This V8 from the factory weighed a little less than the four cylinder with a lot more power.
The owner of this car went all out. That is a "cross-ram" intake manifold with four two-barrel Weber carbs. Makes serious power from such a tiny engine in a tiny car. And WHAT a sound!
That's my buddy taking a closer look at the engine.
 I like the looks of this car, very much so.
Next are sports cars lining up on the "false grid" prior to a race. Called false because it is on the pit row, not the actual race course. Starting with one of the two very pretty Corvair Stinger racers. The engine of the one of these was featured in PART ONE. #73 is on it's way to the grid.
 I am among many that really like the later model Corvair and it's looks.
 Another look or two and some of the Datsun racers seen in PART ONE.

 This is a good comparison of the Datsun 510 and BMW 2002.

 I don't know why I shot so many Pinto pictures.
 The BMW above is an early 3 series, not a 2002. I think.

 This is the only Mustang racer there. It has a V8. Sounded great, but never finished very high.
 Again that MG-B V8.
I made many shots of the cars in the false grid, as you will see.

 Quite a mixture of cars and engines. No logic to it to us, but they competed well.
 #202 and the other yellow BMW 2002 were always at the front......
 The cars below were/are in the under 2 liter class along with the 2 Formula Vee racers.
 The car above is an Elva.
 I don't know why this fellow above and the woman below were "guarding" this Sprite and Midget.

 Below, the Sprite's guard sprinting to get out of the way. #212 is a Fiat 850 with an Austin Healy "Bug-eye" Sprite behind it.
Below, a close up of the happy looking older Sprite.
 Can you sense the butterflies in the bellies the as the drivers await the start?
 Below are Formula racers all under 2.5 liters. All Fords? I don't know.
 Number 20 is a Classic Ford like I explained in the text earlier.
 That pointed nose is about one inch off the pavement, or "tarmac" as they call it.
 The shot above shows just how LOW these race cars are!

 I love these two shots. It happens when a very long lens is used. The objects seem to be much closer together than reality. Pretty cool, huh?
Next, are action shots. I did not take too many as I did not bring my Nikon DSLR.
 The previously mentioned #44 Bob Tullius Triumph leading a pretty (and one of my favorite cars) Triumph GT6. I never saw it in the paddock or I would have made more images.
 Above and below are two MG-B racers. The fellow below in #329 made the roll bar high enough for a basketball player to drive it.

 These two yellow BMW 2002s were constantly swapping the lead.
 This shot and the one below are from the first lap. I love the way the Datsun, Corvair and BMW, above, are stacked tight and on the "racing line".
 Above shows the other Datsun 510 that may have been a BRE racer (left side) and the other Porsche 914-6 (green one) between the blue Alfa and red Pinto.
 Above, two bellowing American V8 engines. Only one in an American car.
This tiny Mini surprised us by passing everyone and taking the lead for many laps, only to be passed on the last one. Small but mighty.
 Two of the three pace cars. They also have a brand new Chevy Impala. The one below is on loan from Summit Point.
 These last shots conclude my coverage, but not my thoughts, of the Vintage racing weekend at DR. Below are the two Corvair Stingers again.

 I have these images in PART ONE, but am showing them again. Corvairs had three engine choices: Two carburetors that made 110 horsepower. The sticker on the left air cleaner is from a 110 engine. This one with four carbs which put out 140 horses and the Turbocharged models. The early ones put out 150 horses and later ones, 180.

 The one and only Ferrari there, a 365 GT4 with a flat-12 engine. That's like two Porsche 911 (or Corvair) flat-6 engines end-to-end.


 The one-and-only Shelby there. An early GT350 from 1966.
 Back in the day, each country had it's national racing colors: Italy was red, England was green, Germany was silver and the USA was white and blue.

 Above and below, my favorite Volvo wagon the V70R. Turbocharged 2.5 liter FIVE cylinder engine putting out 300 horsepower and 300 pound-feet of torque. Plus, all-wheel-drive.
This had towed a race car to the races. As low as a V70R sits, that surprised me.

And now, my final thoughts. I interviewed some of the drivers, this, of course was their first time at DR too. Most liked it very much. Some complaints about the racing surface,  and the many walls DR put up, some VERY close to the course which made for some literal and mental tight spots while racing.

DR, like VIR and many other racing circuits that are popping up here in the USA and abroad offers memberships. For? To drive and/or race whatever lap-worthy car you might have. Eventually there will be garage spaces and sleeping places for those that can afford them to keep their rides at the circuit.

I LONG to take a lap, but the Porsche (924S), Audi (TT quattro), Camaro (Z28) and Subaru (WRX wagon) are all living with other owners. My Volvo, the V70R's little brother with a less powerful T5 engine, while quick, fast and a great braking car, is still a Volvo station wagon. So handling is not it's thing.

As to the racing, VRG members brought some great stuff. Once the word gets out about the DR facilities, more will come to race. The northern part of the circuit, starting with turn one offers great viewing and we hope for some small stands in the future. All those we talked with had fun racing there and look forward to coming again. My favorite parts aside from the sights was the sounds. The sound of racing engines is truly music to my ears.

Thanks once again for looking. I really appreciate your comments.

Scott

Earbuds In-Ear Verses Over-Ear Headphones Which Ones Sound Better?

 October 8, 2026 #553 Gentle reader, I have been in the best-sounding-enjoyment-of-recorded-music-I-can-afford, hobby for fifty years. I do ...