Review of Spark Models Maker of Sparky Diecast Cars 1970 Porsche 917K Cars

July 15, 2022

#450 

Gentle reader,

I have been a car guy my entire life and I'm turning 66 next month. According to my mother, by age three I could identify every car I saw, year, make and model. I can't remember, obviously, but would she lie?

As kids in the 1960's our parents did their best to try and get us as many presents for Christmas as they could despite Presbyterian Ministers not making much money. That being said, they bought my brother and I an Aurora Model Motoring HO slot car set one year. We LOVED racing, and saved our meager allowances to buy more track and cars. The set included two 1950's Jaguar XK120 cars. One was a roadster and one a coupe. Both had driver's figures in them. I STILL have slot cars and track. Not the original set, though. Our parents decided (without our input) to "donate" a lot of our toys prior to our moving to Colorado in 1971.

I was well aware of endurance sports car racing back then, especially the famed 24 Hours of Le Mans and it's iconic Circuit de la Sarthe. So, when I heard (I have no idea now how I found out back then) that the film Le Mans was coming out in June, 1971, I was determined that Jim and I see it. Mom said, "If you can figure out how to get there and back, you can go." She did not realize my determination. The film was in another town. I somehow got ahold of the regional bus schedules and figured out which buses to take and when. She was so impressed that I did this that she let us go. And as you know, the film was fantastic!

I have this famous photo signed by both Vic Elford and Brian Redman. Brian was one of the co-drivers of car #20 which "Michael Delaney" co-drove in the film.

Sadly, that car did not even finish. His co-driver missed a gear change passing the pits and the engine blew up!

A still image from the filming of Le Mans signed by Vic Elford.

I have written several articles about Le Mans and endurance racing in general and have representative 1:18th scale cars from 1965 through 1970 as seen in these two photos.
I receive daily e-mails from Diecast Direct.com and one day, they showed the #21 and #22 cars from Spark Models in 1:64th scale. I was SO excited, I ordered one of each immediately.
They did not, however, have #20, but I suspected where I could find one, on eBay. And I did. I wanted to set up a diorama which you see here. Not in final form. Note the stickers sheet which comes with it. The fence is metal.

I have wanted all three of those cars for sometime now and these were the most economical way to get them. 

This is an image I found on the Internet of a 1:32nd scale set which I coveted. I do not know who made them.
When I first saw this image, I thought it was taken outside of JW Engineering in the UK. Only years later did I find more photos of the diorama of them and found they are diecast models and the "set" is a picnic table!
The tell-tale photo!

That has all been back story. But you are here to find out about the Sparky models. I have arranged them in various poses below. Then I will show one along side other models for comparison sake and will add some photos of the real car for comparison.
The diorama is sold as "Gulf Racing" and includes many stickers which can be seen in the first photo of it above.
The truck is a Hot Wheels and it does have room for one car inside. In fact, HW just came out with a Car Culture Truck/Car set with #22!


Each stand has the Le Mans drivers' names on it (not visible in these pictures).


The detail is extraordinary for 1:64th scale in this price range.


The diorama set includes eight rubber tires.

And now, some comparison pictures.
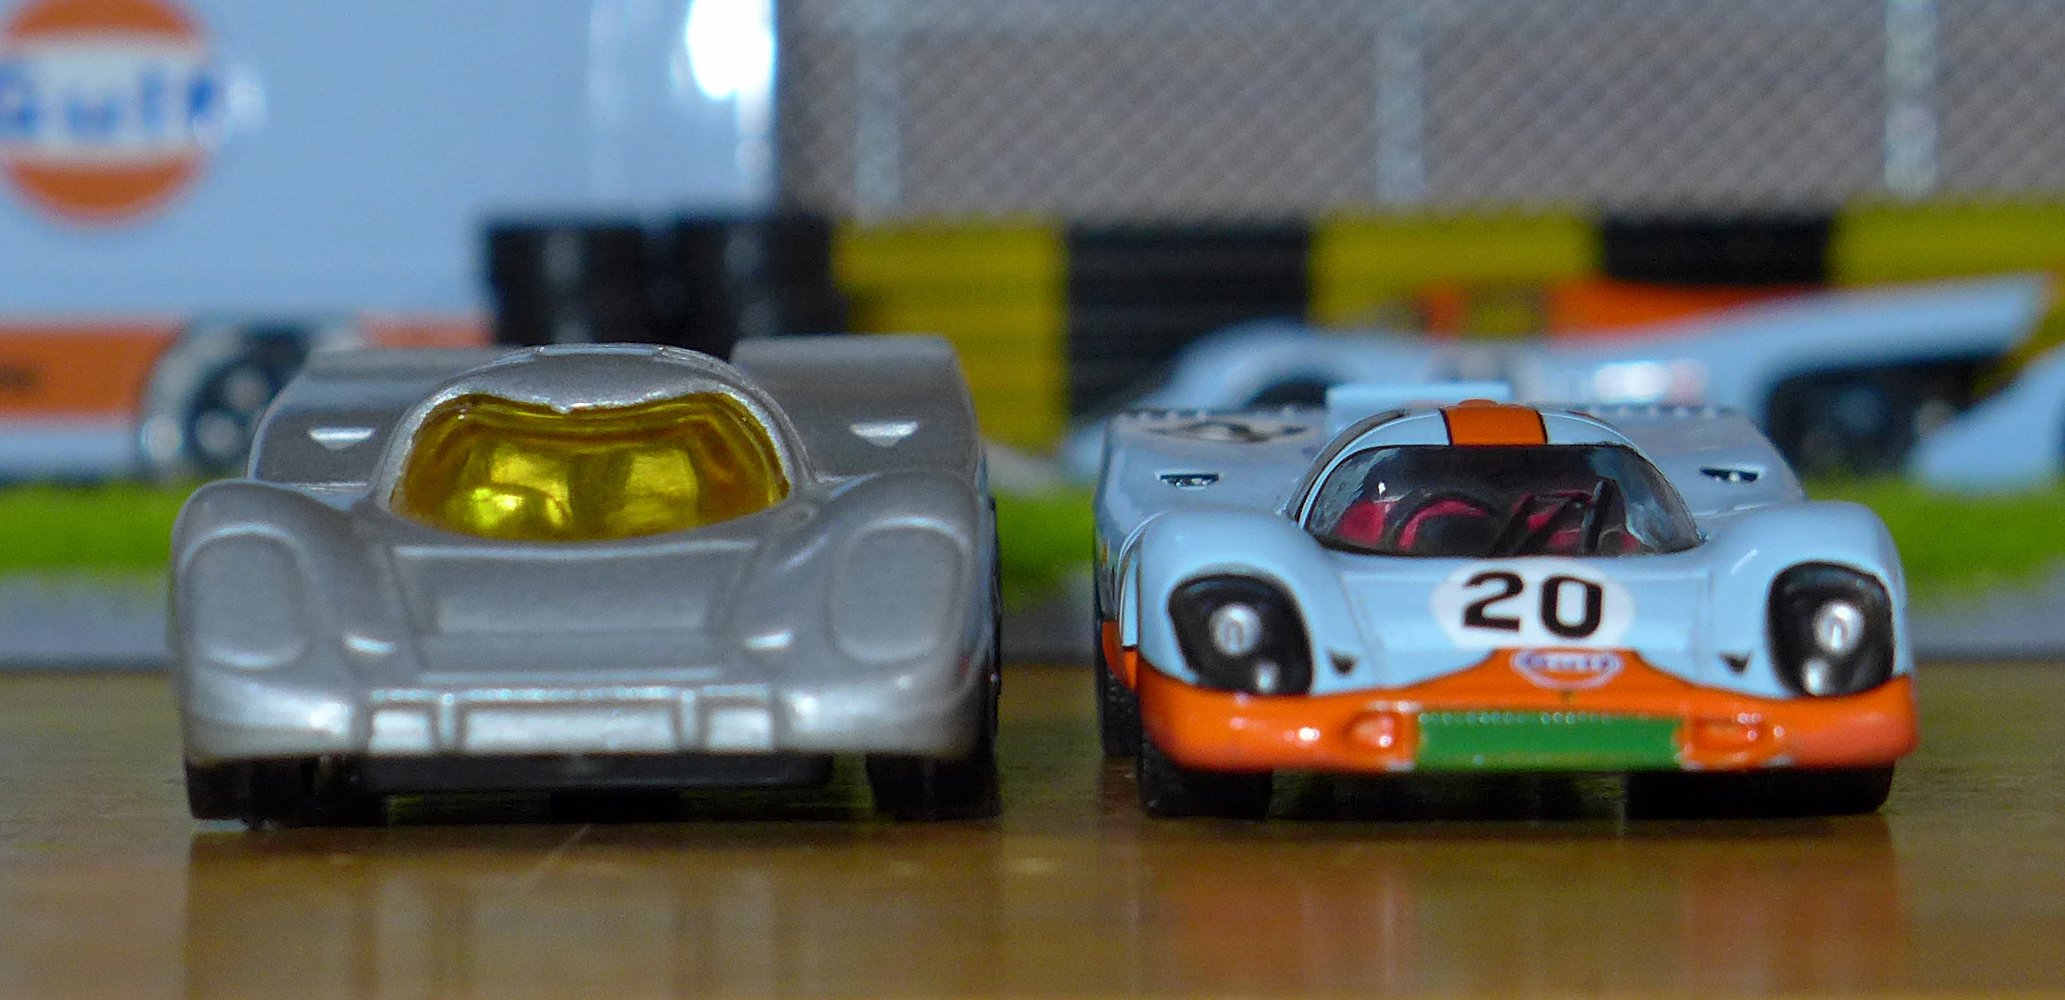
First, let's start with Hot Wheels' latest model, part of a "Car Culture" boxed set which also has a silver Jaguar E-Type, a Mercedes Benz 300 SL and a ramp truck.

Note how much smaller the windshield and door windows are. Also, the HW engine has exposed intake tubes on the engine. Overall, the HW proportions just are not right.
WHAT were the HW modelers thinking by molding the wiper/arm into the windshield plastic windshield? Note that the HW car has wider fenders with raised lips, especially noticeable on the rear engine cover.
I was quite excited when I saw this unpainted diecast car for sale on eBay. It's a Corgi Junior "Growler" model make in England.
Some roughness around the front of the roof over the windshield in the Corgi.
One trick diecast makers have done to cars which were made to RACE, is to make a thin ridge on the "tires" which greatly decreases the grip of the wheels, thus increasing speed. 
The Sparky 917's wheels barely rotate. But then, they are NOT toys.
Digital photos really highlight flaws one's naked eyes miss. See the untrimmed metal around the driver's window on the Corgi?
Overall, the Corgi is not bad, especially for when it was made.
The photo below, recently placed on the Facebook Group 917 The Legend page is from the era, either 1970 or 1971.
I JUST noticed that this car has added on front fender flares around the wheel openings. But, the point of this photo is the WIDE rear fenders of the 917K.

In Spark Model's defense, these two 1:18th scale models differ significantly. Both are supposedly 1970 bodies. #2 is a Universal Hobbies model of the winning car at Daytona in January, 1970. Nothing opens on it. #20 is an AutoArt model of the most famous of the 917s. NOTE the differences of the rear fender's shape. Also, the UH fan is two colors indicating metal, they are fiberglass and a sort of beige color.
Drones-eye-view of a 917K.
A real five liter 917 Porsche engine in the car. Note the color of the fan and panels around the intake tubes. The rain covers are not in place.
The driver's size and how much of the cockpit he takes up gives us and idea of how small the cars really are.
These photos show how far the tail of the engine cover extends beyond the rear tires.
Those massive eighteen-inch wide tires!

Back to the review of Spark Models Sparky Porsche 917K models. 
This Ford GT40 is an example of "artistic license" used by model makers. The mold is actually a Mark I from back when they were just called Ford GTs.* Note the two cutouts around the number 40 on the "hood" of the car. Also note the narrowness of the rear body. 

*The press dubbed the cars "GT40" due to the car being forty inches high. 
The Porsche 917 is thirty-six inches high! And they are tiny compared to a 911 or other street sports cars.


That is because it is the SAME model shown here. Number 72 is the very FIRST Ford GT to WIN a race in 1966. Autoworld made both. This one for Car & Driver Magazine.
These are my four generations of Ford GT race cars, newest to oldest. #33 is a Mark I (W). I have added the "W" to indicate the widened fenders to accommodate much wider wheels and tires. By 1968, since so many had been made and sold, the Ford GTs were simply sports cars and not "current" prototypes. #4 is a Mark IV, from 1967. #3 is a Mark II. They had 7 liter or 427 CI big block Ford NASCAR engines in them compared to the 5 liter 302 CI small block engines of the Mark Is. #2 is an original Ford GT from 1965. They had wire wheels then, narrow tires.
This is a Mark I Ford GT cutaway drawing. A later version since it now has Halibrand magnesium wheels and not wire ones. Note the white/blue American Racing colors.
And this is a Gulf Oil advertisement with a cutaway drawing of a Porsche 917K with technical specifications.
Above is a cutaway of the UR (original) Porsche 917LH. Below is another cutaway drawing of a 1970 917K Porsche.

Back to comparing JW Engineering's Gulf Ford GT to Gulf Porsche 917K models.
Both are true 1:64th scale and both are the same livery, same team. Just different eras.

From an earlier article in which I compared these two representations of the same car, the only chassis to win Le Mans TWICE in a row: 1968 and 1969. Again, by then, Ford GTs were just sports cars and not expected to win against the latest Porsche prototype race cars. NOTE how wide the fenders are compared to the 1:64th model above. And, also do you see the single opening in the "hood" for the hot air to extract from the radiator?

To demonstrate what I wrote about the Porsche prototype racer's SIZE, here are three photos of my #20 next to a 1985 Porsche 924.


The 917's tires are MASSIVE!
Here are two photos to show how LOW the 917s and other prototype racers were (and still ARE) compared to street cars. 
Both photos were take at SPA in 1970 at the same corner by the same photographer. Part of a series of photos recently posted in the same Facebook group I mentioned above.

My conclusions are that the Sparky Porsche 917K models (other liveries are available including winning cars) are excellent representations on a tiny scale.

Thank you for taking the time to read my article. My blog is something I love to do and still cannot believe how many people read it, not that this is my 450th one!

Feel free to comment below on on Facebook. Some readers have made friends with me via Facebook which greatly humbles me. I thank you, my friends.

Scott Robb
June 15, 2022
#450

Two Ways to Modify Datsun 510 Cars in Forza Motorsports: Traditional and Pro-Street

 June 9, 2022

#449

Gentle reader,

I have been simulation racing for a number of years now. Nothing serious, console-based, but always with a steering wheel and pedals, shifting for myself. Just like driving my real rides. My car has a six-speed manual transmission. 

Speaking of driving, I've been doing that for almost fifty years. As a kid I knew what I wanted "to be" when I grew up: An auto mechanic.

So, I attended tech school in the afternoons of my junior and senior high school years. In the mean time, I got a job at a Mobil station. Or rather, a job reached out to 16-year-old me.

I came home to find a note, written by one of my sisters, to call, "Urmer Bosim". I had no idea what or who that was. Turns out, he spelled his name, Ermer Bocim. He called himself, "A Polack and proud of it."

He was the owner of said Mobil station and a customer who attended our church recommended me to him. I never found out who that was.

But, I digress. I do that sometimes. THIS article is about one of my favorite activities involving one of my favorite cars, real and virtual. The 1970's Datsun 510.

It was the little brother of the iconic 240Z. A sedan, or wagon version of the sports car having 2/3rds (1.6 liters) of the 2.4 liter six cylinder engine of the Z car. Four-wheel independent suspension (except the wagon), unheard of in an economy car then. Front disc brakes too.

And yes, I drove a real one. A two-door in kind of an orange color. Manual transmission, of course. Dad needed an economical car to commute over the weekends to and from Washington, D.C. We had a 510 on the used car lot at the Chevy dealer I worked for. He bought it. On weekends, whenever possible, I was canyon carving in Dad's car.

These are 1/24th scale models of two Datsun 510s. The one on the left is the same model and color of my Dad's, but Pro-street. To the right is another Por-Street car, but painted up in the livery of one of the winningest SCCA racers back in the day.

The first 510 diecast I bought was a kit. Little did I know, that it had no interior, only the hood opened, AND, it did not include a complete engine. No ignition system and only two cylinders representing the two carburetors that should be there!

This is a photo of JDM twin Datsun 510 carburetors and their intake manifold. These have aftermarket (not stock) air filters on them. So, imagine twenty-four times smaller and plastic versions attached to the engine above.

So, I bought this model which has a later model (and turbocharged) Nissan DOHC engine in it. A common upgrade in the field of Pro-Street.
Although this is only a molded one-piece representation of the engine bay, it too has a similar engine. Plus a strut brace.

SO, getting back to modifying the cars in Forza Motorsports. I have always modified the stock Datsun 1.6 liter SOHC engine just as the racers did back in the day. I go no higher than B Class (from F) with the car. 

Believe it or not, this is a MODEL engine bay of the BRE Datsun 510 SCCA racer! SUCH detail! Those are twin Weber two-barrel carburetors on it. No air filters as race cars often do not have them.

The engine is kind of buzzy at higher RPMs, and the car could be faster at the top end. BUT, the car is so LIGHT to begin with, and with full roll cage and removing all the unneeded weight, it is even lighter, so I always stuck with the stock engine. Kind of a purist.

I thought about it and finally decided to try an engine swap making everything else the same, except the wheels. Check out the performance specs below.

This is the Benchmark Page for the car with the SOHC engine. Note the specifications. Good acceleration, great cornering, but it tops out at just under 140 MPH.

Now, the DOHC four cylinder engine's specifications, above.

The zero-to-sixty acceleration time is DOWN by 1.339 seconds. Yet, the Zero-to-one hundred time is faster by 0.413 of a second. Not much, for sure, but it's a difference. And you KNOW, from racing how much of a difference seconds make in race results.

Now, look at the cornering figures. The red, white and blue BRE Datsun has cornering ability OVER one G. Yet, the engine swapped 510 cornering ability is way down!

Why? They have the same width, diameter and type of tires on both cars. The wheels are different, but both weigh about the same. So, un-sprung weight is not a factor.

The answer? TRACTION. The twin-cam DOHC engine, while still in B Class is much more powerful than the fully modified stock SOHC engine. Resulting in a TOP speed of almost TWENTY miles an hour higher!

The rear tires, despite my having installed a limited slip differential, just cannot get a grip with "normal" race acceleration! I found that I had to "roll onto the accelerator pedal, rather than nailing it with this engine.

I had not even test driven a 510 with this engine before, but took it right to the FULL Twin Ring Motegi circuit for the B Class championship races. 

I immediately discovered the wheel spinning and lack of cornering ability and restarted the race after the second corner.

I was easy on the throttle until the car was going well. I kept it in at least third gear on all the corners. The DOHC engine's torque was strong enough to accelerate in third with minimal wheel spin. I found that the car PULLED away from the other AI cars on every straight, but they often caught up to me because I had to corner slowly and carefully to avoid excessive oversteer. I was able to make 2.22 laps doing that. 

"OK," I thought, "Let's hire a driver and see how the AI does." Riding along in the 2nd heat, the AI was often shifting all the way down to first in the slower corners, even though the car was traveling forty or more MPH at the time. Not something I often do unless the car is in a really low (F or E) class. The AI found that it had to immediately upshift to second each time. Nonetheless, it was past all the other cars ahead of it by the end of the first lap and won the race with a 2.19 lap time.

While on the subject of TOP SPEED. I have ALWAYS installed front spoilers/splitters and rear spoilers/wings on my cars. ALWAYS. Yet, there is one drawback to doing so: TOP SPEED.

Those wind cheaters, while providing downforce to aid in higher cornering speeds, ALSO cause DRAG which results in ten to twelve or more MPH SLOWER top speeds. 

On some small tracks, that makes no difference. But on courses with long, high speed straights, it makes a HUGE difference. 

Go ahead, try this experiment for yourself. See what your results are. Especially top speed. 

HERE are the CAR modifications I ALWAYS do: Race brakes, lowering the car fully, stiffening the suspension with the heaviest anti-sway-bars. Full roll cage. Completely removing all excess weight. The lightest flywheel. Race clutch. Full-race six-speed sequential race transmission. Carbon fiber driveshaft. Two-way rear differential. 

Then, depending upon the class I am trying to keep it in, I then start modifying the engine. Beginning with: Fuel Injection. Race intake. Race Exhaust. Then, depending upon how high a class I am taking it to, other engine modifications. I rarely do engine swaps. But if needed, I supercharge or turbocharge the engine with a race Intercooler.

IF, you chose to let Forza do quick class upgrades, that's fine. But, my history of having been a mechanic and a longtime racer, it gives me joy to modify the cars with my own choices. 

I would rather race a fully-modified (but still IN class) OLD car, such as a Chevy Corvair, or VW Karmann-Ghia, or Datsun 510 or 240Z (Fairlady) than choose any puddle-jumper front-wheel-drive economy car. Plus, it really pisses off the AI cars when I show up in my racy old car. Seriously, they crash into me right at the start of the races!

Thank you for taking the time to read this article. I LOVE simulation racing, but am fully aware of my limits and thus happily stay with Forza Motorsports 4 on the Xbox 360.

Scott Robb

June 9, 2022

#449

Recreating a Suburban Dry Creek to Control Rainwater Runoff.

June 27, 2022

#448

Gentle reader,

It has been a month and a half since I have written for you. Mainly because we are transitioning from acquiring things to getting rid of them so that our adult children will not have so much to deal with when we are gone.

While we both still collect, we are much more cognizant of finding room for new things by removing older ones.

That being said, this article has nothing to do with collecting, unless one counts rocks and stones.

A note on photographs within this blog. If you click or tap on any, they will enlarge to make it easier to see details. THIS photo is a panorama made from three photos taken from one location. As a result, the dry creek appears to curve, which it does not in reality.

Let me start with photos of our backyard after a heavy rain with the original iteration of the dry creek.

As you can see, the dry creek was quite a bit narrower than the new version seen in the panorama photo above.

It has two trees in the middle of it, the one above has since died, so we cut it down and removed the stump. There is vegetation growing in the creek as well. This was not anticipated by us. Rain washed soil and silt down the hill into the creek as well as pollen, leaves and other tree debris settled between the rocks and stones. Plus, there was nothing to keep the water from leaving the bed of the creek.

That metal structure had supported a fabric and screen tent-like enclosure which we had sat inside, enjoying the weather and our pond. The pond was gone by the time these photos were made. Note how deep the water is over the flat stones.

Note, also, how the water flows towards the fences and makes a right turn, following the contours of the land.
It exits the backyard to the left of the tall grass and flows down the driveway to the gutter.
I have since found a better place to store the ladder. It was left by renters next door and the owner offered it to me. It's a long and heavy ladder, much stronger and taller than the one we already owned.

The pond we had installed was surrounded and fed by a huge number of stones we had purchased as well as all of the large ones which were found for us by our sons. 

When we removed the pond and filled the hole back up, we had a LOT of rocks/stones piled up which gave me the initial idea to make a dry creek. The metal structure was also removed and the metal recycled.

The willow tree seen here, to the right of the "deckette" was a Corkscrew Willow we grew from a cutting. Since it did not "know" it was not still a branch, it grew to "weep". Sadly, removing the pond was the death knell of that little tree.
Looking up the dry creek from next to the deckette. Note how many rocks/stones are piled upon others, just as they do in real rivers and creeks.

While we did put weed blocking fabric down before we put the thousands of rocks and stones down, as previously stated, Nature did it's thing, determined to fill the gaps between the rocks so that plants could grow.

The tall tree in the creek bed above and below, is also a Corkscrew Willow. Sadly, something killed it, ending many years of enjoying it's beauty.
Above is another panorama photo, taken from a different angle, showing most of the creek and the garden Nancy decided to put in the middle of the yard. 

This fisheye photo, taken during the rain, from the Listening Room's window, shows the stark difference from the one above it. You can just see the stump of the willow in the creek. Our largest oak tree which was part of a copse of woods left by the developers in 1987, had died. 
It was HUGE and the tree surgeons recommended taking down the Tulip Poplar next to it since they are fragile trees. The only good that came from that is the Giant Sequoia now receives much more sunlight that was blocked by the willow.

Another fisheye lens photograph of the new fabric in place. I was not going to let nature try and cover it up this time!

A couple years ago, I painstakingly removed, by hand, EVERY ONE of the thousands of river rocks and stones, placing them all on the deckette. Vowing to redo the creek and make it better. We did not keep track of how many 50 pound bags of river rocks we bought to make the creek. But it was a lot of them. 

Finally, I was determined that 2022 was going to be the year to do just that. Armed with 100 feet of quality and wider weed block fabric, I removed the old fabric and all the debris that had settled on it. I first had to remove all of the large granite and quartz rocks which bordered the creek. I laid out the new fabric, starting with the 48" wide roll at the bottom end of the creek. I employed more than 100 fabric "staples" designed to hold in place this type of fabric.

These three photos, taken with an 18mm lens from the deck, are the ones which were merged to make the panorama photo at the beginning of the article.
I bought twenty 50 pound bags of Sacrete quick setting concrete mix and had them delivered. That's 1000 pounds. We knew it was not going to be enough, but had to start somewhere.
This photo shows how far thirteen bags and many hundreds of stones covered. This time, I put the concrete mix between all the border rocks to discourage inflow of silt from the hill and keep the water in the creek. Also, larger river rocks were cemented in front of the large rocks to further deter the water. Note how many stones remained on the deckette after we finished. We were afraid we might run out since the creek is so much wider than before.

We took both our cars to Lowes and bought twelve more fifty pound bags of concrete mix, another six hundred pounds total. It took nine bags to make it to the neighbor's fence. For a total of 1,350 pounds of concrete, PLUS the weight of the countless rocks and stones. This creek is not going anywhere!

Nancy was now home for the weekend and anxious to help me finish the creek. She is QUITE the hard worker! Without her invaluable help, I might not yet be finished. Note, how much wider the creek is that the previous version.
To my surprise, we had some large rocks left over, so the grouping seen here, covers the bare earth where the willow stump had been.
Try and wrap your mind around this. EVERY SINGLE ROCK AND STONE you see in these photos was HAND SET into the concrete mix, one-by-one! Whew!
Unlike the previous version, there is only ONE layer of river rocks. Each pressed into the concrete mix which was around an inch and a half to two inches deep.
I deliberately left this area open because I need a path to get the lawnmower from the lower portion of the lawn to the "upper forty" as I call it.
We had previously built this "wall" to capture the silt from the hill.

As the huge pile of thousands of rocks and stones lay upon the deckette for a few years, Nature continued to drop dust, sticks, leaves, pollen and other things which formed soil between and beneath the rocks. We found one ant colony and a number of large earth worms which really were enjoying living there. We relocated the worms to the grass. This debris had to be removed, by hand, from all of the thousands of rocks on the deckette!

We have three bags of concrete mix left over. I am going to make a "sifter" out of steel screen with 1/4" square holes in a wooden frame over the wheelbarrow. I will carefully pour the concrete mix bags over the screen to remove the small rocks. Then, using a lawn seeder spread the remaining 150 pounds over the the bed to fill in between the rocks and stones. That's the plan anyway.

Thank you for taking the time to read this article. It is is prime example of how putting off things one knows are going to be a lot of work can complicate that work with things that would not have been present had the work be done sooner rather than later.

Scott & Nancy Robb

June 27, 2022

#448

White Van Speakers. Who Fell Victim to those Sneaky "Salesmen" Back in The Day?

  July 10, 2026 #459 Gentle reader, There is an interesting Audio-Equipment-History YouTube channel called "Multimedium". They mak...