Gentle reader,
As you know, I like to experiment with things, cameras, stereo equipment, speakers, cars, car racing simulations and more.
I have tried countless speakers over the years, many sounded great. But like so many audiophiles (in my case, low-budget) I'm always seeking better sound. It all began in 1975 when I was a teen.
I've tried many interconnects too. Interconnects is the fancy name for the wires that connect your CD player, turntable, tuner, etcetera to your stereo receiver, integrated amplifier, pre-amplifier and power amplifier. Stereo requires two channels, so pairs it is for everything. The terminals on the ends of those interconnects are called "RCA" because RCA invented them. A LONG time ago.
I tried many different brands and have happily settled on Monster Cable's various interconnects AND speaker wires.
That is until I spied these:

I found them on, you guessed it, eBay. The seller makes all the cables, both power and speaker cables plus much more. This is a link to the seller's items page:
Plainly you can see they are intricately braided. I've tried to braid my own in the past and they never turned out like these. He offers them with the choice of banana plugs or these spade lugs.
I referred to these in the blog's subject line as "Budget Kimber Kable 4TC" cables. So, in fairness to Kimber Kable, here is their web page showing their 4TC which are the simplest and least expensive of their "TC" line of speaker cables:
Kimber Kable - 4TC They also make them in 8TC: Kimber Kable - 8TC
and even thicker ones called 12TC. ALSO to be fair, I have never auditioned any Kimber Kable products. Because they are way outside my budget. They ARE well known to be amazing sounding products. In fact, my favorite audio dealer carries many of their products. Here is a link to their page so you can price out your own: Kimber Kable 4TC Speaker Cable-Audio Advisor
That page lists an equivalent pair of genuine Kimber Kable 4TC cables will cost $259.00. Examining the images on Kimber's 4TC page shows different gauge sizes of copper wires inside each strand. I'm pretty sure these budget BLE cables individual wires are not made that difficult and no doubt expensive way.
Now that I have shown you the photo and all the relevant links, let me tell you about these cables. First off, they don't weigh much compared to my Monster Cable M Series or Z Series. And since it would be tricky, (I'm still thinking of doing it anyway) to do an A/B blind test to compare the two, I am only going to give you my non-golden-ears opinion of these cables.
I tried them with all three pairs of speakers in the listening room: My custom modified tiny wooden speakers once known as Radio Shack's Minimus 7W, the Philips MCD908 speakers and my Cerwin Vega! LS-12 speakers.
In each case, I heard a very open sound, lots of distinctness to some of the instruments that I had not heard before. Plus a crispness to the treble, especially cymbals. Altogether a very pleasing sound. The music seemed to come alive and was very engaging. Do I like them? Oh, yes. Very much so! I'm not sure why I specified spade lugs, but I did and here are some photos of them attached to terminals.

Above is the Legend LE412 speaker switch. It turns out this is the ONLY component that actually will accept spade lugs! And yes, the other terminals on the left ARE different than the input ones. The metal portion of the switches 3-way binding posts are very thin and the Nakamichi banana plugs have actually broken a few of them. So, I found I had eight other posts that I could replace them with. They are thicker and required enlarging the mounting holes and sanding down their outside edges to make them fit.

Above and below they are attached to the former 7W speakers. These lugs fit all the speaker terminals perfectly. Note, also how very reflective is the surface of the Philips speakers. As young Dory might have said, "Ooh, shiny! I like shiny."

Hopefully, by these three photos you can see the spade lugs attached to the speaker's 3-way binding posts.
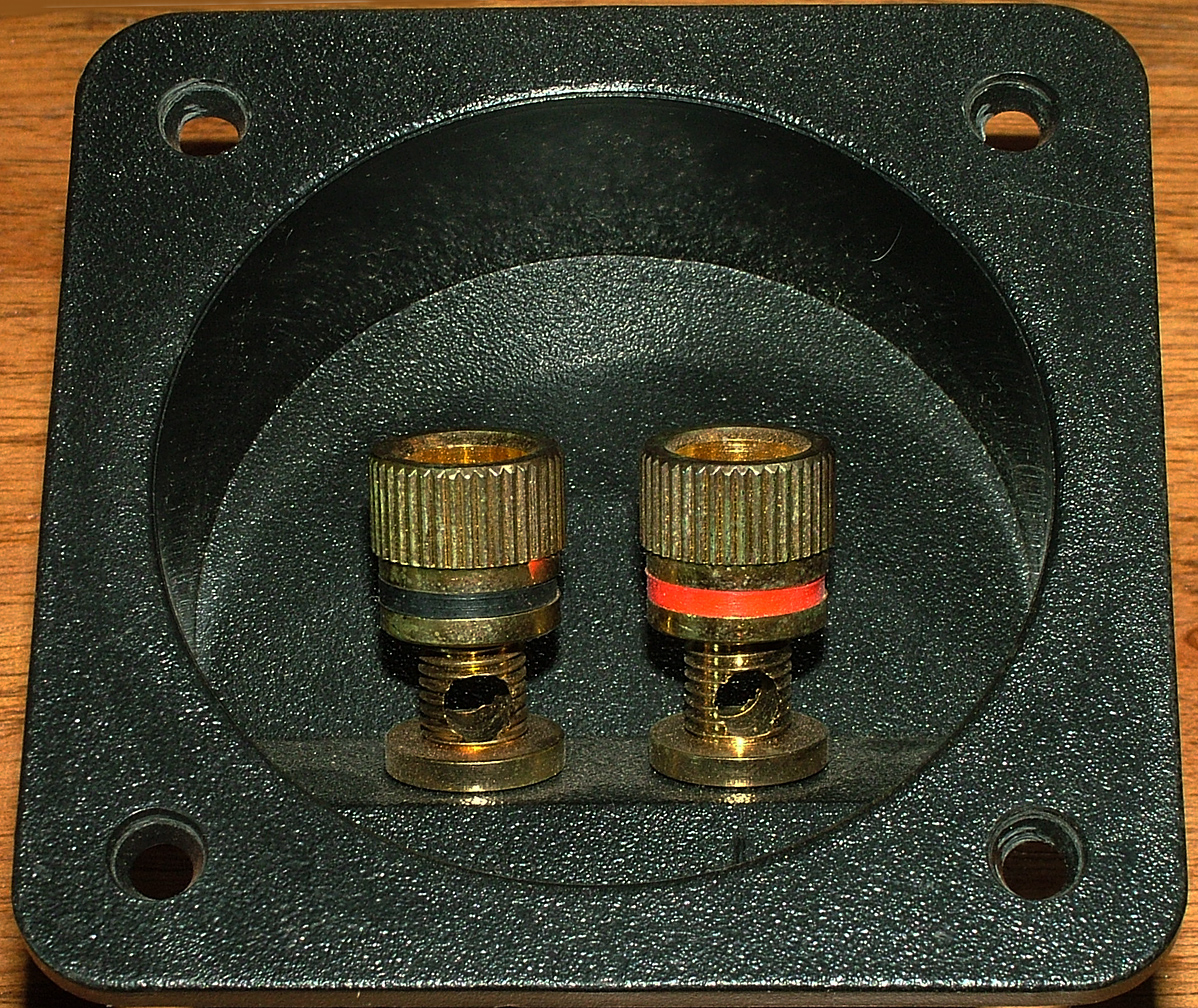
So just what are 3-way binding posts, anyway? I'm glad you asked that. Below is a photo of a pair of said 3-way binding posts as installed in a typical terminal cup as found in the back of some speakers:
 I have unscrewed the two knurled nuts to show the holes drilled through the posts. These holes are for bare wires to be inserted in as you will see below. Those holes are #1 of 3 possible "ways" to use these types of terminals. Note how little metal there is on each side of the hole. These are at least twice as thick as the ones that came on the speaker switch shown above. Those holes weaken the integrity of the posts making them fragile. Thus the reason I had to replace eight of them on the switch with thicker ones.
 The photo above shows the view looking down into the holes that are drilled lengthwise into the terminal posts. These holes are made to accept banana posts. Those holes are #2 of 3 possible "ways" to use these types of terminals.
 Above shows speaker cables that are 12 gauge in diameter. These are not only marked for polarity by the color of the insulation, but also because the wire in the clear insulation is silver plated and in the blue insulation is plain copper. The red, or positive terminal is securing the silver wire by screwing down the knurled nut. Below is a closer view. Doesn't my Fujifilm digital camera make amazing macro shots?
 Once the second wire is secured in the second post, the connection is complete. Black markings or molded nut is used for the negative wire. As seen below:

 Above are three different speaker cables or wires if you prefer. The ones on the left as mentioned are larger at 12 gauge. The other two, both Monster Cable brand are smaller gauge, around 14. Note the silver thing inside the clear covering in the middle cable. I forget what they called it and frankly what the called these cables. I can find no reason for it to be there. It is NOT wire nor conductive. Weird, right? Monster Cable has running through the middle of all the copper wires what they call a "flux tube". Again, I have no idea what it does other than make the wiring look thicker than it actually is.
So, what IS the 3rd of 3 possible "ways" to use these types of terminals? Why it is the spade lugs like the white and blue wires have on them. As seen in the photos way at the top, like the bare wires, they go under the nuts and are secured by them, same as the bare wires. But by design they have greater surface area for better conductivity. PLUS, they are usually gold plated.
Below are some of the MANY different devices one can attach to the bare wires on the ends of your speaker cables/wires which are also often gold plated. From left to right is: Spade lug, gold plated wire that has been soldered at the tip to keep it from becoming unwoven, and two banana posts. While all three black bodies are made by SEWEL. They are knock offs of Monster Cable terminals. In fact, the spade lug WAS a gold plated wire that got frayed, so I cut them off and installed the spade lugs. Note the SEWEL banana plug has collapsed. That is one of the reasons they sell for much less than Monster Cable brand ones do. The one on the right IS a Monster Cable unit that screw onto the speaker wire in the same way wire nuts do. The rubber sleeves (come in red and black) slip over them and act as insulation.
 And here is the gold plated wire terminal inserted in the bare wire's hole in the 3-way binding post.
 OK, so technically, this could be a forth way to use 3-way binding posts. If you want to get all technical.
Now, for your viewing pleasure, from some of the MANY speakers I have owned and enjoyed over the decades are a selection of several speaker maker's choice for terminals.
 These are typical "spring" terminals. One presses the lever down and inserts their (thin) wires into each hole. Very small contact area is the result and you are limited to thin wires.
 Above is the 3-way binding post that I installed to replace spring terminals. This type can also be found on power supplies such as a variable voltage device for electronics testing. By the way, by design, world-wide, banana plugs (remember, they go in the visible holes) are 3/4" apart. Double-banana posts were originally used for voltage not sound.
 Above is another type of 3-way binding posts. Much less robust, but they do the job if you're careful with them.
 Above is the back of some vintage Coral speakers. One pushes the red or black button and inserts their bare (thin) wires into the holes. Also, one had the option of using "phone" plugs in the larger holes. Phone plugs (single channel) are what headphone plugs evolved from and what professional speakers used to use.
 Definitive Technology's method of installing all-metal 3-way binding posts in narrow speakers.
 Also from Definitive Technology, these are on the bottom of a surround speaker. Quite thick as you can see with colored plastic nuts.
 I replaced the simple screw terminals on these Electro-Voice speakers with 3-way binding posts.

 Now these, above, are different. They accept banana plugs and also unscrew to allow really thick wires too.
 Pioneer used a different looking spring terminals that really worked the same. Press down and insert thin speaker wires.
 Polkaudio's molded in 3-way binding posts on their vintage model 5A speakers which also included external fuse holder for speaker protection.
 Above is a much more modern polkaudio speaker that can be "bi-wired". Simply unscrew all four 3-way binding post nuts and remove the gold jumpers. Then insert TWO PAIRS of speaker cables from TWO amplifiers. The top set would power the tweeters, the bottom pair the woofers.
 And finally, another look at typical cheap spring terminals. Anything to save a buck! They are still used today.
To conclude, by older fellow audio lover couldn't imagine what difference wires could make in speakers. He always used what most everyone did back in the day: Lamp cord. In other works, the wires that attach to a lamp or other small electrical appliance made dandy speakers wires.
Well, I gave him rolls of different kids and brands and thicknesses of speaker cables to try out. He did, to his surprise, find out they DO make significant difference. Guess you can teach an old dog, or music lover a new trick.
Thanks for looking,
Scott
So just what are 3-way binding posts, anyway? I'm glad you asked that. Below is a photo of a pair of said 3-way binding posts as installed in a typical terminal cup as found in the back of some speakers:


So, what IS the 3rd of 3 possible "ways" to use these types of terminals? Why it is the spade lugs like the white and blue wires have on them. As seen in the photos way at the top, like the bare wires, they go under the nuts and are secured by them, same as the bare wires. But by design they have greater surface area for better conductivity. PLUS, they are usually gold plated.
Below are some of the MANY different devices one can attach to the bare wires on the ends of your speaker cables/wires which are also often gold plated. From left to right is: Spade lug, gold plated wire that has been soldered at the tip to keep it from becoming unwoven, and two banana posts. While all three black bodies are made by SEWEL. They are knock offs of Monster Cable terminals. In fact, the spade lug WAS a gold plated wire that got frayed, so I cut them off and installed the spade lugs. Note the SEWEL banana plug has collapsed. That is one of the reasons they sell for much less than Monster Cable brand ones do. The one on the right IS a Monster Cable unit that screw onto the speaker wire in the same way wire nuts do. The rubber sleeves (come in red and black) slip over them and act as insulation.


Now, for your viewing pleasure, from some of the MANY speakers I have owned and enjoyed over the decades are a selection of several speaker maker's choice for terminals.


Did the same with some KLH model 24 speakers.


To conclude, by older fellow audio lover couldn't imagine what difference wires could make in speakers. He always used what most everyone did back in the day: Lamp cord. In other works, the wires that attach to a lamp or other small electrical appliance made dandy speakers wires.
Well, I gave him rolls of different kids and brands and thicknesses of speaker cables to try out. He did, to his surprise, find out they DO make significant difference. Guess you can teach an old dog, or music lover a new trick.
Thanks for looking,
Scott