Unique PROTON D540 Integrated Amplifier has entered the Listening Room. Part TWO

Gentle reader,

I previously wrote about my buying a PROTON integrated stereo amplifier because it was genetically related to my Dynaco Stereo 200 power amplifier here:
The Robb Collections: Unique PROTON D540 Integrated Amplifier has entered the Listening Room 
Here it is, in situ as they used to say in Latin:
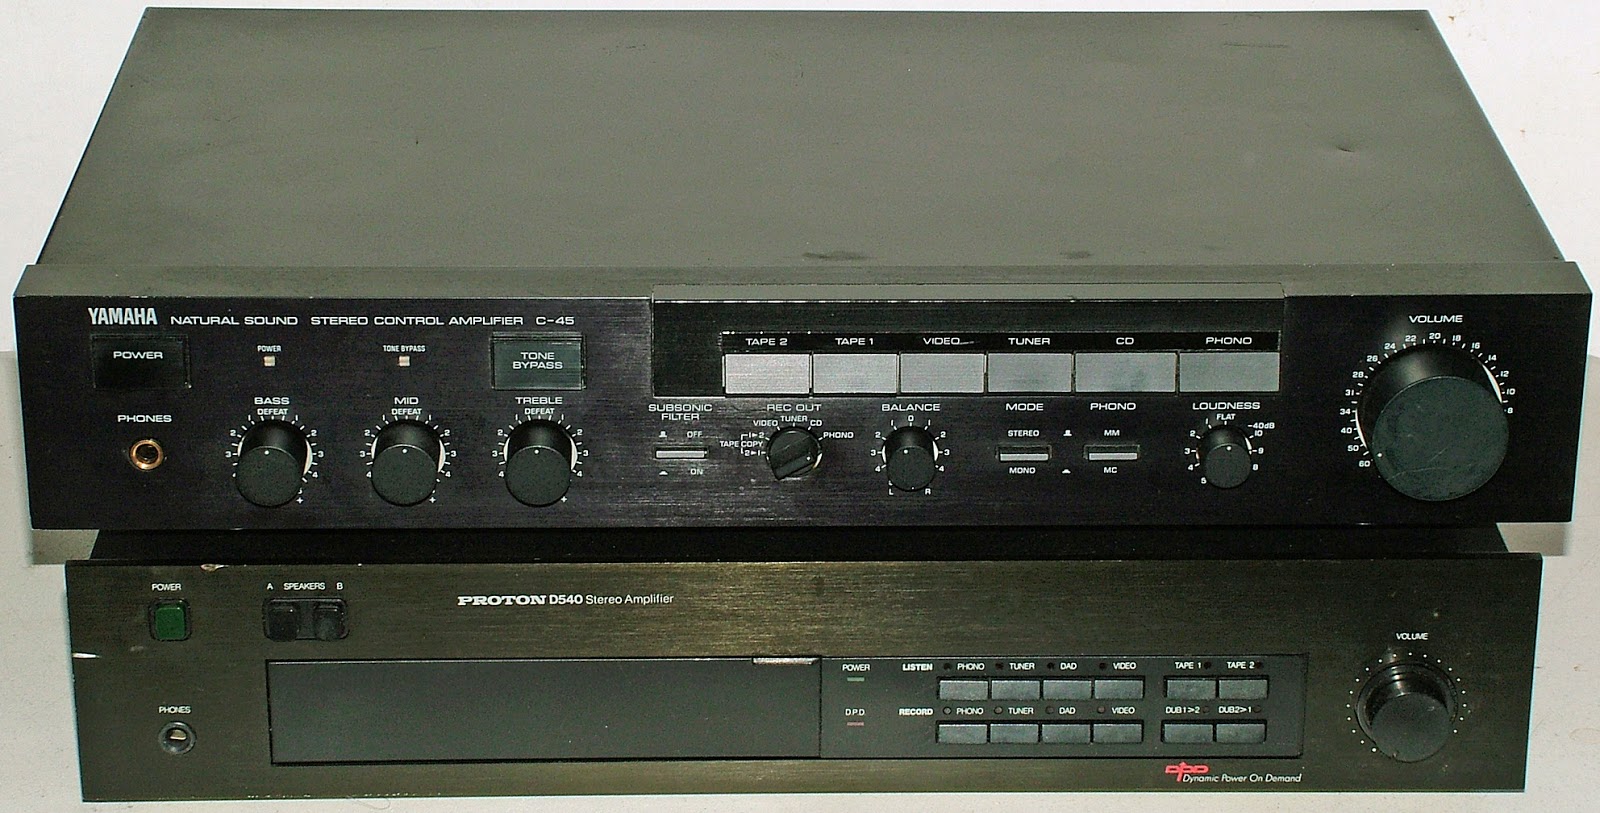
It now resides where the Dynaco power amp once sat. I moved the JVC 3-head cassette deck to the location the preamplifier usually sits as it's interconnect cables would not reach. This left an empty slot, so I stacked the Yamaha and Dynaco and slid them as seen below:
Yes, this photo IS different than the one above. I found that what I thought were plastic sleeves on the Nakamichi speaker terminals must not be. Two would touch and trip the amp's protection. So, I redid it all, as you can see.
What I have been able to do, finally, is use it as PROTON intended as an integrated amplifier instead of as a preamplifier as I had been. If you've read the previous post (linked above) you will know that PROTON invented a unique way to have tremendous power on demand, AKA: as needed, while still having it play in Class A mode most of the time.

Why I had to wait was because this integrated amp's speaker terminals, like the huge Technics integrated amp that I had also written about previously, are what appears to be 3-way binding/banana posts. I wrote about those type of termianls and some neat braided speaker wires I found here:
Here is a photo of them, empty. Note, no metal tube inside the holes.
Here are two photos from previous blog posts showing 2-way binding/banana speaker terminals. Why 2-way? Because they also will not accept spade lugs:
The photo above is a close-up of the amplifier at the bottom in the photo below. The one on top, is of course my Dynaco power amp. Clearly you can see the metal tubes I wrote about that accept banana plugs which are my favorite speaker cable/wire terminals.
Since copper can oxidize, I don't like using it bare. So I needed pin plugs, but not straight ones. Ones that I could only get directly from China. Here they are below in two photos.
The reason they are bent is to fit around the curved post and make better contact.
Now, here is a view of the speaker terminals from a higher angle showing the opening on the top-right portion of the black plastic behind the red and black plastic "nuts" that tighten down.
One unscrews the plastic nuts, they don't come all the way off, and slides the wire, or in this case, fancy bent pins into the opening sliding the curved portion (think the letter j) in and down then tightens the nuts. Below shows them attached to the braided wires. I went ahead and used the banana terminals on the other ends of these wires. So much for those spade lugs.
Those banana terminals came from the ends of these huge Monster Cable M-Series speaker cables that I use as jumpers to the speaker switch.
Below shows all eight terminals in place. Kind of annoying that they stick up, but I found out they break easily. Yes, I did.
Let's talk about, OK, let ME write about, conductor girth. No, not orchestra director's size, the diameter of wires as they conduct the signal or electricity from one end to the other.

These braided wires, which sound fantastic, are comprised of six 18 gauge wires cleverly braided to resist RF interference and also get the music dizzy on it's way to the speakers. I jest. When I stripped them and twisted them together, they were still quite thin. 

I had bought brand new, two reels of Monster Cable speaker cable and wrote about them here:
I had found that they lacked bass significantly. An A/B comparison with the thicker cable as seen above, clearly showed that. So, I bought used Monster Cable Z-Series which is their top of the line, and sold the small stuff on eBay.

Despite these braided wires thinness, I have not found any lack of bass. So far. So perhaps Monster Cable miscalculated something. Fear not, I intend to listen critically as time permits.

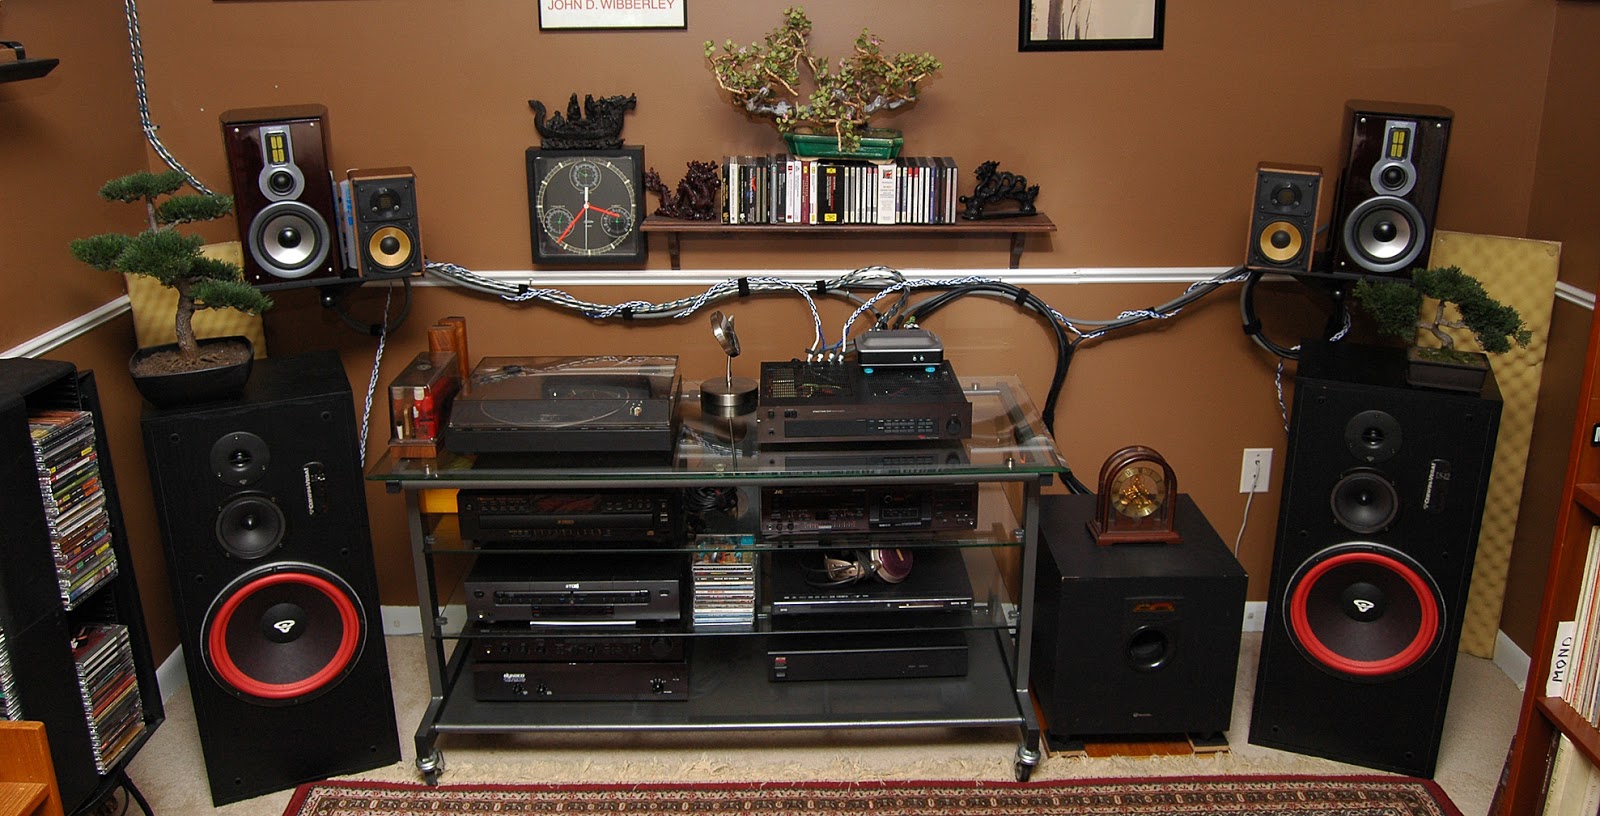
So, this last photo shows the PROTON D540 fully loaded and ready for use:
All of the interconnects in the image above except the lighter blue ones, which are the last of the Liberty Cable units and the black ones which connect the cassette deck, are various Monster Cable units. NOTE that the Liberty Cable ones replace the simple U shaped pins that connected the preamp portion to the power amp portion of the D540.

I redid the speaker switch as mentioned at the top of the post. I made feet from Blu-Tak to secure it to the top of the amp which also prevents it from letting the amp breathe and cool itself.
I now have all four pairs of speaker cables attached electronically to the amp most via the switch. The black cables are the Monster Cable Z-Series cables which are my default littlest speakers. If I wish to listen to other pairs, I slip the black ones out of the switch's inputs and choose #1 or #2. The big Cerwin Vega! LS-12 speakers are attached to speakers "A" and gray jumpers are attached to speakers "B". I continue to really enjoy the new braided wires.
 

So, how does it sound all by itself? At first, I wasn't sure. This was last night and I couldn't turn it up much because my wife was watching TV and reading in the living room. So, rather than making a rash decision. I put in a really well made CD and listened exclusively to the smallest speakers and the subwoofer. 

The design works and it doesn't generate heat. Crescendos were loud and crystal clear, bass was excellent, wide, deep and high soundstage. I could point to unique musicians locations. Since I hadn't played a cassette in a long time, I chose a MCA HQ cassette of Acoustic Alchemy performing their first album called Red Dust and Spanish Lace.

There was one piece where it was just the two of them (both play acoustic guitars, one has steel strings, the other nylon) playing something very Flamenco like and I was hearing echoes and really felt like I was IN the recording room as they played. I have NEVER experienced that without some form of surround speakers and multi-channel playback. 

Does this mean I am going to pass on the Dynaco Stereo 200 power amplifier? No, but maybe the Yamaha preamp will find a new steward to house it.

Thanks for looking,

Scott

Budget option for Kimber Kable from BLE Design plus 3-way binding posts explained.

Gentle reader,

As you know, I like to experiment with things, cameras, stereo equipment, speakers, cars, car racing simulations and more.

I have tried countless speakers over the years, many sounded great. But like so many audiophiles (in my case, low-budget) I'm always seeking better sound. It all began in 1975 when I was a teen.

I've tried many interconnects too. Interconnects is the fancy name for the wires that connect your CD player, turntable, tuner, etcetera to your stereo receiver, integrated amplifier, pre-amplifier and power amplifier. Stereo requires two channels, so pairs it is for everything. The terminals on the ends of those interconnects are called "RCA" because RCA invented them. A LONG time ago.

I tried many different brands and have happily settled on Monster Cable's various interconnects AND speaker wires. 

That is until I spied these:
I found them on, you guessed it, eBay. The seller makes all the cables, both power and speaker cables plus much more. This is a link to the seller's items page:
Plainly you can see they are intricately braided. I've tried to braid my own in the past and they never turned out like these. He offers them with the choice of banana plugs or these spade lugs. 

I referred to these in the blog's subject line as "Budget Kimber Kable 4TC" cables. So, in fairness to Kimber Kable, here is their web page showing their 4TC which are the simplest and least expensive of their "TC" line of speaker cables:
Kimber Kable - 4TC  They also make them in 8TC: Kimber Kable - 8TC
and even thicker ones called 12TC. ALSO to be fair, I have never auditioned any Kimber Kable products. Because they are way outside my budget. They ARE well known to be amazing sounding products. In fact, my favorite audio dealer carries many of their products. Here is a link to their page so you can price out your own:  Kimber Kable 4TC Speaker Cable-Audio Advisor
That page lists an equivalent pair of genuine Kimber Kable 4TC cables will cost $259.00. Examining the images on Kimber's 4TC page shows different gauge sizes of copper wires inside each strand. I'm pretty sure these budget BLE cables individual wires are not made that difficult and no doubt expensive way. 

Now that I have shown you the photo and all the relevant links, let me tell you about these cables. First off, they don't weigh much compared to my Monster Cable M Series or Z Series. And since it would be tricky, (I'm still thinking of doing it anyway) to do an A/B blind test to compare the two, I am only going to give you my non-golden-ears opinion of these cables. 

I tried them with all three pairs of speakers in the listening room: My custom modified tiny wooden speakers once known as Radio Shack's Minimus 7W, the Philips MCD908 speakers and my Cerwin Vega! LS-12 speakers. 

In each case, I heard a very open sound, lots of distinctness to some of the instruments that I had not heard before. Plus a crispness to the treble, especially cymbals. Altogether a very pleasing sound. The music seemed to come alive and was very engaging. Do I like them? Oh, yes. Very much so! I'm not sure why I specified spade lugs, but I did and here are some photos of them attached to terminals.
Above is the Legend LE412 speaker switch. It turns out this is the ONLY component that actually will accept spade lugs! And yes, the other terminals on the left ARE different than the input ones. The metal portion of the switches 3-way binding posts are very thin and the Nakamichi banana plugs have actually broken a few of them. So, I found I had eight other posts that I could replace them with. They are thicker and required enlarging the mounting holes and sanding down their outside edges to make them fit. 
Above and below they are attached to the former 7W speakers. These lugs fit all the speaker terminals perfectly. Note, also how very reflective is the surface of the Philips speakers. As young Dory might have said, "Ooh, shiny! I like shiny."
Hopefully, by these three photos you can see the spade lugs attached to the speaker's 3-way binding posts. 

So just what are 3-way binding posts, anyway? I'm glad you asked that. Below is a photo of a pair of said 3-way binding posts as installed in a typical terminal cup as found in the back of some speakers:
I have unscrewed the two knurled nuts to show the holes drilled through the posts. These holes are for bare wires to be inserted in as you will see below. Those holes are #1 of 3 possible "ways" to use these types of terminals. Note how little metal there is on each side of the hole. These are at least twice as thick as the ones that came on the speaker switch shown above. Those holes weaken the integrity of the posts making them fragile. Thus the reason I had to replace eight of them on the switch with thicker ones.
The photo above shows the view looking down into the holes that are drilled lengthwise into the terminal posts. These holes are made to accept banana posts. Those holes are #2 of 3 possible "ways" to use these types of terminals.
Above shows speaker cables that are 12 gauge in diameter. These are not only marked for polarity by the color of the insulation, but also because the wire in the clear insulation is silver plated and in the blue insulation is plain copper. The red, or positive terminal is securing the silver wire by screwing down the knurled nut. Below is a closer view. Doesn't my Fujifilm digital camera make amazing macro shots?
Once the second wire is secured in the second post, the connection is complete. Black markings or molded nut is used for the negative wire. As seen below:
 
Above are three different speaker cables or wires if you prefer. The ones on the left as mentioned are larger at 12 gauge. The other two, both Monster Cable brand are smaller gauge, around 14. Note the silver thing inside the clear covering in the middle cable. I forget what they called it and frankly what the called these cables. I can find no reason for it to be there. It is NOT wire nor conductive. Weird, right? Monster Cable has running through the middle of all the copper wires what they call a "flux tube". Again, I have no idea what it does other than make the wiring look thicker than it actually is. 

So, what IS the 3rd of 3 possible "ways" to use these types of terminals? Why it is the spade lugs like the white and blue wires have on them. As seen in the photos way at the top, like the bare wires, they go under the nuts and are secured by them, same as the bare wires. But by design they have greater surface area for better conductivity. PLUS, they are usually gold plated.

Below are some of the MANY different devices one can attach to the bare wires on the ends of your speaker cables/wires which are also often gold plated. From left to right is: Spade lug, gold plated wire that has been soldered at the tip to keep it from becoming unwoven, and two banana posts. While all three black bodies are made by SEWEL. They are knock offs of Monster Cable terminals. In fact, the spade lug WAS a gold plated wire that got frayed, so I cut them off and installed the spade lugs. Note the SEWEL banana plug has collapsed. That is one of the reasons they sell for much less than Monster Cable brand ones do. The one on the right IS a Monster Cable unit that screw onto the speaker wire in the same way wire nuts do. The rubber sleeves (come in red and black) slip over them and act as insulation.
And here is the gold plated wire terminal inserted in the bare wire's hole in the 3-way binding post.
OK, so technically, this could be a forth way to use 3-way binding posts. If you want to get all technical.

Now, for your viewing pleasure, from some of the MANY speakers I have owned and enjoyed over the decades are a selection of several speaker maker's choice for terminals.
These are typical "spring" terminals. One presses the lever down and inserts their (thin) wires into each hole. Very small contact area is the result and you are limited to thin wires.
Above is the 3-way binding post that I installed to replace spring terminals. This type can also be found on power supplies such as a variable voltage device for electronics testing. By the way, by design, world-wide, banana plugs (remember, they go in the visible holes) are 3/4" apart. Double-banana posts were originally used for voltage not sound.
Above is another type of 3-way binding posts. Much less robust, but they do the job if you're careful with them.
Above is the back of some vintage Coral speakers. One pushes the red or black button and inserts their bare (thin) wires into the holes. Also, one had the option of using "phone" plugs in the larger holes. Phone plugs (single channel) are what headphone plugs evolved from and what professional speakers used to use.
Definitive Technology's method of installing all-metal 3-way binding posts in narrow speakers.
Also from Definitive Technology, these are on the bottom of a surround speaker. Quite thick as you can see with colored plastic nuts.
I replaced the simple screw terminals on these Electro-Voice speakers with 3-way binding posts.
Did the same with some KLH model 24 speakers.
Now these, above, are different. They accept banana plugs and also unscrew to allow really thick wires too.
Pioneer used a different looking spring terminals that really worked the same. Press down and insert thin speaker wires.
Polkaudio's molded in 3-way binding posts on their vintage model 5A speakers which also included external fuse holder for speaker protection.
Above is a much more modern polkaudio speaker that can be "bi-wired". Simply unscrew all four 3-way binding post nuts and remove the gold jumpers. Then insert TWO PAIRS of speaker cables from TWO amplifiers. The top set would power the tweeters, the bottom pair the woofers.
And finally, another look at typical cheap spring terminals. Anything to save a buck! They are still used today.

To conclude, by older fellow audio lover couldn't imagine what difference wires could make in speakers. He always used what most everyone did back in the day: Lamp cord. In other works, the wires that attach to a lamp or other small electrical appliance made dandy speakers wires. 

Well, I gave him rolls of different kids and brands and thicknesses of speaker cables to try out. He did, to his surprise, find out they DO make significant difference. Guess you can teach an old dog, or music lover a new trick.

Thanks for looking,

Scott


Unique PROTON D540 Integrated Amplifier has entered the Listening Room

Gentle reader,

Firstly, (yes, that IS a word) my wonderfully supporting wife will surely be shaking her head as she reads this. If you follow my blog, thank you so much! I have bought, enjoyed and passed on to others a lot (a whole lot!) of audio gear, photography gear, music, well, a lot of things. 

My wife and I both have the collector gene. She doesn't do so much anymore and I definitely have slowed down. Occasionally I will buy something unique, like the Philips speakers and Technics integrated amplifier seen in the last two posts. 

I just finished cleaning out several things and passing them on to others via eBay. The huge and heavy Technics made it safely to New Jersey and the new steward, Ian, is thrilled:

I started my interest in good sounding audio equipment in the mid-1970's. Quadraphonic was all the rage then. What is quadraphonic? It was the precursor to surround sound. Two rear speakers would provide ambiance or maybe other instruments would appear behind you. All I could afford was a cheap system that had a built-in 8-track tape player that also played quad tapes. Electrophonic was the name. At the time that was the only quad format that truly used for separate sound sources. It came with four cheap speakers.

There were competing companies trying to dominate the quadraphonic scene: SQ, QS, EV, CD-4 and DY. The last was Dyanco's answer to fancy circuits. Sansui's format prevailed in that Dolby used their form of quad decoding to come out with Dolby Pro Logic for movie sound.

Below shows the new-to-me PROTON D540 amplifier beneath the YAMAHA  C-45 preamplifier I've been enjoying for a while now.
One more thing about quadraphonic sound. Long ago, I came across a massive Sansui quad receiver at a thrift store and bought it. We used it with our VHS player as a surround sound provider and it decoded the sound perfectly. We were in awe watching Operation Dumbo, I think it was called. A Viet Nam gun boat was chasing the hero and the elephant in a boat (hey it was Disney and the 1980's) they fired and we heard the boom and the shell flying over our heads. It was AWESOME! From then on I was going to have a theater-like experience when watching a movie. Here is a Sansui similar to the one we had:
Back to the story. Once I started making money at my first job, I was an apprentice car mechanic at a Mobil station in Denver, Colorado. I started researching what kind/brand of electronics I wanted. 

Kids, believe it or not, back then, there was NO Internet (at least for ordinary people), no cell phones, no Google. What did one do? Went to the library. Read magazines about your interest.  Asked around. But mostly, we went to the library. I settled upon Dynaco for the preamplifier and another company (based upon price) for the power amplifiers. 

Still with me? MANY years later, I found a Dynaco A/V receiver. Here is is:
It was unlike any Dynaco component I had ever seen. So, thanks to the Internet, I was able to determine that it was in fact a PROTON component sold as a Dynaco. The PROTON model was AVS-2583. Other than the name, they were identical. What's called "Badge Engineering" in the automotive world. 

That's when I found thought that PANOR was possibly part of PROTON. Or the other way around. I have yest to find the connection. PANOR bought the rights to the Dynaco name and began making audiophile quality tube and transistor stereo components and their own updated versions of Dynaquad:

I had enlarged the spring terminals to accept banana plugs. I hate spring terminals. Only the cheapest equipment has them for speakers. Dynaco came out with a better version that had all three-way binding/banana post terminals.

PANOR made tube preamplifier and one transistor model called the PAT-6. My original 1970's preamp was a PAT-5. The PAT-6 also has a tuner in it. It has only a few inputs and I need at least five, six is better. So the PAT-6 was out.

So that got me to thinking. My power amplifier, as you know, is a 1990's Dynaco Stereo 200. It was made by PANOR and is the same size as their top-of-the-line Stereo 400 and actually was more useful. Perhaps there was a PROTON preamplifier from the same era that I could buy and try out.     

Well, I don't think PANOR made a preamplifier,* but they did make some integrated amplifiers that contained "Pre-Out, Main-In" RCA terminals. My research revealed the model D540 would fit the bill. First off, here is a link to a site that has some history of PROTON:
*Until I found this site, which lists a preamplifier, that is. It is called A-1000, there is also an 1100 and they are quite rare. 
I chose to make this picture large so you can see the different approaches each maker chose for the front panel/controls. The PROTON is almost plain in execution. See that DPD symbol on it on the right side? That something PROTON came up with. I have a contemporary review from Stereo Review magazine by Julian Hirsch which completely explains the way it works He said, "The Proton D540 is not only the most powerful '40-watt' amplifier we have used, it is one of the few of any rating whose capabilities begin to encompass the dynamic properties of live music."

Found this: "Winner of the 1987 Audio/Video International Magazine Hi-Fi Grand Prix Award." on this site:
Proton D-540 solid state amplifier

Here's a link to a brief review:

They designed the power amplifier section with two transformers and sets of capacitors. In normal operation it is Class A. When a crescendo (I love that word, say it out loud: cre-shen-doe) happens, super-high-speed switches cut in the second transformer and it provides the needed power, up to 150 watts into 8 ohms, 280 into 4 ohms and a staggering 530 watts into a 2, yes a TWO ohm load! It will last up to 1/2 second! It revolutionized audio thinking. Hirsch concluded that this design practically negated the need for large heavy expensive and power hungry amplifiers. It was more than capable of meeting 99% of music needs for a fraction of the size, weight and price of far more powerful amps.

But, I bought it as a preamplifier. Some more photos of both front and rear:
The less often used controls are behind the door on the front. BTW, I bought the original owner's manual from the same seller. Very glad I did because there was much to learn.
Above shows their different approaches to choosing what can be recorded while listening to something else. Yamaha: a small knob, PROTON: duplicate push buttons. My Adcom GFP-565 preamplifier used identical large knobs side-by-side to accomplish the same task.
The smaller sized PROTON, which is much heavier contains all that the larger Yamaha has PLUS all the power amplifier components too. Their unique design shrunk the normal component's footprint.
Only the Phono inputs are gold plated on the D540. 
These speaker terminals, which at a glance look like three-way binding/banana posts are in fact just like the Technics: For bare wire only.
ABOVE are the terminals I told you about. Those U shaped metal pieces connect preamp to power amp. A.C.C stands for Anti Clipping Circuit, since CDs can contain much more sound energy than the average LP, they added this protective feature. Just in case. The Bridging switch allows one to make the stereo power circuits to act as one much more powerful mono amp. 
Note the choices of turntable cartridge it provides for: Moving Coil; high and low output. Moving Magnet three levels of capacitance. While the Yamaha has the former, it does not have the latter.
The manual tells one to put "shorting" RCA plugs into the MAIN-IN terminals so the power amplifier circuit will not turn on. I'd sees the things before (LONG ago) but did not know their name or what they were for. The Technics had them in the Phono inputs and I kept them. Little did I know that a couple weeks later they would be needed.

I used contact cleaner spray on all the external connections which is why it looks like something wet got on the rear panel. It did.

Now, the sound? I do not claim to have "golden ears" but my humble ears have quickly decided that this PROTON D540 sounds phenomenal. I glad I took the advise of someone posting on an audio website's advice to buy a PROTON.

Back to the Dynaco-PROTON connection. After an exhaustive search, I found a connection, at least as far as the golden 2583 A/V integrated five-channel amplifier goes. I have been finding a LOT of pictures of PROTON equipment. It has got me to thinking, new research project, maybe?

Some web sites state that the PROTON factory in Taiwan also made NAD components. Both the PROTON D540 and Dynaco Stereo 200 have very similar black anodized aluminum face plates.
And here they all are "in situ" as the Latin once said:

I'll hang on to the C-45 for a while. But once again, the D540 is definitely a keeper.

Thanks for looking!

Scott

PS The page view number is quickly closing in on 100,000!

Fifty-Year-Old Time Capsule Found: Rare "Black Chrome" Kodak Pocket Instamatic 60 Camera Deluxe Set Is it Better than Digital?

  May 6, 2025 #512 Gentle reader, It has been a L-O-N-G time since I have written about film cameras. I used to collect them and longtime re...